How to Recover Deleted Files From an SD Card
Have you accidentally deleted files from an SD card you didn’t mean to? Maybe you pressed the wrong button on your camera or realized later that you hadn’t actually copied those photos to your computer. Whatever happened, you might still be able to get them back.
Today, we’ll go over whether it’s actually possible to recover files from an SD card, and what’s the best way to go about it without making things worse.
Can You Recover Data From an SD Card?
We don’t want to keep you in suspense; the short answer is yes, it is possible to recover deleted files from an SD card. The longer answer? It depends on a few things.
- Like how long ago the files were deleted.
- Whether you’ve used the card since.
- And what kind of damage, if any, the card has taken.
Here’s what’s actually happening behind the scenes: when you delete a file from an SD card, it doesn’t get wiped out. The data stays there, it’s just marked as “free space,” which means the system can now write over it. Until that happens, recovery software can still grab it.
That’s why the most important thing is to stop using the card right away. No new photos, no formatting, no moving stuff around. The more activity on the card, the more likely the original data gets partially or completely overwritten.
So yes, SD card deleted data recovery is definitely possible. But timing and method matter. Let’s break down your first steps right now:
- First, put it away. If the SD card’s still in your camera, safely remove it. Don’t take more photos, don’t scroll through anything, and definitely don’t format it.
- Next, don’t connect it to your computer just yet. Wait until you’re fully ready to scan it with recovery software. No rush.
- Then, download and install reliable recovery software on your computer (we’ll talk about it in the next section).
Once that’s done, you’re ready to start the SD card recovery process the right way.
How to Recover Deleted Files From an SD Card on a Computer
Alright, now that your SD card is safely out and untouched, let’s talk recovery.
For this, we recommend using Disk Drill, it’s our partner product, and for good reason. It’s been around for over a decade, earned wide recognition, and consistently delivers strong results in all kinds of data loss situations, including SD cards.
Despite its powerful recovery engine under the hood, it’s surprisingly easy to use. The interface is clean, it doesn’t overwhelm you with options, and it works smoothly with the file systems most commonly found on SD cards (like FAT32, exFAT, and even NTFS if you’ve reformatted it that way).
What really helps, especially if you're dealing with something more than a basic deletion, is Disk Drill’s huge built-in file signature library. It supports nearly 400 file formats, everything from standard JPEGs and MP4s to RAW image types like CR2, NEF, and ARW. That matters if metadata is missing and files need to be rebuilt from scratch.
But enough with the intro, let’s actually walk through how to use Disk Drill to recover your deleted files from a memory card:
- Head over to the official CleverFiles site and download the latest version of Disk Drill for your OS. The site usually auto-detects whether you’re on Mac or Windows and gives you the right installer. Install it like you would any normal app.
- Once that’s done, plug your SD card into a USB card reader.
- Now open up Disk Drill. You’ll see a list of all the connected drives. Look for your SD card; it might show up by brand name (like SanDisk or Kingston), or just as a generic removable drive. If there are multiple partitions, pick the full device for the best results.
- Click Search for lost data next to your SD card. It will give you two scan
types: Universal Scan or Advanced Camera Recovery. If you
deleted the files while the card was connected to your computer, go with Universal
Scan. That’s the better fit for standard deletions.
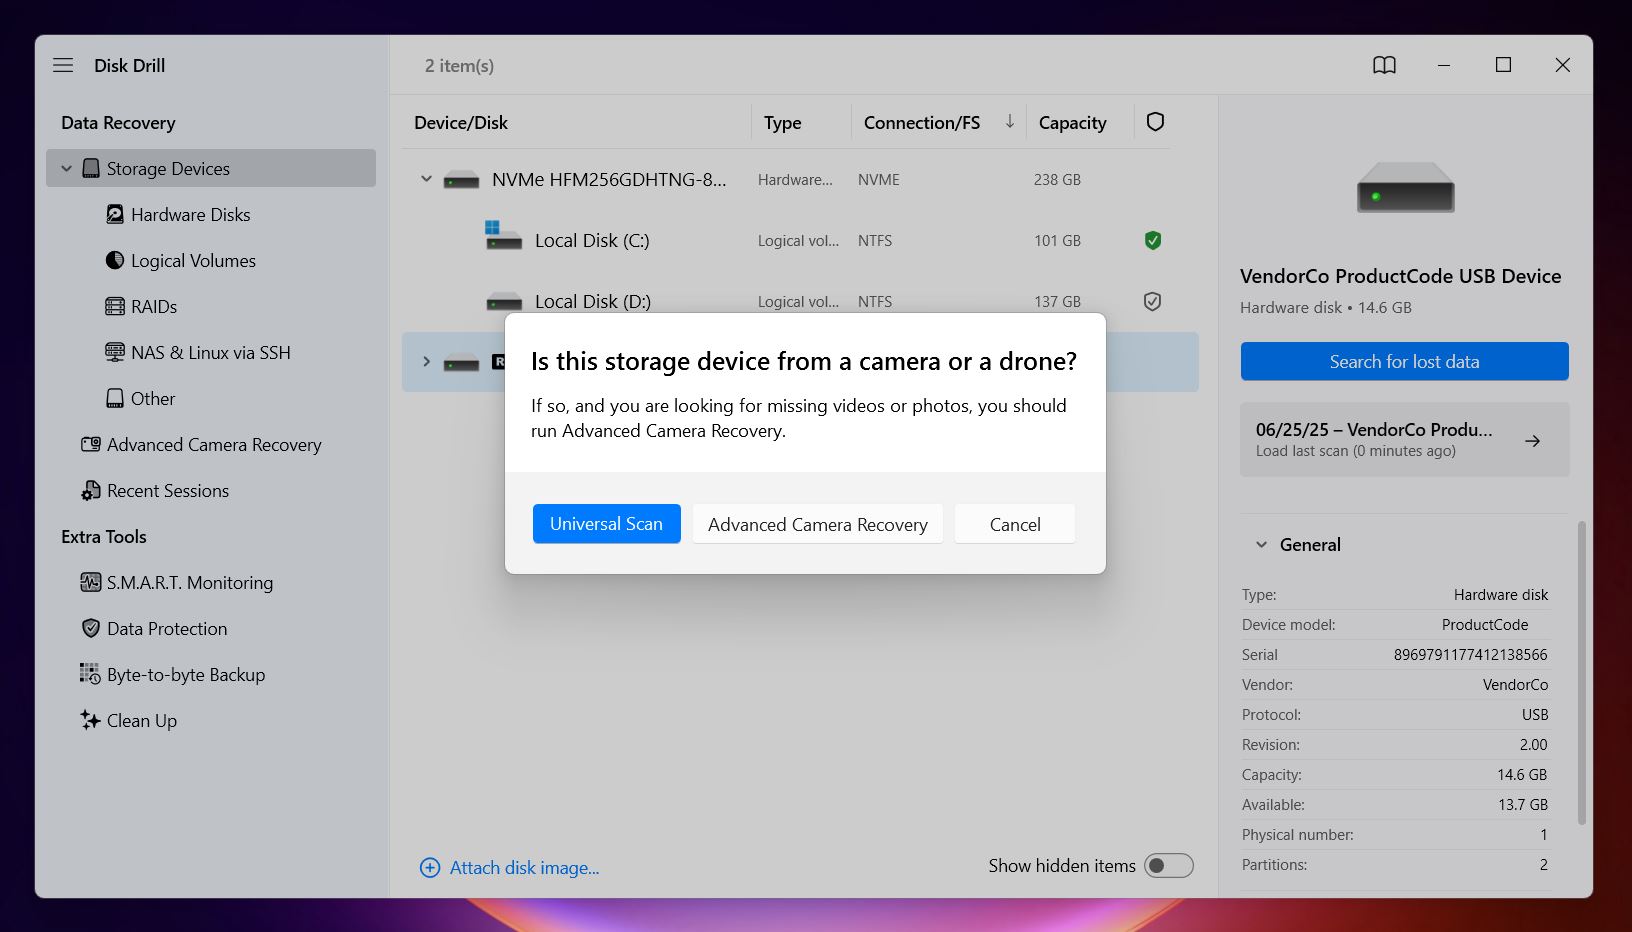 If the files
were deleted directly in the camera, or they never even showed up because the recording got
interrupted, try Advanced Camera Recovery. It’s tuned specifically
for those cases where footage didn’t save properly or was lost
mid-record.
If the files
were deleted directly in the camera, or they never even showed up because the recording got
interrupted, try Advanced Camera Recovery. It’s tuned specifically
for those cases where footage didn’t save properly or was lost
mid-record.
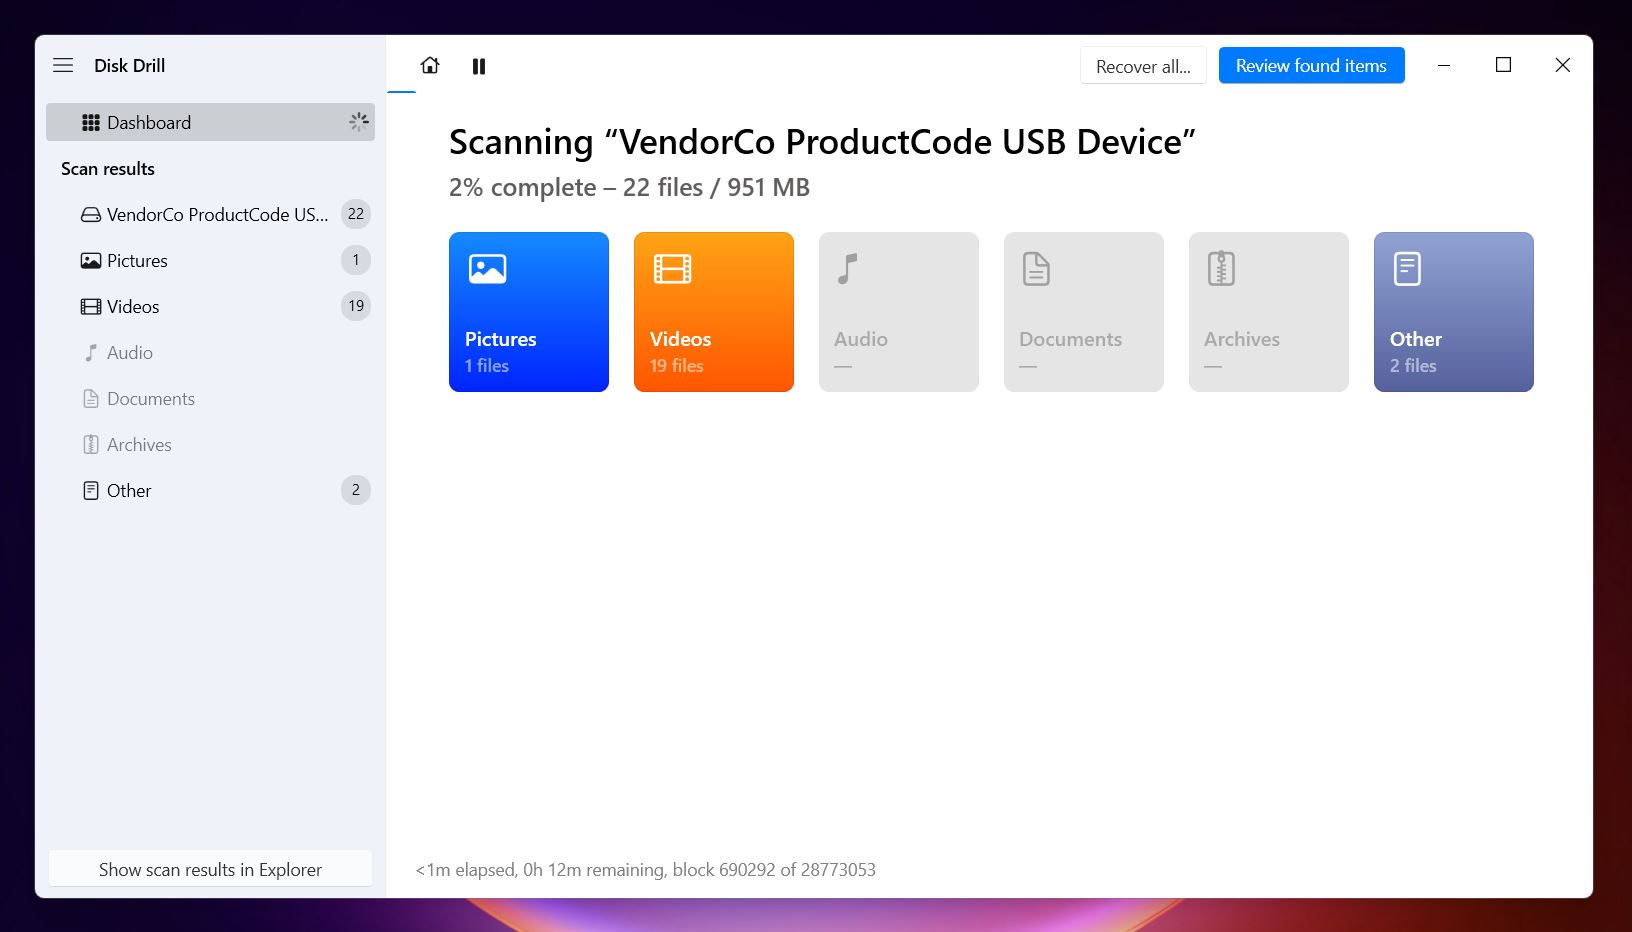
Whichever one you start with, you can always run the other type of scan afterward if your files don’t show up right away. - As the scan starts, Disk Drill begins organizing everything by file type: Pictures,
Video, Audio, Documents, and so on. You don’t have to wait for it to
finish to start poking around.
 You’ll
also notice Disk Drill groups results under
a few main sections: Deleted or Lost, Reconstructed, and
Existing.
You’ll
also notice Disk Drill groups results under
a few main sections: Deleted or Lost, Reconstructed, and
Existing.
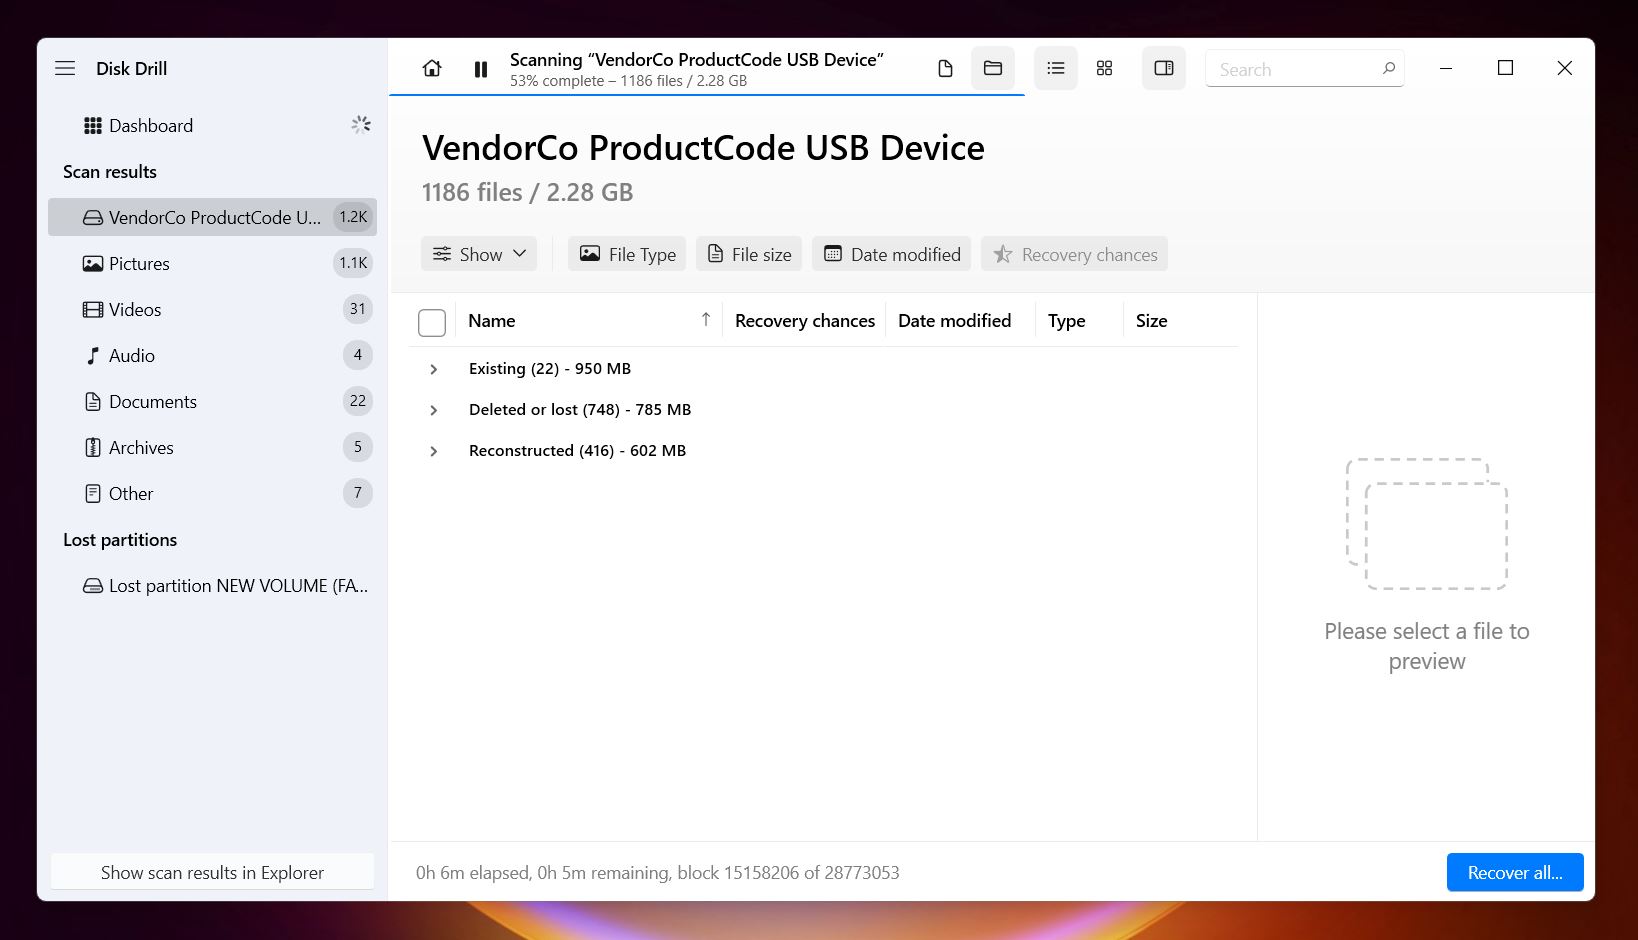
- Deleted files, yep, the ones you’re probably after, will show up under Deleted or Lost. That’s where you should start. But if the file system was damaged or metadata is missing, you might find useful stuff under Reconstructed as well. Existing is for files still on the card but not accessible through normal means.
- If you’re looking for something specific, say, .jpg images or .mp4 videos, you can use
the filters on the left to narrow things down fast. Or just type into the search bar. You
can enter the full file name, a partial name, or even the file extension. It’s super
handy when you're sorting through hundreds of results and only care about one folder or file
type.
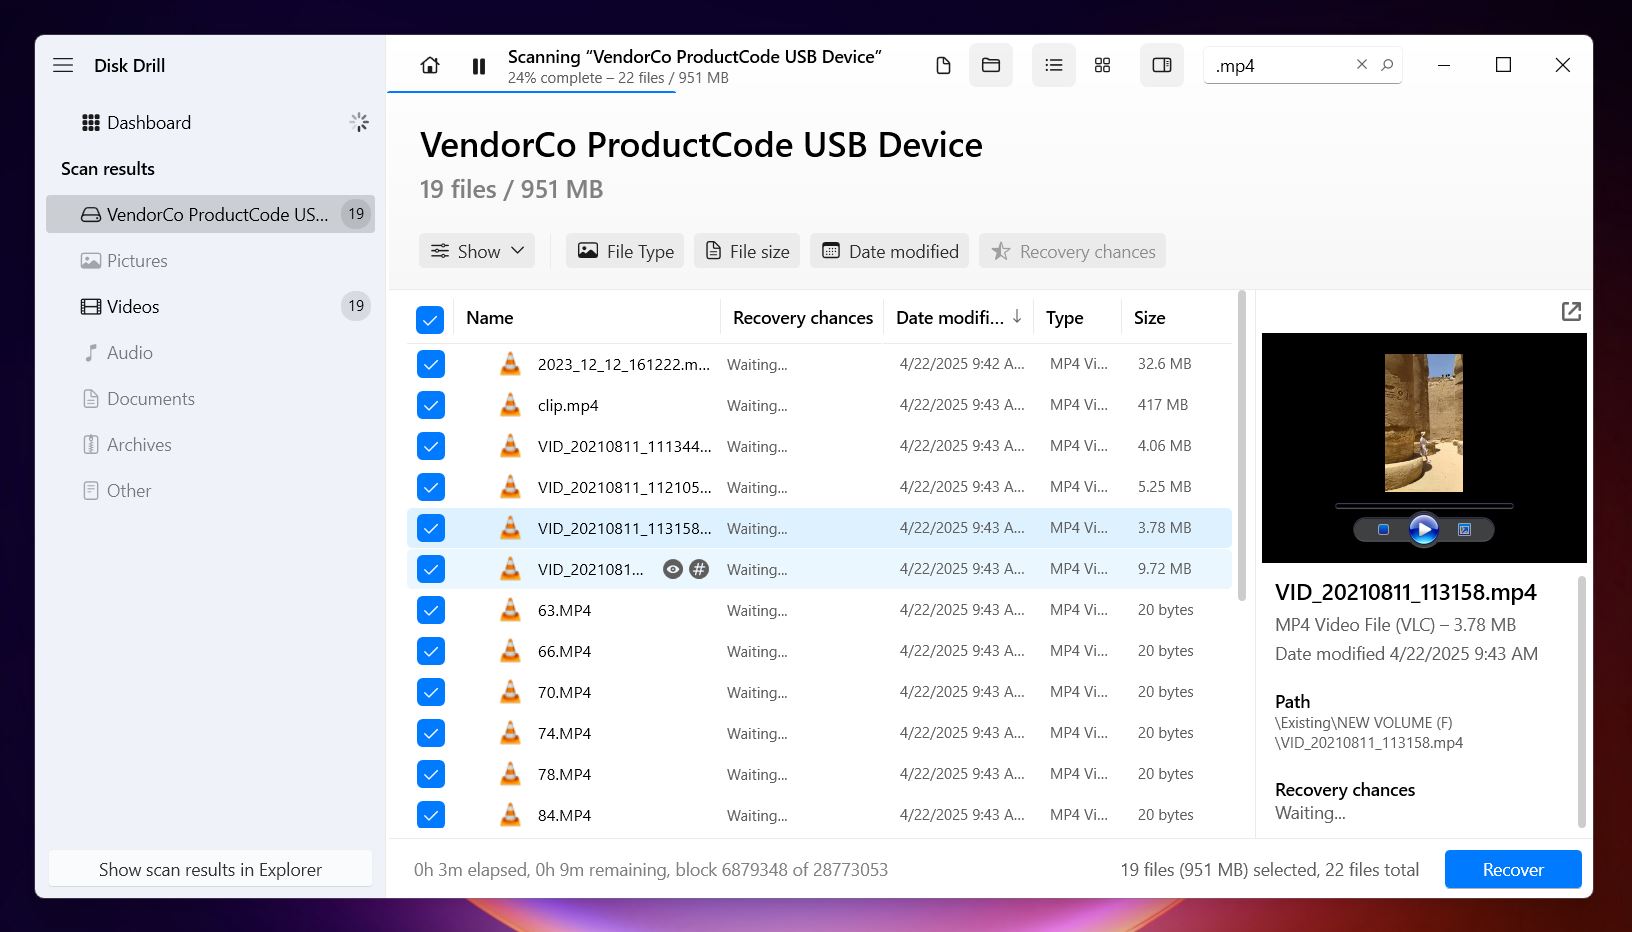
- Here’s a handy trick: click the eye icon to preview files. If it loads a thumbnail or lets you scrub through the video, that’s a sure sign the file is still usable. Disk Drill also gives you a recovery rating: High means good condition, Average or Low usually means the file might be incomplete or corrupted.
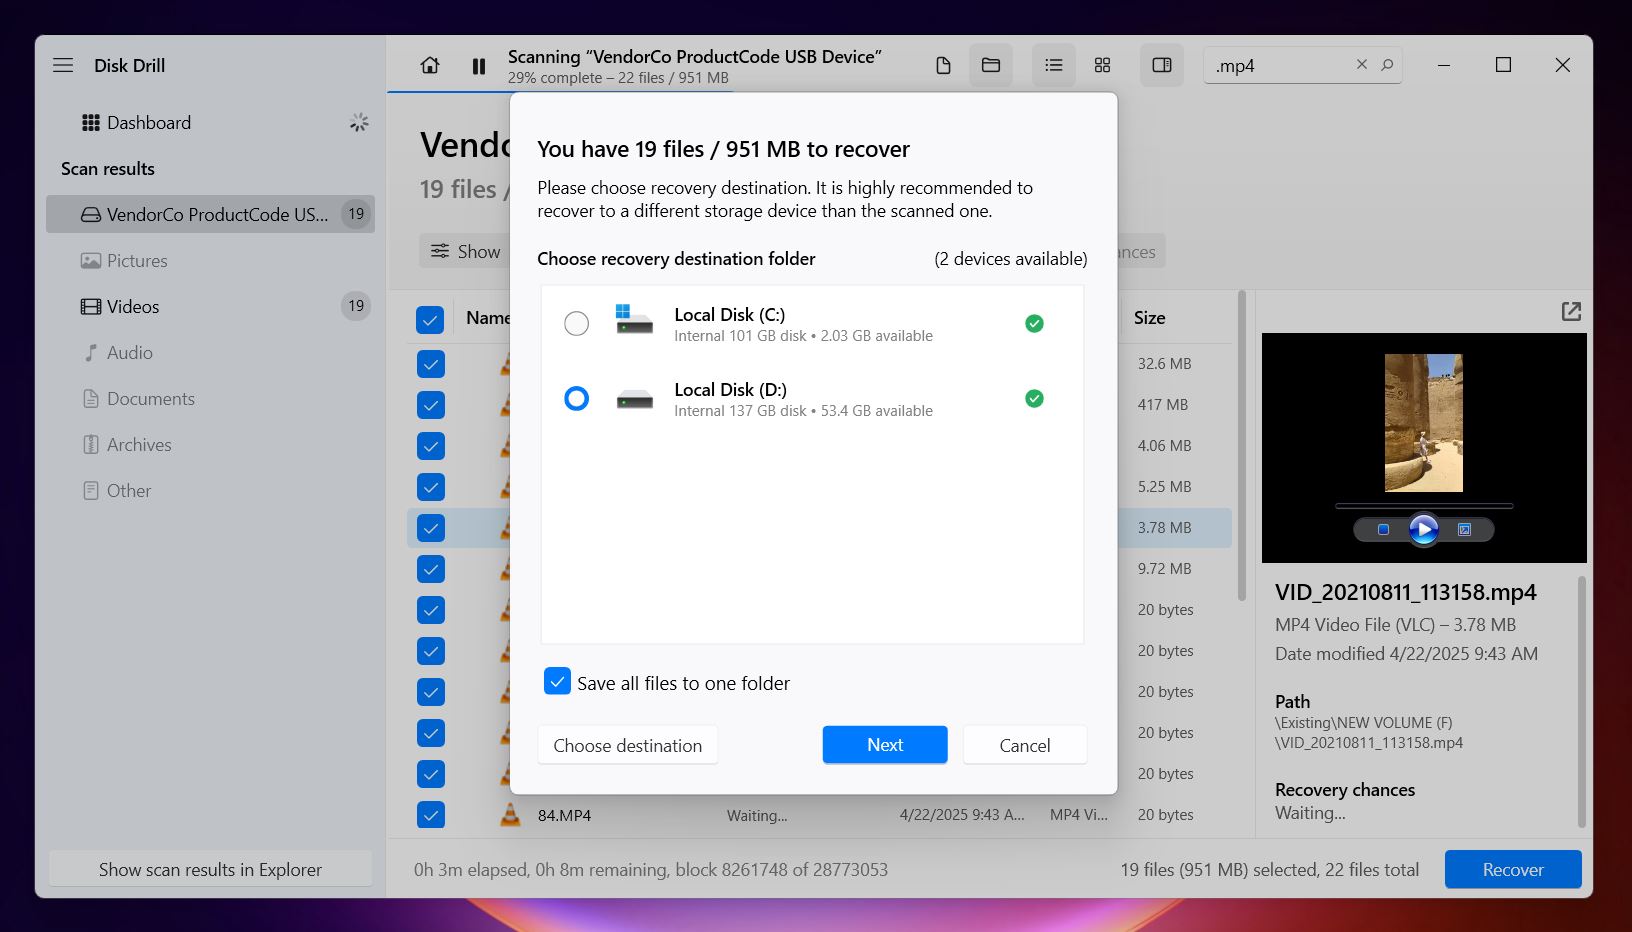
- Once you’ve selected everything you want, click Recover, and choose a
destination folder that’s not on your SD card. Trust us, recovering back to
the same card can ruin any files still waiting to be found. Disk Drill will warn you if you
try, but it’s best to keep things safe from the start.
With the free version of Disk Drill on Windows, you can recover up to 500 MB of data without paying. That’s enough for a good batch of photos or some short video clips. Larger files, like longer 4K video, will probably push you past that limit, but scanning and previewing stay fully unlocked. So you can see if it’s worth upgrading before you spend anything.
On top of recovery, Disk Drill comes with a few extra features (some of which can be really helpful when you’re dealing with tricky cases). A couple worth pointing out:
- Byte-for-byte SD card backup (a.k.a. disk image
creation)
If your SD card is acting up, say it keeps disconnecting, throws read errors, or seems to work only sometimes, it’s a smart move to create a full backup image of the card before trying to recover anything. That way, you’re scanning the image, not the actual card, which prevents further damage or accidental overwriting.
Now, if you simply deleted some files and the card’s working fine, this step is usually overkill. But it becomes especially important with older cards, cards that have taken a beating, or ones already showing signs of corruption. It might take more time to create the image, but it’s worth it when the card feels unstable.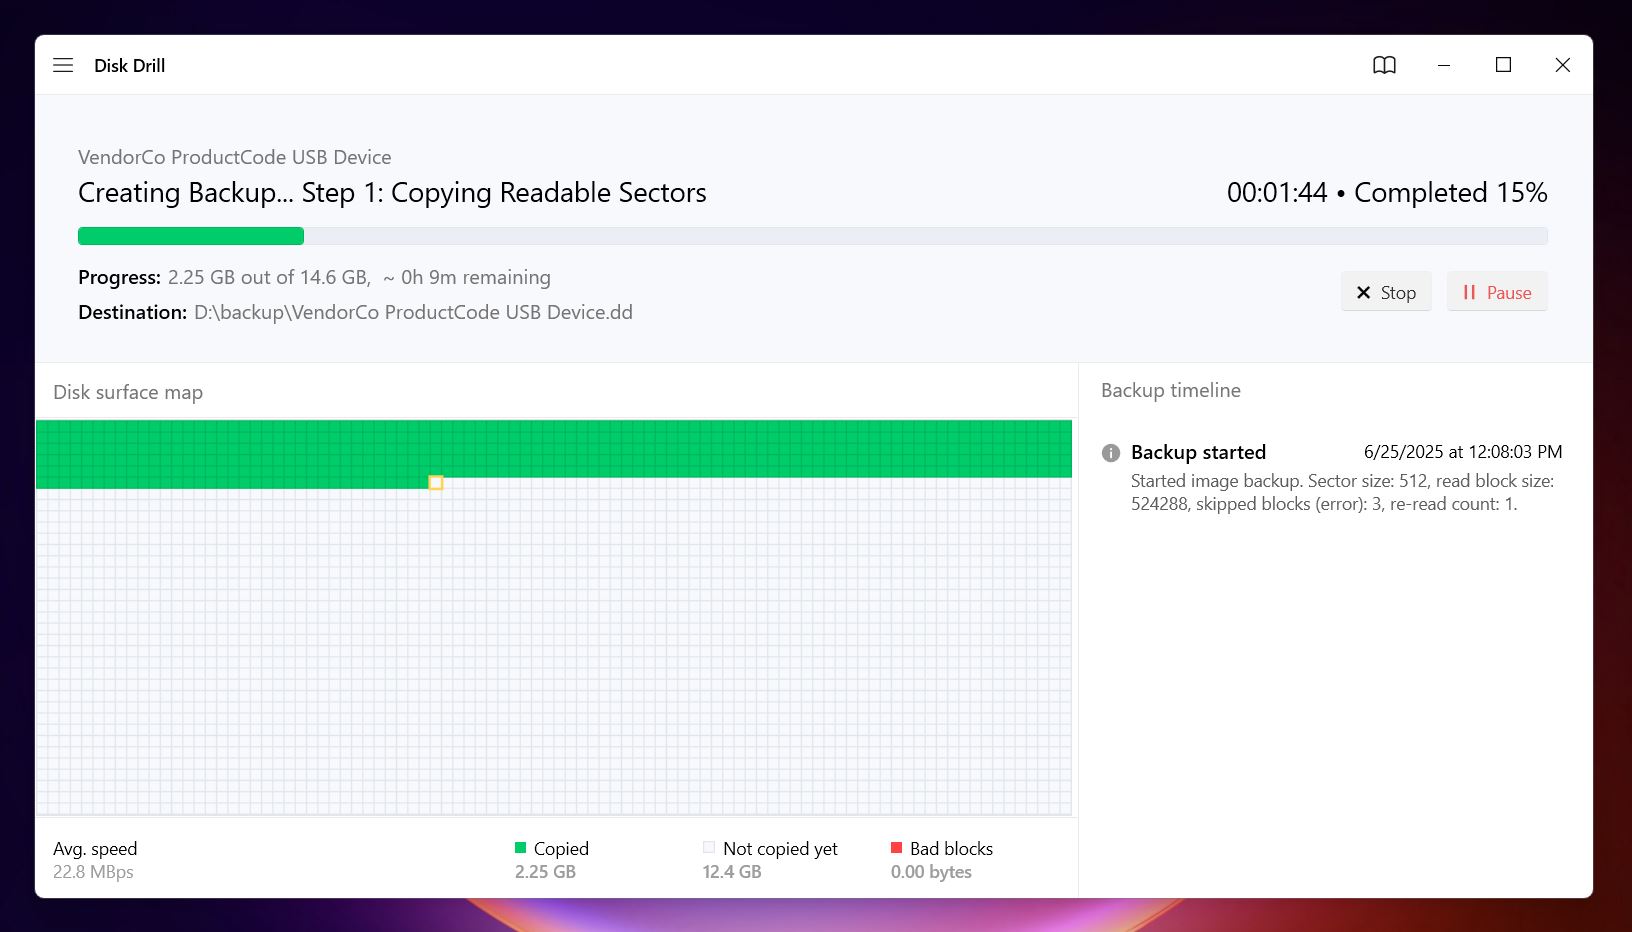
- S.M.A.R.T. monitoring
Disk Drill can also pull health data from your SD card if the reader and card support it. This includes info like read error rates, remaining lifespan, and general wear level. While it’s more common on SSDs and HDDs, some SD cards (higher-end ones) support these diagnostics. It’s a quick way to check if your card is physically failing, and if it is, stop using it immediately and recover what you can.
These tools aren’t always needed, but when things go sideways, they can make a big difference.
Also, remember, like we said earlier, if you didn’t find the files you were after, don’t give up right away. Head back to the main screen and run a different scan type. It’s totally fine to try both methods. Sometimes one catches what the other misses.
Is it possible to Recover Deleted Files From an SD Card Without Software?
Well, the only real way to recover deleted files from an SD card without software is if you have backups. Maybe your files were synced to your computer at some point, think OneDrive, iCloud Google Drive, Dropbox. Or maybe you used a modern digital camera that automatically offloaded photos to a companion app or storage device.
Canon, for example, offers image.canon, which can upload your photos and videos straight from the camera to the cloud, no computer needed. If you used it before and forgot about it, now’s the time to log in and check. Even if you didn't install the app, your camera might've sent something there if auto-upload was enabled.
If any of that sounds familiar, check those places first. Sometimes people forget they had auto-sync turned on and get a nice surprise.
But if the files were only ever on the SD card, then you’re out of luck without a recovery tool. SD cards don’t have a recycle bin or undo option. Once you delete something, the system makes it invisible, not gone, but definitely not accessible without help.
So yeah, unless you’ve got a backup somewhere, you’ll need to use recovery software.
💡 Note. If you used the SD card in an Android phone/tablet, you might be able to recover files directly on the device using apps like DiskDigger for Android, no computer needed. Just keep in mind, recovery options are limited without root access. Without root, you can typically only recover deleted photos and a few media files.
Also, if the SD card was set up as adoptable (system) storage, recovery gets tricky. In that case, the card is encrypted and tied to the phone. If the phone isn’t already rooted before the data loss, recovery isn’t possible.
So while Android recovery is possible in some cases, there are a lot of caveats, and it won’t work in every situation.
Recovered Your Files But They Won’t Open?
Usually, if you followed our advice at the beginning, stopped using the SD card right away, scanned it properly, and recovered to a safe location, your chances of a full recovery are pretty solid. But let’s be real: data recovery isn’t always that clean. Sometimes the files come back, but they won’t open. Videos won’t play. Photos show weird glitches or give you an error.
Let’s talk about when things aren’t so simple.
Most of the files we store on SD cards are media: photos, videos, maybe some audio recordings. And these file types are especially vulnerable to corruption if the card was used after deletion or had a file system issue.
- If, for example, you can’t open a recovered video, you’re probably looking at a
corrupted file. One common issue is that the moov atom (a small but
critical chunk of metadata that tells media players how to load the video) got damaged or
overwritten. Without it, players won’t even try to play the file. In that case, you
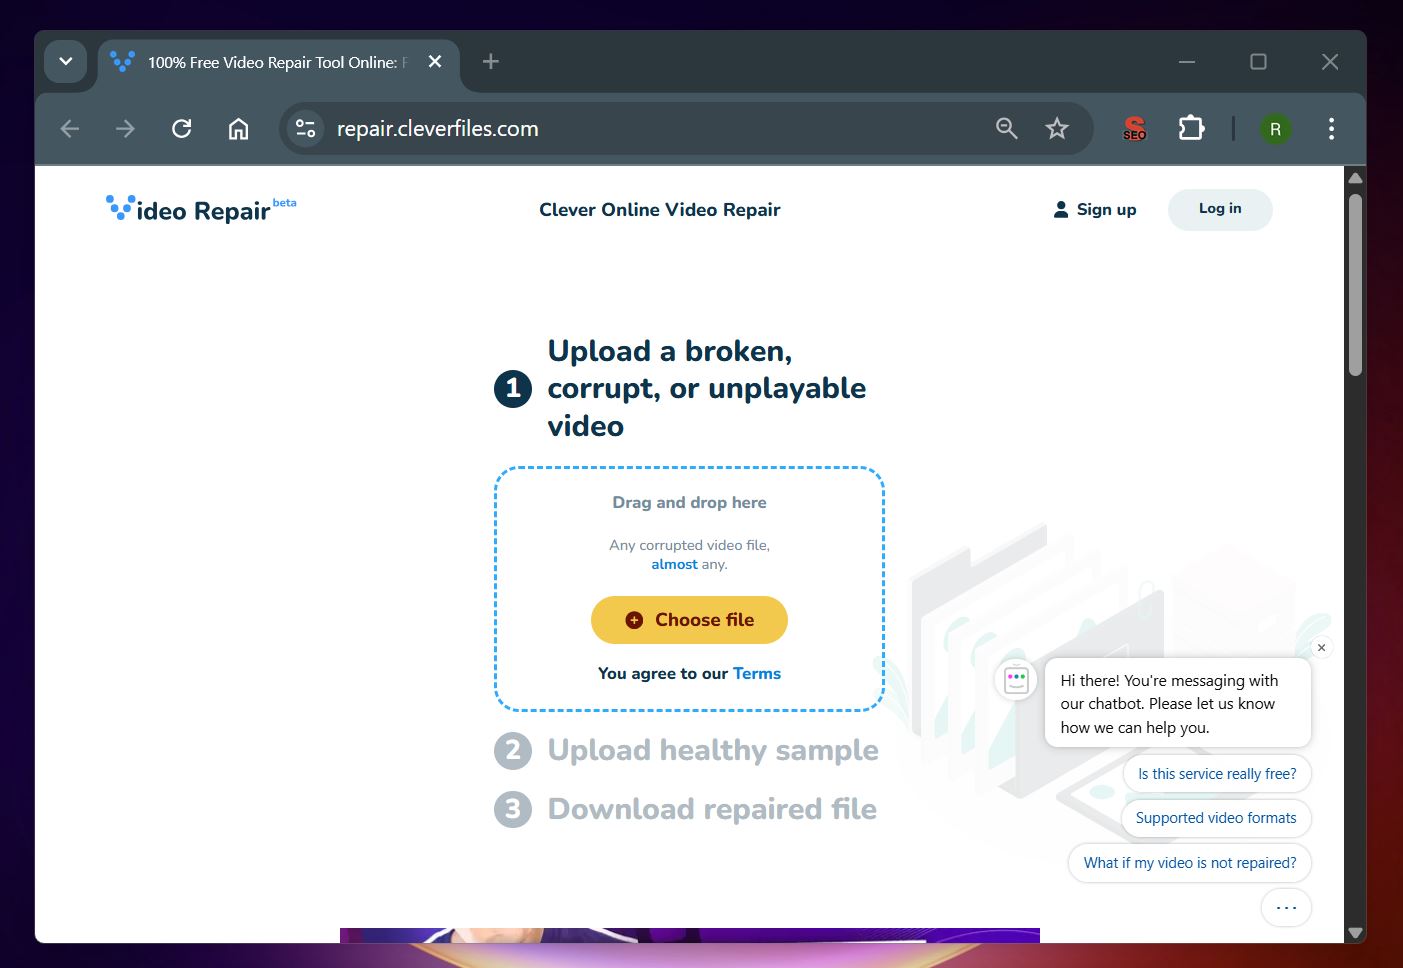
can try a few video
repair tools. One we recommend is a free online utility called Clever Online Video Repair.
It’s simple to use: upload the broken video and, if possible, a working video recorded
with the same device. The tool compares them and tries to rebuild what’s missing in
the damaged file. It supports MP4, MOV, M4V, and many other popular
formats. No install needed, everything runs in the browser.
- For broken image files, especially JPGs, we suggest heading over to DiskTuna. Their site has detailed guides on image repair and tools that can handle structurally damaged photos. If you're dealing with broken JPGs or corrupted RAW files like CR2, NEF, or ARW, you’ll want to check out this article on JPG-repair and corrupt RAW photos. It breaks down common causes of image corruption and offers tools and methods that can actually repair damaged image data.
So even if recovery wasn’t perfect, don’t toss the files yet. A lot of them can still be fixed; you just need the right tools.
Bottom Line
If we had to condense this whole guide into a few sentences, it’s this: If you act quickly and smartly, you can recover SD card data with a high chance of success. Stop using the card right away, connect it to your computer using a decent card reader (or a built-in SD slot if you’ve got one), then scan it with reliable recovery software like Disk Drill. Recover to a safe location (never back to the card itself).
If you follow just those steps, you’re already ahead. DIY recovery often rewards people who take the right actions early. This kind of data loss scenario is relatively tame compared to some of the messier ones we’ve seen. And honestly, we’ve watched plenty of people who’ve never dealt with anything like this pull it off just fine.
Hopefully, you’ll be one of them.