How to Recover Deleted Videos From PC
Deleted an important video by accident? Don’t know what to do next? Good news, you’ve landed on the right guide. We’ve seen all kinds of deleted video recovery cases on PC, and today, we’re going to break down exactly what can be done, in plain English, no tech degree required. Stick around, we’ll help you figure out your next move step by step.
Can You Always Restore Deleted Videos on PC?
Let’s start with the basics. There are multiple ways a video can disappear from your PC, and not all of them mean it’s gone for good. Sometimes, the file is still sitting in the Recycle Bin. Other times, you’ve deleted it using Shift + Delete or emptied the bin without thinking; those cases feel more final, but recovery might still be possible.
Here’s the key thing: when a file gets “deleted,” Windows doesn’t immediately wipe it from your drive. It just marks the space it took up as available. Until something else overwrites that space, recovery tools can still grab the data. That’s why timing matters a lot. The sooner you stop using the drive and start recovery, the better your odds.
So yes, in many cases, you can restore deleted videos from your PC, even if they were “permanently” deleted. But your chances hinge on a few key factors.
What Affects Your Chances of Recovering Deleted Videos on PC
Here’s what makes the biggest difference when it comes to video recovery:
- ⏱️ How much time has passed since the video was
deleted?
Time is critical. Deleted files stick around on your drive until they get overwritten. The faster you act, the better your odds. - 💿 Have you used the drive since deleting the
video?
Still watching videos, editing clips, or saving screenshots to the same disk? That’s not ideal. New data can overwrite the deleted video file, even if it’s small. If recovery matters, stop using the drive immediately. - 🗑️ Was the video removed permanently, or is it still in the Recycle
Bin?
If you used regular Delete, the file might still be chilling in the Recycle Bin. That’s the easiest recovery scenario. But if you emptied the bin or used Shift + Delete, recovery software is your next step. - 💾 What kind of storage device are you dealing
with?
Hard drives (HDDs) are more forgiving. Deleted files often sit untouched until new data replaces them. SSDs are different. Most internal SSDs use a feature called TRIM that wipes deleted data automatically. External SSDs? That’s where things get interesting. If yours connects over a USB hub or adapter, TRIM may not run, which means recovery is still on the table.
First Steps to Recover Deleted Videos Without Extra Tools
Before we get into video recovery software, we want to mention a few things that might seem obvious, but still, we feel like they’re worth pointing out.
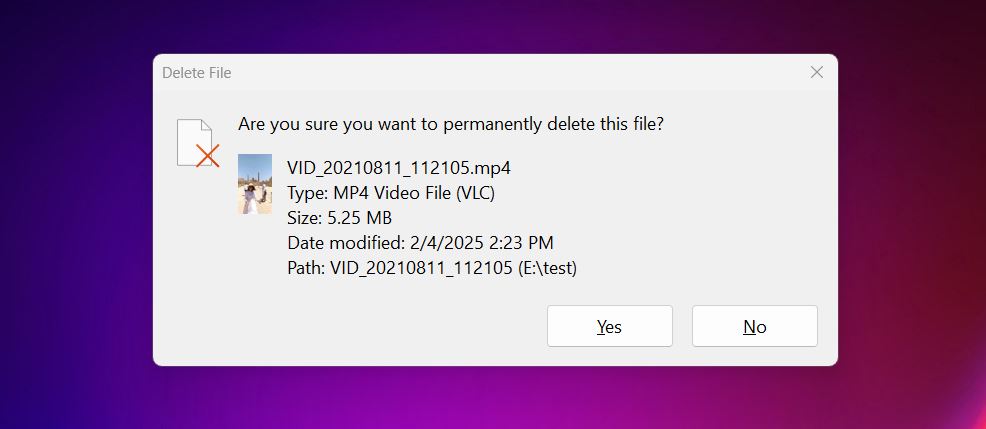
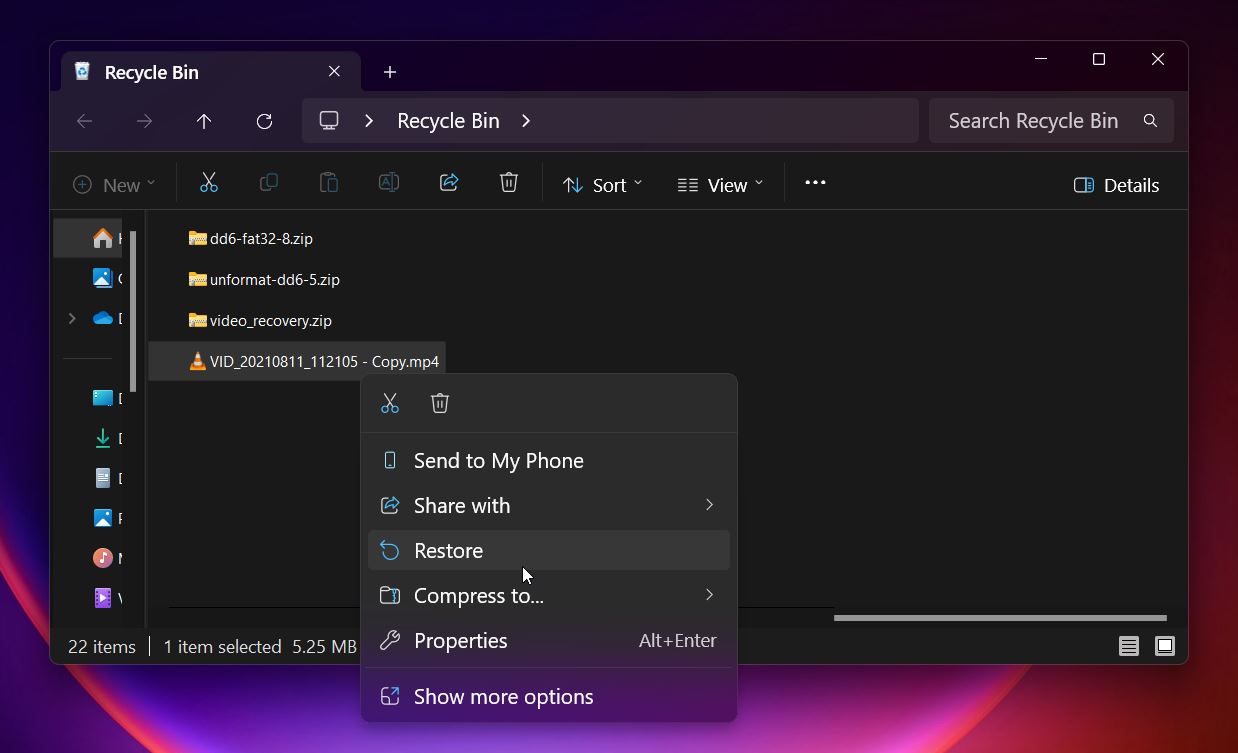
- First, yes, we know we’re repeating ourselves, but check the Recycle
Bin. Seriously. You’d be surprised how often people forget this step in
the heat of the moment. If you deleted the video with a simple right-click or hit the Delete
key, it probably ended up there. Open the Recycle Bin, scroll through the list (or use the
search bar), and if you see your video, right-click it and hit “Restore.”
That’ll send it back to its original folder like nothing ever happened. Easiest thing
in the book.
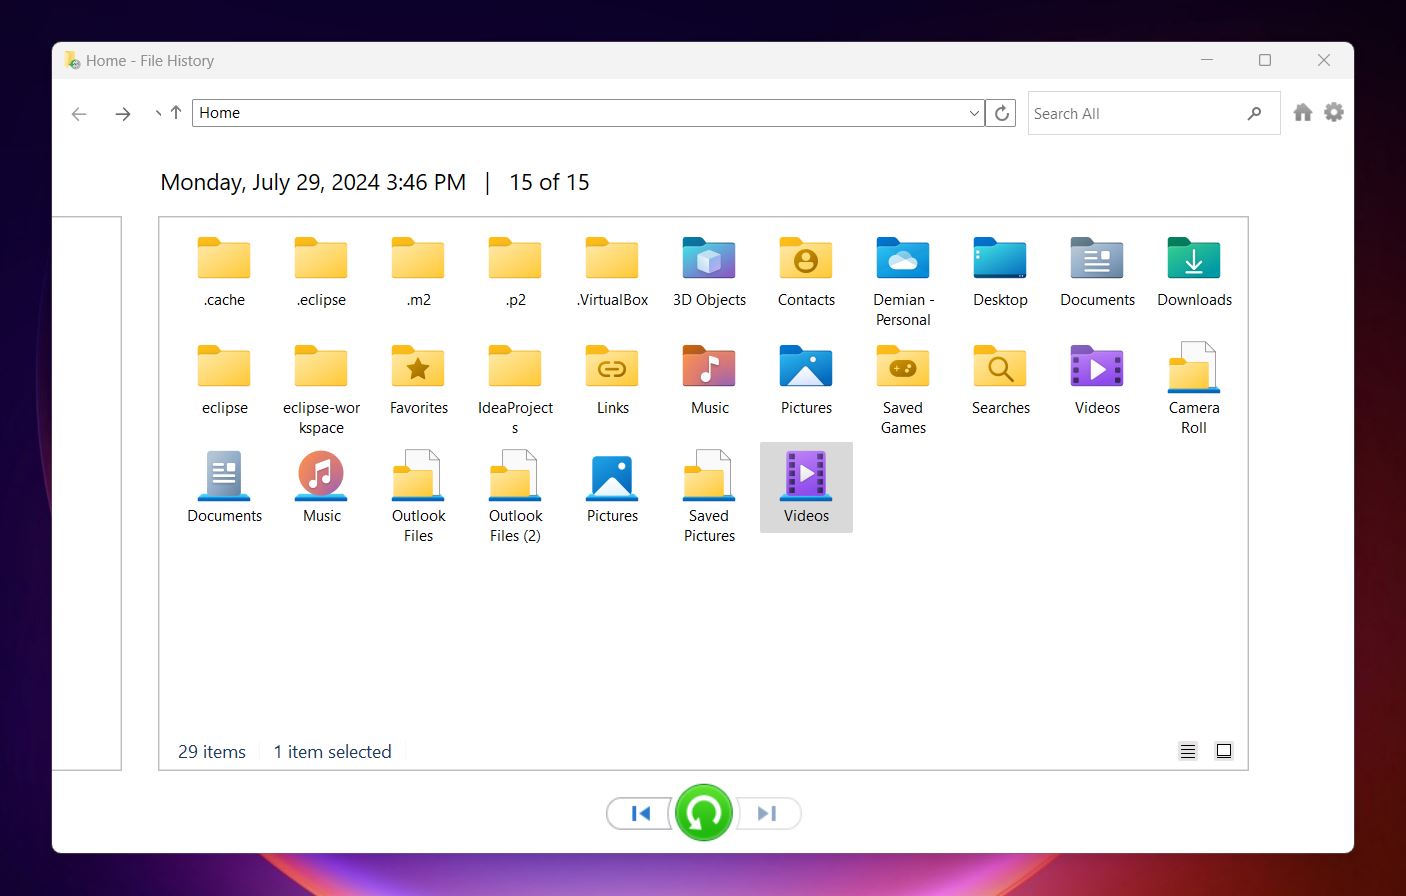
- Next, give yourself a moment to think. Have you ever turned on File
History? Or maybe OneDrive was running in the background? These are the
kinds of backup or sync tools that quietly save your data without you even thinking about
it. So, check File History first. You can search for “Restore your files with File
History” in the Start menu. If it’s been set up before deletion, you might be
able to go back in time and pull the video from a previous version of the folder.
- And don’t forget synced folders: OneDrive, Google Drive, Dropbox. You're especially in luck if you use Google Drive, since it handles deleted synced files a little differently. When you delete a video from a synced folder on your PC, Google Drive doesn’t immediately wipe it everywhere; it just unsyncs it. That means the file might vanish from your computer, but still end up in the Trash on your Google Drive account online. So before you assume it’s gone for good, check there. You might find exactly what you’re looking for.
📝 Quick note: It might also be worth using the search bar in File Explorer to try and locate the video. Sometimes files get moved accidentally or saved in unexpected folders. You can search by the file name if you remember it, or, if not, try searching by extension. Just type something like *.mp4 or *.mov into the search bar and let Windows do the digging. It’s a simple trick, but it works more often than you’d think.
How to Recover Permanently Deleted Videos from PC
Okay, let’s assume you did all the basic checks and the videos are truly gone. In that case, it’s time to bring out the big guns. We’ll walk you through two of the best tools for video recovery on PC: our usual go-to, Disk Drill, and the popular open-source option, PhotoRec.
Method 1: Use Disk Drill (Beginner-friendly, supports previews)
We’ll start with Disk Drill, because it’s the most universal option. It works in a wide range of situations. And what makes it stand out isn’t just the results (which are consistently strong), but how easy it is to use. If you can click a button, you can use Disk Drill.
The reason it’s so effective with videos comes down to a few key strengths:
- It works great with all the common file systems, like NTFS (what your system drive probably uses), exFAT, and FAT32. S, whether your video was deleted from your main drive, a USB stick, or a camera card, Disk Drill can scan it. It handles standard “deleted file” situations extremely well.
- But even if the file system is a mess, Disk Drill doesn’t give up. It falls back on what’s called a signature scan. That means it looks for known video file patterns (like .mp4, .mov, .avi, and literally hundreds of others) directly on the raw disk. So even if your file table is gone, there’s still a real shot at pulling those videos back.
- Also, Disk Drill lets you preview your videos in real time as it scans the drive. As long as the video is intact and your system has the right player to open it, you’ll be able to watch a preview before actually recovering it. That’s a huge plus.
Alright, let’s walk through the step-by-step process to recover permanently deleted videos from your PC using Disk Drill:
- Download Disk Drill from the CleverFiles website. If you’re running Windows 10 or 11, the latest version (Disk Drill 6) will download automatically. If you’re using Windows 7, 8, or 8.1, scroll down to find Disk Drill 4.5. For older systems like XP or Vista, there’s a legacy version (Disk Drill 2.0) that still supports basic recovery.
- Locate the installer (usually in your Downloads folder) and double-click to launch it. When prompted, choose a drive other than the one where your videos were deleted (it could overwrite the files you’re trying to get back). Follow the setup wizard. It only takes about a minute.
- Launch Disk Drill. You’ll see a list of all connected drives and partitions. Select
the drive that previously held your video files.
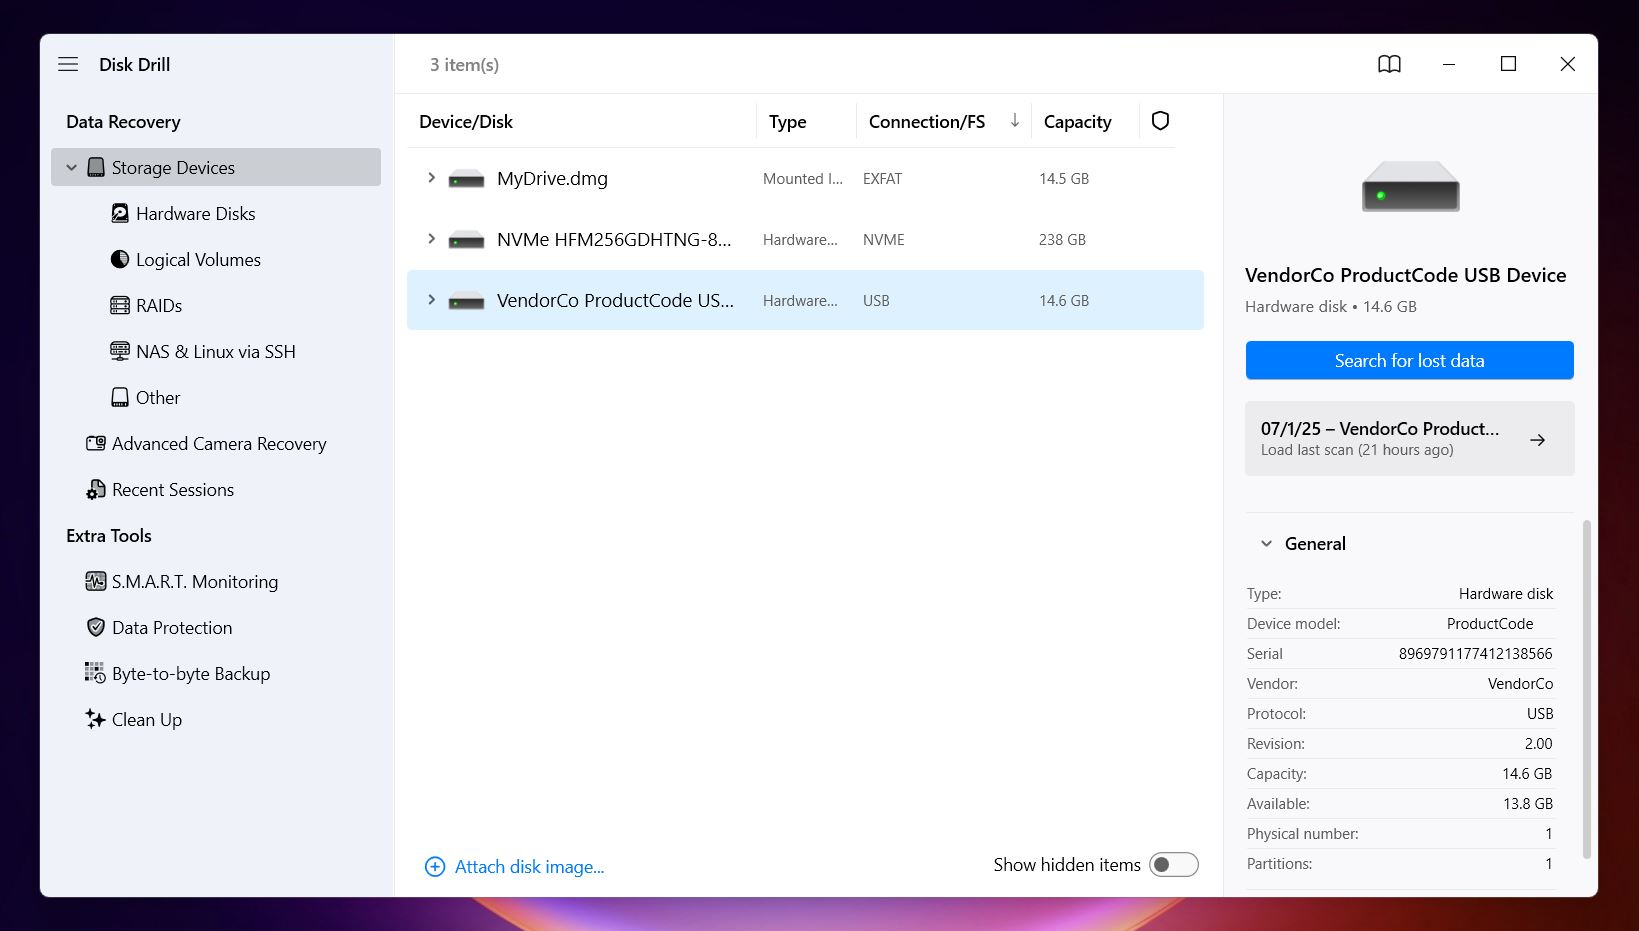
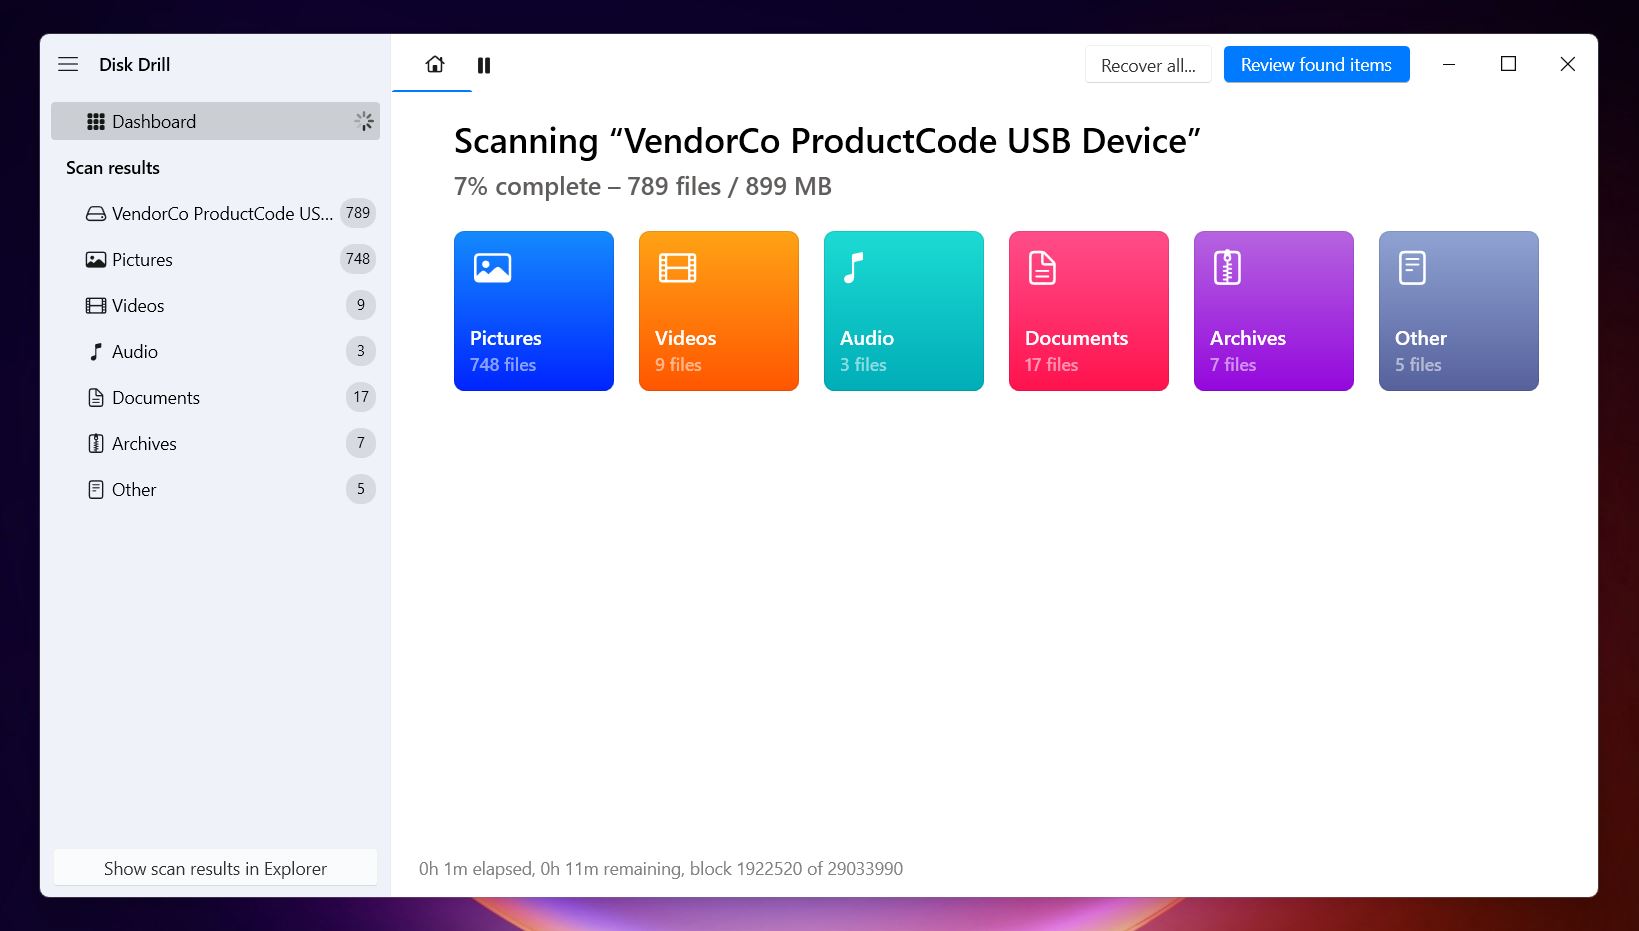
- Click the “Search for lost data” button next to the selected drive. Disk Drill will begin scanning for recoverable files. If you selected an external device like an SD card or USB stick, you’ll also see a prompt asking which scan type to use: Universal Scan or Advanced Camera Recovery (ACR). Advanced Camera Recovery is designed specifically for recovering videos from camera SD cards, especially when large files like 4K footage are fragmented. But for most situations (including deleted videos from your internal drive or general external storage), Universal Scan is the better choice.
- While Disk Drill scans, it automatically categorizes recoverable files. Click the
“Videos” category to start browsing recoverable video files in real time. You
don’t need to wait for the full scan to finish, you can preview and recover videos as
they’re found.
- If you prefer to browse everything, click “Review found items.” From here, you
can switch views (tree view or icon grid), sort by file type or recovery chance, and search
by filename or extension (like .mp4 or .mov). Deleted or Lost shows files flagged as
removed. Reconstructed includes videos found via signature scan.
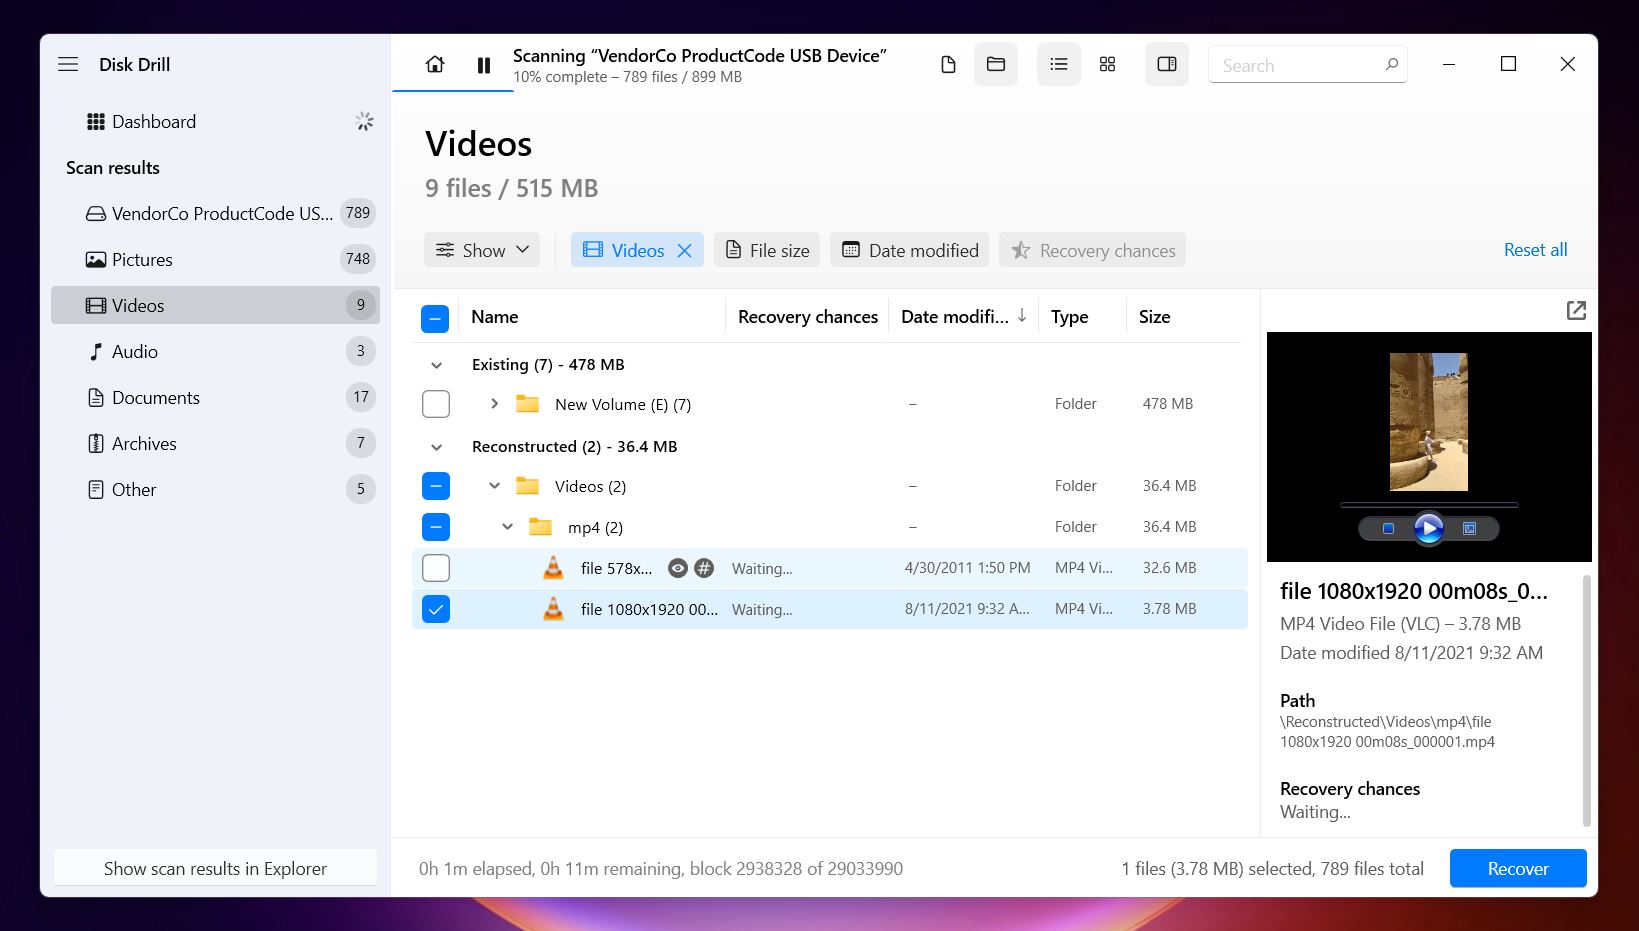
- Use the preview feature to check each video before recovery. Hover over a video and click the name of file to watch a preview. If the video plays, that’s a 100% sign that the file is intact and fully recoverable. Disk Drill also shows a Recovery Chance rating for each file: High, Average, or Low.
- Once you’ve selected the videos you want to bring back, click the
“Recover” button.
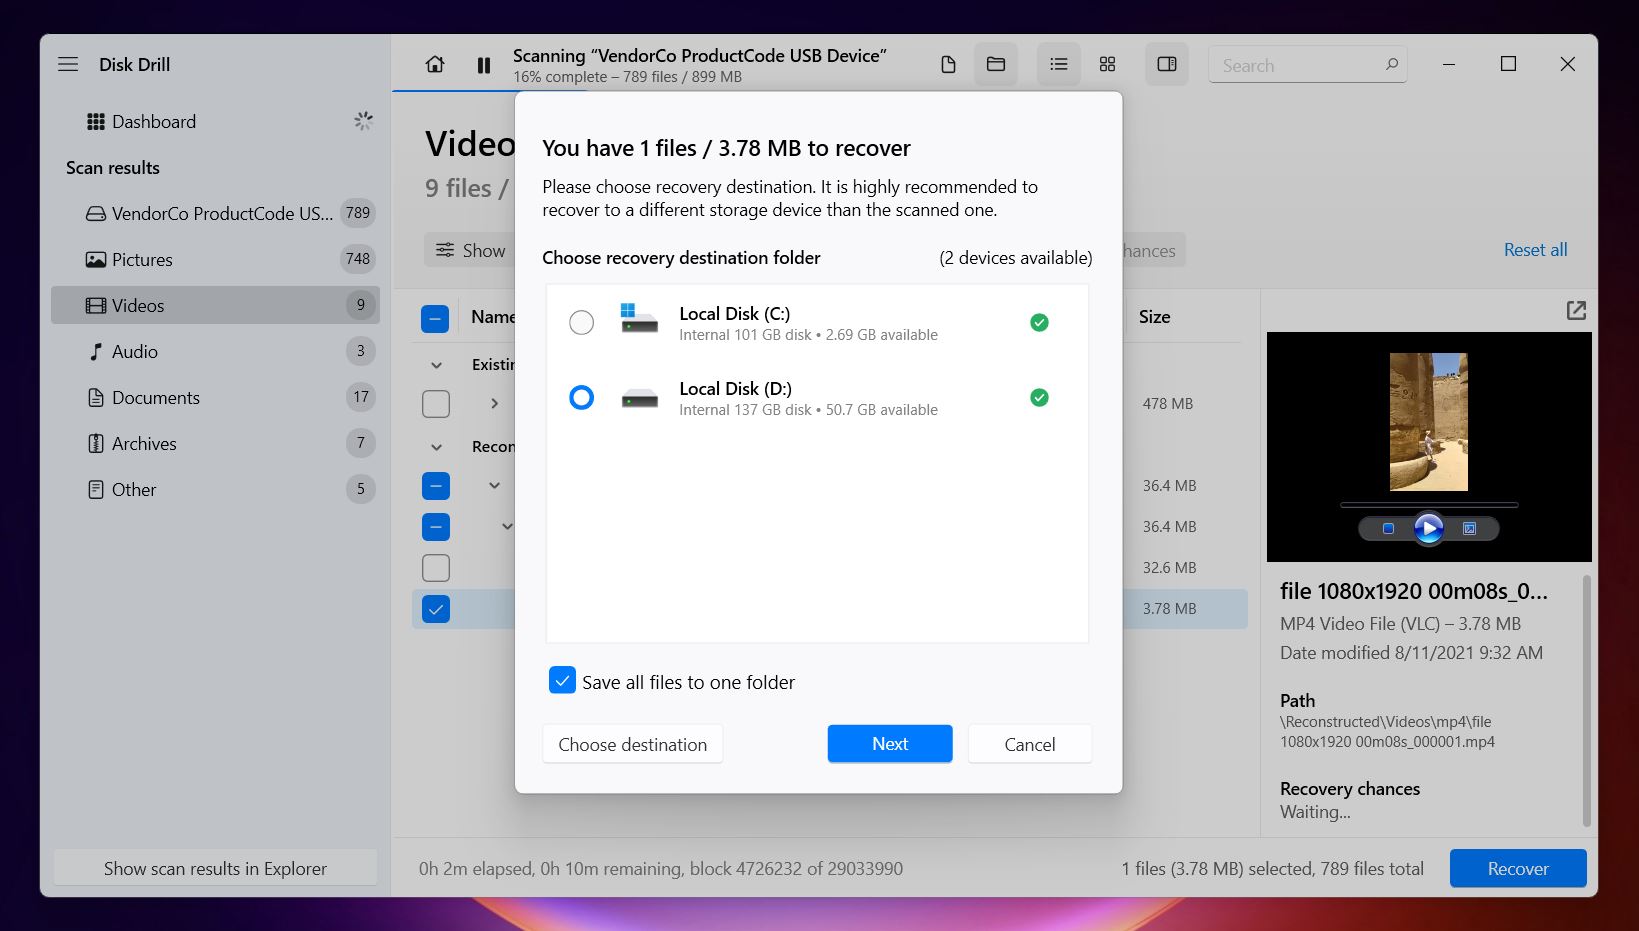 You’ll be prompted to choose a
recovery destination.
Make sure to pick a different drive than the one you’re recovering
from. This helps avoid overwriting other deleted files that might still be
recoverable. In its free version for Windows, Disk Drill lets you recover up to 500
MB of data without upgrading to the PRO version. That’s usually enough
for a few short or medium-quality videos. And here’s the nice part: you’re not
limited in how many times you can scan or preview files. Run as many scans as you need;
it’s totally up to you.
You’ll be prompted to choose a
recovery destination.
Make sure to pick a different drive than the one you’re recovering
from. This helps avoid overwriting other deleted files that might still be
recoverable. In its free version for Windows, Disk Drill lets you recover up to 500
MB of data without upgrading to the PRO version. That’s usually enough
for a few short or medium-quality videos. And here’s the nice part: you’re not
limited in how many times you can scan or preview files. Run as many scans as you need;
it’s totally up to you.
- When recovery is done, click “Show recovered data in Explorer” to open the folder. Take a few minutes to review the files, test playback, and make sure everything you need has come through.
In our experience, Disk Drill pulls up all kinds of video files during a scan: MP4, MOV, FLV, AVI, and even less common formats like BRAW or MXF.
On top of that, it includes a bunch of useful extras built right into the free version. You get byte-to-byte backup (a must-have if you’re scanning a flaky or failing drive), S.M.A.R.T. monitoring to keep an eye on drive health, and even data protection and cleanup tools.
📝 Note. While you're in Disk Drill, it’s worth taking a closer look at the data protection extras it offers. When Recovery Vault is enabled for a specific drive or partition, Disk Drill runs a background service that quietly monitors that location. If a file gets deleted, Disk Drill keeps a record of its metadata (like name, path, and structure), which makes it much easier to recover with full details later, even after the Recycle Bin has been emptied.
Method 2: Use PhotoRec (Free, open-source)
Next up is PhotoRec. It’s a much simpler tool, usually run in a command-line interface, and while it has plenty of fans, you need to know what you’re in for.
- First of all, this isn’t a click-and-go app like Disk Drill. There’s no modern interface, no real-time previews, and no recovery chance ratings.
- Also, unlike Disk Drill, PhotoRec only does a signature scan. That means it doesn’t use the file system at all, it skips right to scanning raw data and looking for recognizable patterns (file signatures) for things like MP4, AVI, MOV, and other video formats. The good news is it works even if the drive’s file system is totally gone or unreadable. The bad news is you’ll lose original filenames, folder structure, and the ability to tell what’s what until after recovery. Some people aren’t aware of these limitations and end up confused when they recover hundreds of files named something like f112345678.mp4.
Still, it’s a 100% free tool with support for many file formats, including a wide range of video types. And if the command line sounds like too much, there’s some good news, at least on Windows, PhotoRec comes with a basic graphical version called QPhotoRec. It’s not fancy, but it gets rid of the command-line barrier and makes the recovery process more approachable.
Here’s how to recover deleted videos from a PC using QPhotoRec, step by step:
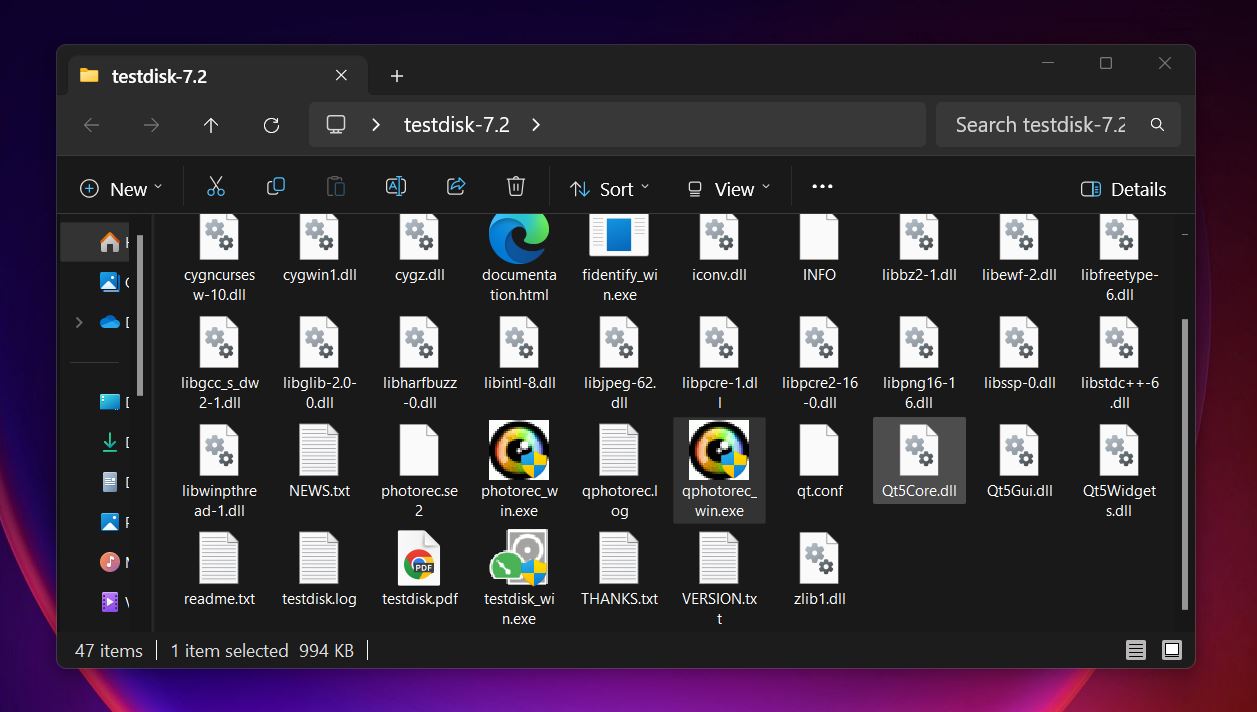
- Download the tool from the official TestDisk website.
QPhotoRec comes bundled with TestDisk in a single ZIP file. There’s no installation,
just extract the contents to any folder on your computer. Make sure to extract it to a drive
other than the one you plan to scan.
- Open QPhotoRec. At the top, select the drive that contained your deleted videos. Drives are listed by size, so use that to identify the correct one.
- Choose the option labeled “Whole: Extract files from whole partition.” This
tells QPhotoRec to scan the entire drive, which helps catch more recoverable files.
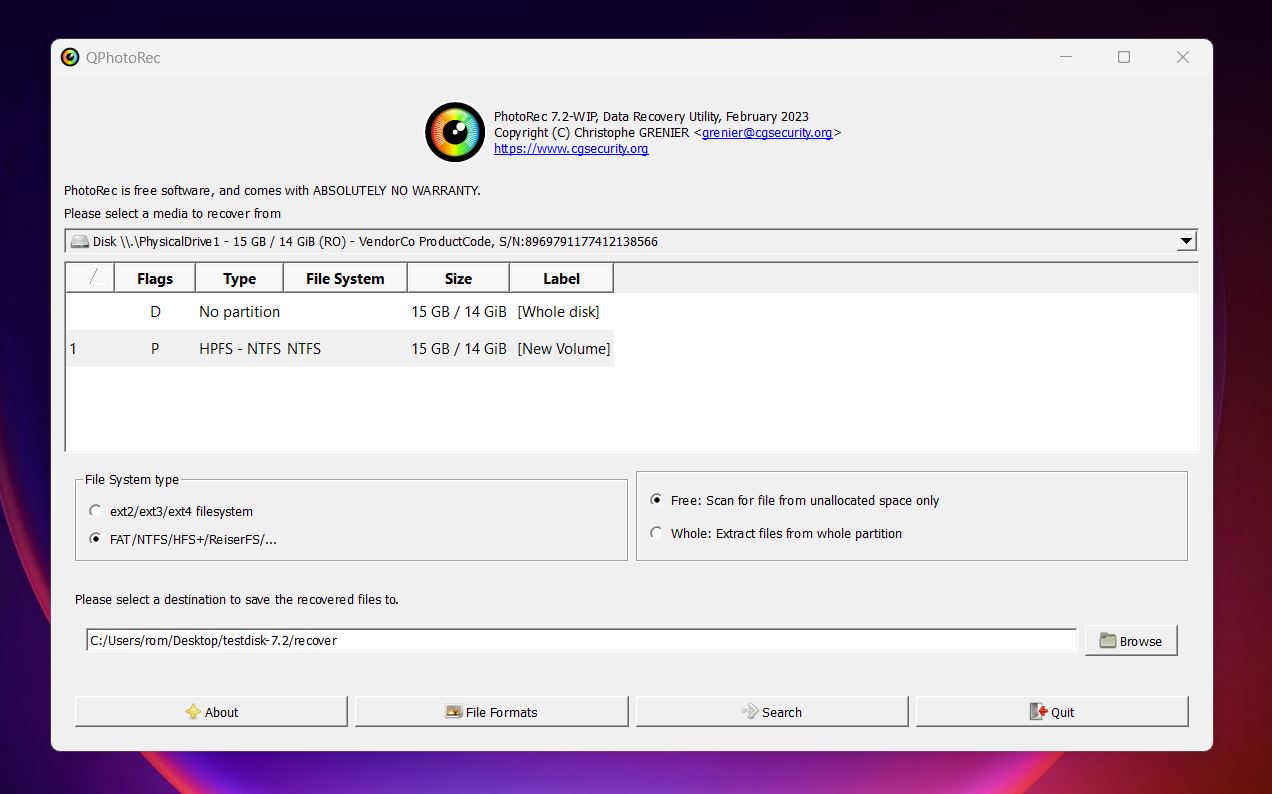
- Under “File system type,” leave the default setting selected: “FAT/NTFS/HFS+/ReiserFS…”. This works for most Windows drives unless you know the disk was formatted with Linux file systems.
- Click the “Browse” button and choose a recovery folder on a different drive, not the one being scanned.
- Finally, click “Search” to start the scan. QPhotoRec will begin recovering files
immediately and save them into folders named recup_dir.1, recup_dir.2, and so on.
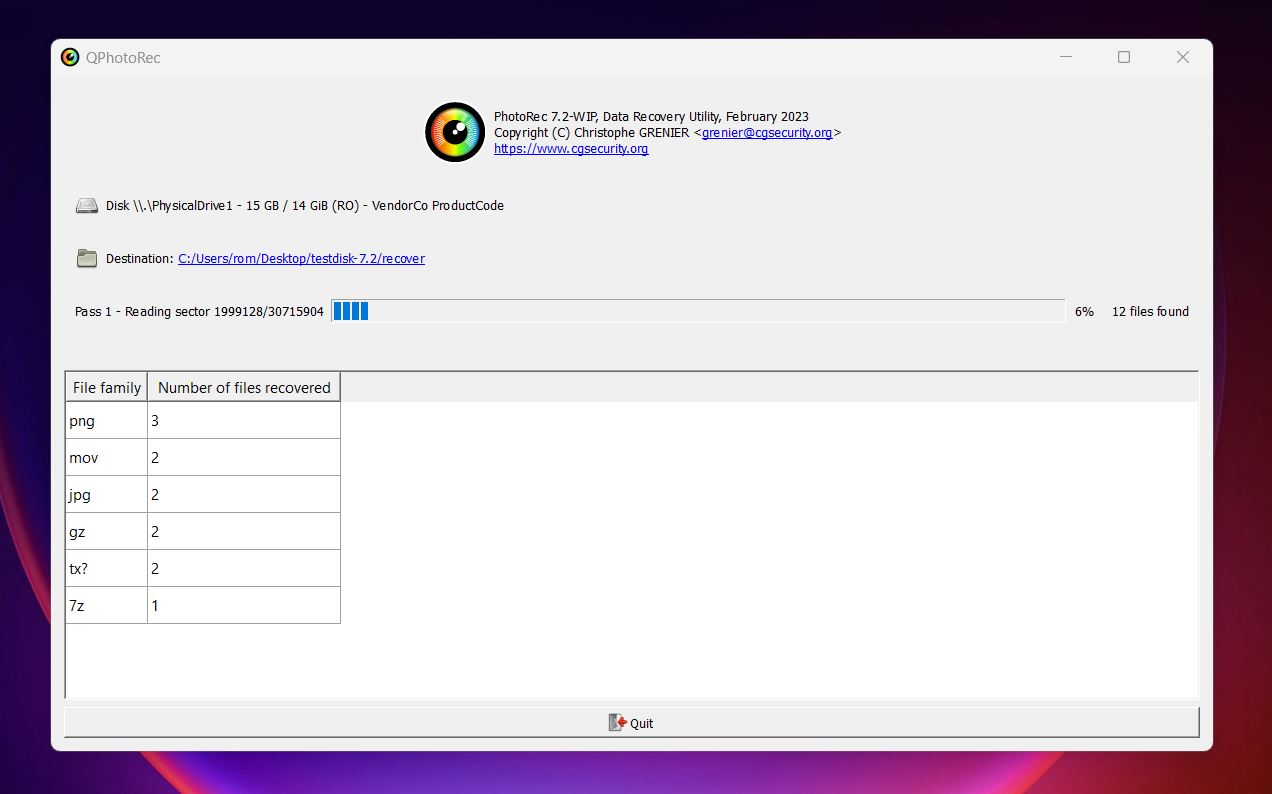 Each time
it finds a new batch of recoverable data, it creates a new folder in your selected
destination. Once the scan is complete, you’ll need to go through those folders
manually to sort and identify your recovered video files.
Each time
it finds a new batch of recoverable data, it creates a new folder in your selected
destination. Once the scan is complete, you’ll need to go through those folders
manually to sort and identify your recovered video files.
The process is minimal: select the drive, pick where to save the files, hit Search, and wait. There’s no preview, no filtering, and no recovery rating. The interface is extremely basic and offers little feedback until the scan is complete.
Still, despite its limitations, it’s easy to see why QPhotoRec is popular. It allows you to recover deleted videos from your PC for free, supports a wide range of media formats, and doesn’t require installation. You can run it directly from a USB stick, and it works on practically any operating system: Windows, macOS, Linux, you name it. For users who don’t mind doing a bit of manual sorting after recovery, it’s a solid no-cost option.
Final Tips
Data recovery is tricky. No matter how good the tool is, it's hard to say in advance whether recovery will be successful. That’s because so much depends on variables we talked about earlier: how much time has passed, what kind of drive you’re using, whether you’ve written new data to it, and so on.
But if you follow the steps in our guide, avoid unnecessary actions (like continuing to use the drive), your chances of getting those videos back are usually pretty high. Especially if the deletion was recent and the drive hasn’t seen much activity since.
Before you go, there’s one more thing to cover. Sometimes, when you recover deleted videos from your computer, the video still won’t play. Again, that doesn’t always mean it’s a lost cause. We’ve seen this happen when a deleted video was partially overwritten. The file may come back with the right name and size, but some of the internal data is missing or scrambled. In those cases, your video player might refuse to open it altogether (even though the majority of the file is technically there).
To fix this, we’d recommend starting with two super simple and quick options:
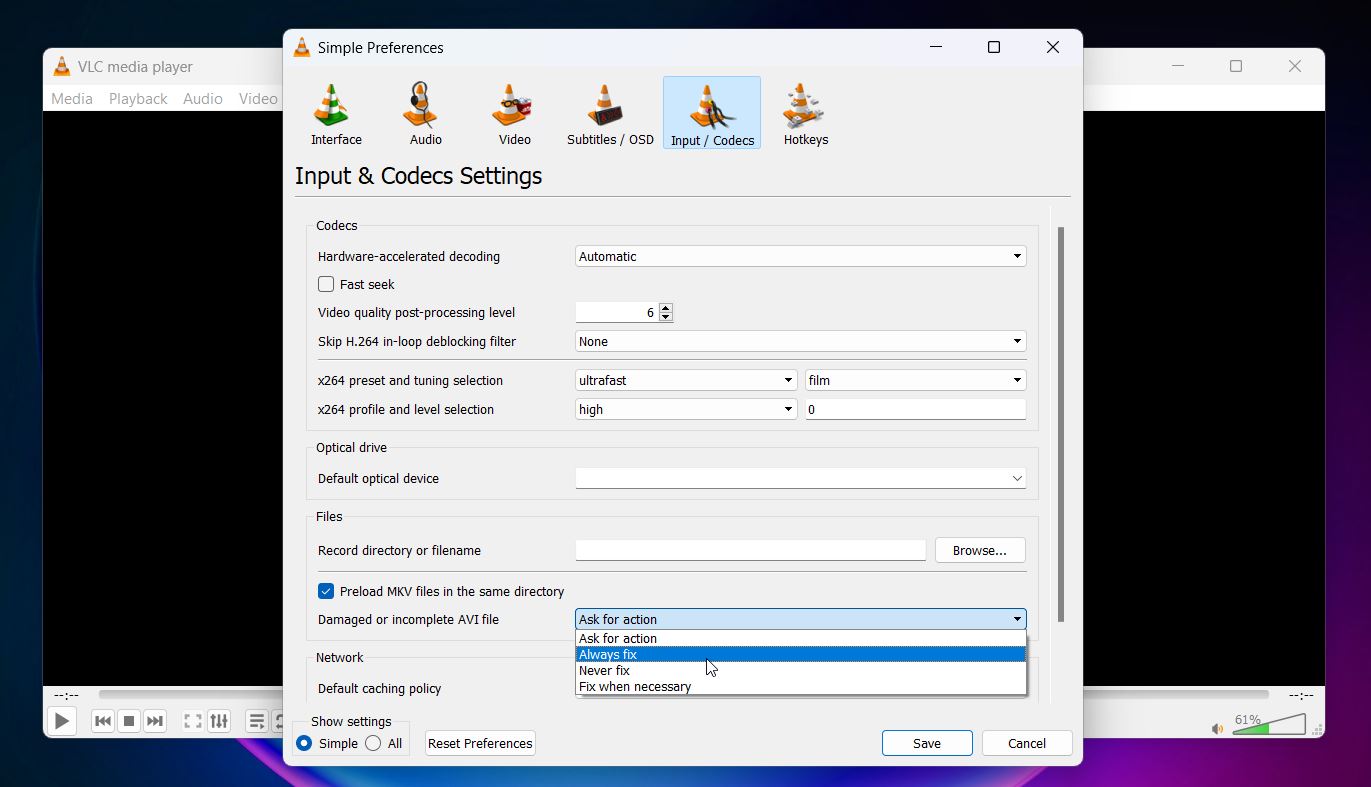
- VLC Media Player is one of
the most popular video players for a reason. Not only does it support a huge number of video
formats, but it also includes built-in repair features. If VLC detects that a video file (an
AVI) is damaged, it may prompt you to fix it automatically when you try to open it. To
trigger this, make sure you rename the file extension to .avi, even if the original format
was different. Then open VLC, go to Tools > Preferences > Input/Codecs, and
under “Damaged or incomplete AVI file,” set it to “Always fix.” It
won’t repair everything, but for basic issues, this method can work surprisingly well.
- Another easy fix is using a free browser-based tool like Clever Online Video Repair. It doesn’t require any installation, just open the site, upload the damaged video file, and let it do its thing. It supports many common formats like MP4, MOV, and AVI, and it’s especially handy if you don’t want to mess with desktop software. While it won’t fix severely corrupted footage, it can often repair header issues that stop your video from opening normally. And here’s a tip: if you have a similar video recorded with the same device (same format, resolution, and settings), you can upload it as a healthy reference file. This helps the tool better understand the structure of the broken one, which can improve the chances of a successful repair. If VLC didn’t help, this is a good next step.