How to Recover Deleted Partitions
Accidentally deleted a partition in Windows? You’re not the first one. Usually, it happens when someone tries to “fix” something; there’s always a thread out there with the same story. But it can also go missing because of a corrupted partition table or a glitch during setup.
The important thing is, it’s not necessarily gone. We’ve handled plenty of these cases, and in most, recovery is absolutely possible. Today, we’ll walk you through the exact steps that actually work.
What We Mean by a “Deleted” Partition
When we say a partition is “deleted,” we’re not talking about physically erasing the data on your drive. A deleted partition usually means the entry that told the system where that partition started and ended, basically, the coordinates, got wiped from the partition table.
Here’s how it works under the hood. Your disk stores partition info in one of two ways: either using the older Master Boot Record (MBR) system or the newer GUID Partition Table (GPT). In both cases, there’s a list (a literal table) that maps out each partition’s location on the drive. Delete a partition, and what you’re really doing is removing one of those entries. The data itself isn’t touched, at least not immediately.
That’s why recovery is possible. As long as you don’t write new data to the disk (which could overwrite the old partition’s contents), the structure of the deleted partition often remains intact. We’re talking about everything from the file system (NTFS, FAT32, exFAT) to individual files, even folder hierarchies.
So here’s what not to do:
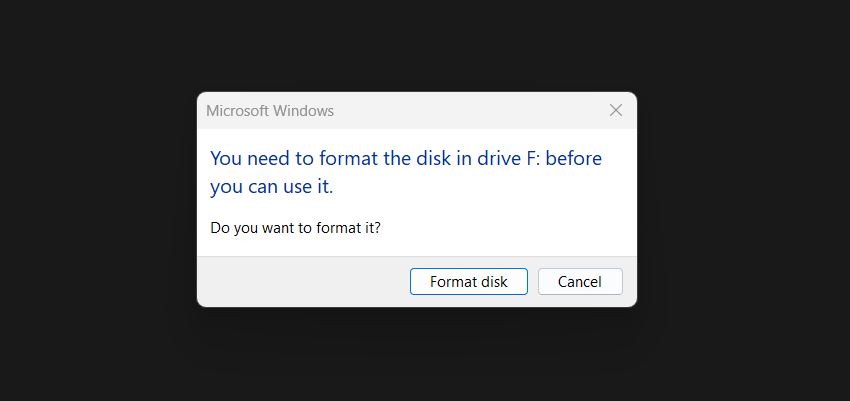
- Do not format it. Even if Windows keeps nagging you to format the
“drive” before use, ignore it. A format (especially a full one) can seriously
damage what’s left of the original partition.
- Don’t run CHKDSK, SFC, or defrag. They can make things worse.
- Use the affected disk as little as possible.
If the partition is still there under the surface, the only thing standing between you and your data is a table entry and a little patience.
Quick Checks Before Breaking Out the Heavy Tools
Before any recovery tools or command-line utilities, check what Windows is actually seeing. Sometimes the partition didn’t disappear completely; it might just be missing a drive letter or showing up in a weird state that’s fixable without any third-party software.
Open Disk Management. Hit Win + X and choose Disk Management from the menu. Or hit Start and search for Create and format hard disk partitions.
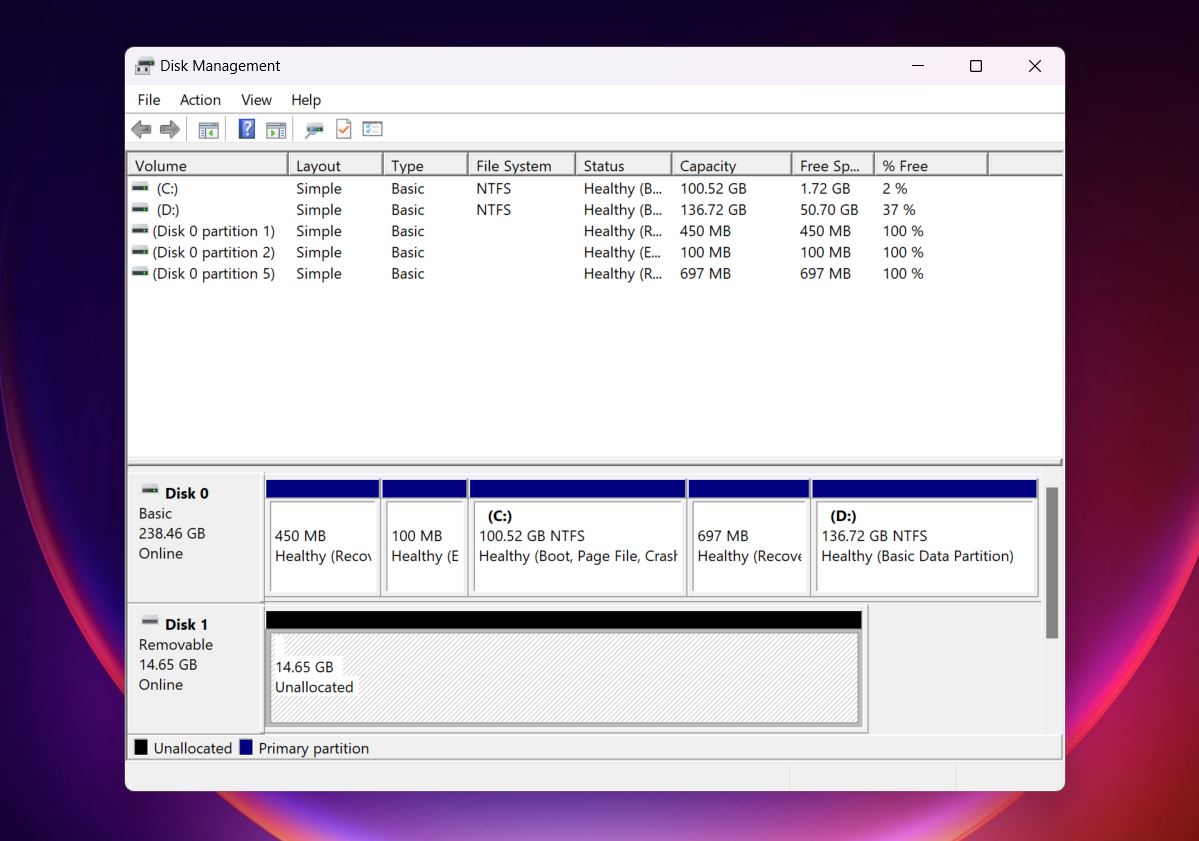
Now take a look:
- If you see a block labeled Unallocated, that means the partition entry is gone, but the space is still physically there. This is classic deleted partition territory.
- If the partition shows up but says RAW under File System, the structure is broken, but Windows still sees the volume. You’re likely dealing with corruption, not deletion.
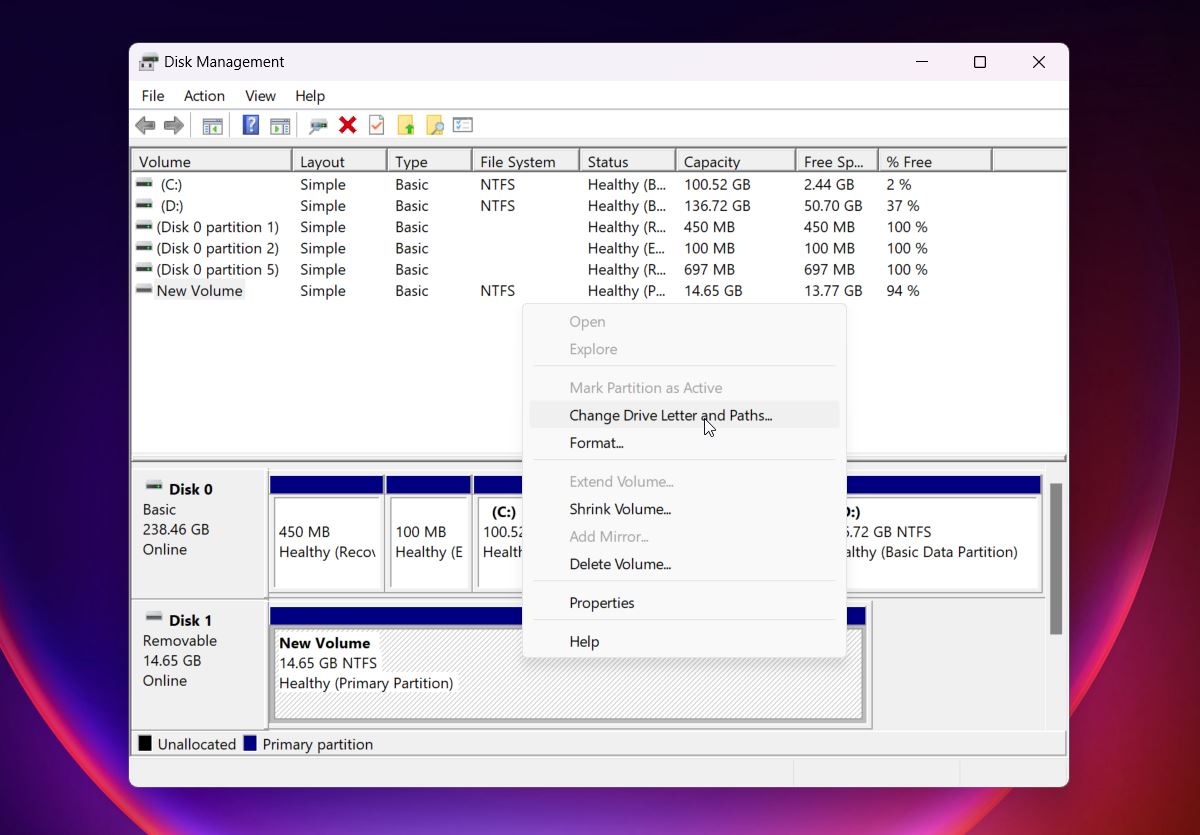
- If the partition looks fine but has no drive letter, that’s an easy one, just
right-click, select "Change Drive Letter and Paths" and choose a letter, it might pop right
back into File Explorer.
These are quick visual clues that tell you what kind of recovery path you're on. This step saves time. No need to fire up TestDisk or scan the whole drive if it’s just a missing drive letter. So always start here.
How to Recover a Deleted Partition on Windows
Now we’ll show you the different ways you can recover a lost partition in Windows - step by step, with screenshots where it matters. Each method tackles a different kind of scenario, so we’ll include a quick note about when it makes the most sense to use it.
Some tools try to bring back the partition itself (as in, they restore it to the partition table so it reappears in Disk Management). Others go straight for the files, which is useful when the partition is too damaged to rebuild properly.
📝 Note. These methods work for both HDDs and SSDs. But deleted partition recovery on SSDs is often harder due to the TRIM command, which wipes data blocks shortly after deletion. We mention this to keep expectations realistic. It’s still worth running a scan, especially if the SSD is external or TRIM wasn’t triggered right away.
Method 1: Restore a Deleted Partition with DiskPart
📁 When to use: Think of this as the command-line alternative to Disk Management. Use it if the partition is still there but not showing up in File Explorer; maybe it’s missing a drive letter or was accidentally hidden. It’s especially useful if Disk Management throws an error, or you’re working from a recovery environment where the graphical interface isn’t available.
If the partition still exists on the drive but doesn’t show up in File Explorer, and Disk Management didn’t help, DiskPart might do the trick. It’s a built-in Windows tool that works from the command line, and while it looks a bit intimidating, it’s actually pretty straightforward once you know the right commands.
Here’s how to do it:
- Open Command Prompt as Administrator. You can do this by hitting Start,
typing cmd, then right-clicking Command Prompt and selecting Run as
administrator.

- Type diskpart and hit Enter. Wait for the prompt to change to DISKPART>.

- Type list disk, press Enter to display all physical drives, and note the number of the disk that matches the size of the drive with the missing partition.
- Type select disk X. Replace X with the correct disk number, and press
Enter to make that drive the active target.

- Type list volume, press Enter to list every volume on the selected disk,
and locate the one with the expected size but no drive letter in the Ltr
column.

- Type select volume Y, replacing Y with the volume number of the missing partition, and press Enter to choose it.
- Type assign letter=E. Replace E with any unused drive letter, and press Enter to mount the partition.
- Type exit to close DiskPart.
Once you do that, Windows will assign a drive letter, and the partition should show up in File Explorer again.
⚠️ Note. If the partition doesn’t appear in list volume, or if the disk shows unallocated space instead, DiskPart can’t help in that case. You’ll need to use recovery tools like TestDisk (Method 3) or scan the whole disk as shown in Method 2.
Method 2: Recover Files From a Deleted Volume
📁 When to use: This is the most universal method for getting your data back. If the partition itself is toast, or you don’t care about restoring the partition structure and just want the files, this is the simplest way to go. It works whether the partition shows as Unallocated or RAW. As long as the drive itself still shows up in Disk Management, you can use this method.
We’ll use Disk Drill for this example because it supports NTFS, FAT32, exFAT, and many others, and shows results in a way that’s easy to browse. It also lets you preview files before recovering them, which saves a ton of time.
It’s a partner product we trust; it’s been on the market for over a decade and consistently delivers strong recovery results. It also recently got a major upgrade to version 6, which improved scanning speed, file previews, and data recovery across the board.
💡 By the way. If you followed the Windows prompt and formatted the partition, don’t give up. You can (and should) still try to scan it. By default, Windows performs a Quick Format, which doesn’t erase the actual data; Disk Drill can still recover most or even all of your files.
Here’s how to use Disk Drill to recover files from a deleted disk partition:
- Download the latest version of Disk Drill and install it.
- Once installed, launch Disk Drill. You’ll get a list of all available drives. Your
missing partition probably won’t show up by name, but the disk it was on will. Look at
the size and manufacturer; it's usually the easiest way to identify it.
 A lost
partition might show up as Unallocated, or it won’t show up at all.
That’s normal. We recommend selecting the entire drive. It gives Disk Drill more space
to scan and usually leads to better recovery results.
A lost
partition might show up as Unallocated, or it won’t show up at all.
That’s normal. We recommend selecting the entire drive. It gives Disk Drill more space
to scan and usually leads to better recovery results.
- Hit Search for lost data. Disk Drill will suggest using its
Universal Scan mode, go with that.
 It’s the default for a reason
and
works best in most situations, whether the partition was deleted, quickly formatted, or the
entire partition table was wiped. You might see other scan options depending on your device,
but you can ignore those for now unless you're trying to recover video footage from
something like a GoPro or DSLR.
It’s the default for a reason
and
works best in most situations, whether the partition was deleted, quickly formatted, or the
entire partition table was wiped. You might see other scan options depending on your device,
but you can ignore those for now unless you're trying to recover video footage from
something like a GoPro or DSLR.
- While it scans, Disk Drill organizes the results into categories: Pictures, Video,
Audio, Documents, Archives, and so on. You don’t need to wait for the
entire scan to finish. You can browse files as they’re being found. Click on a
category to explore, or use the Review found items to see everything in one
place.
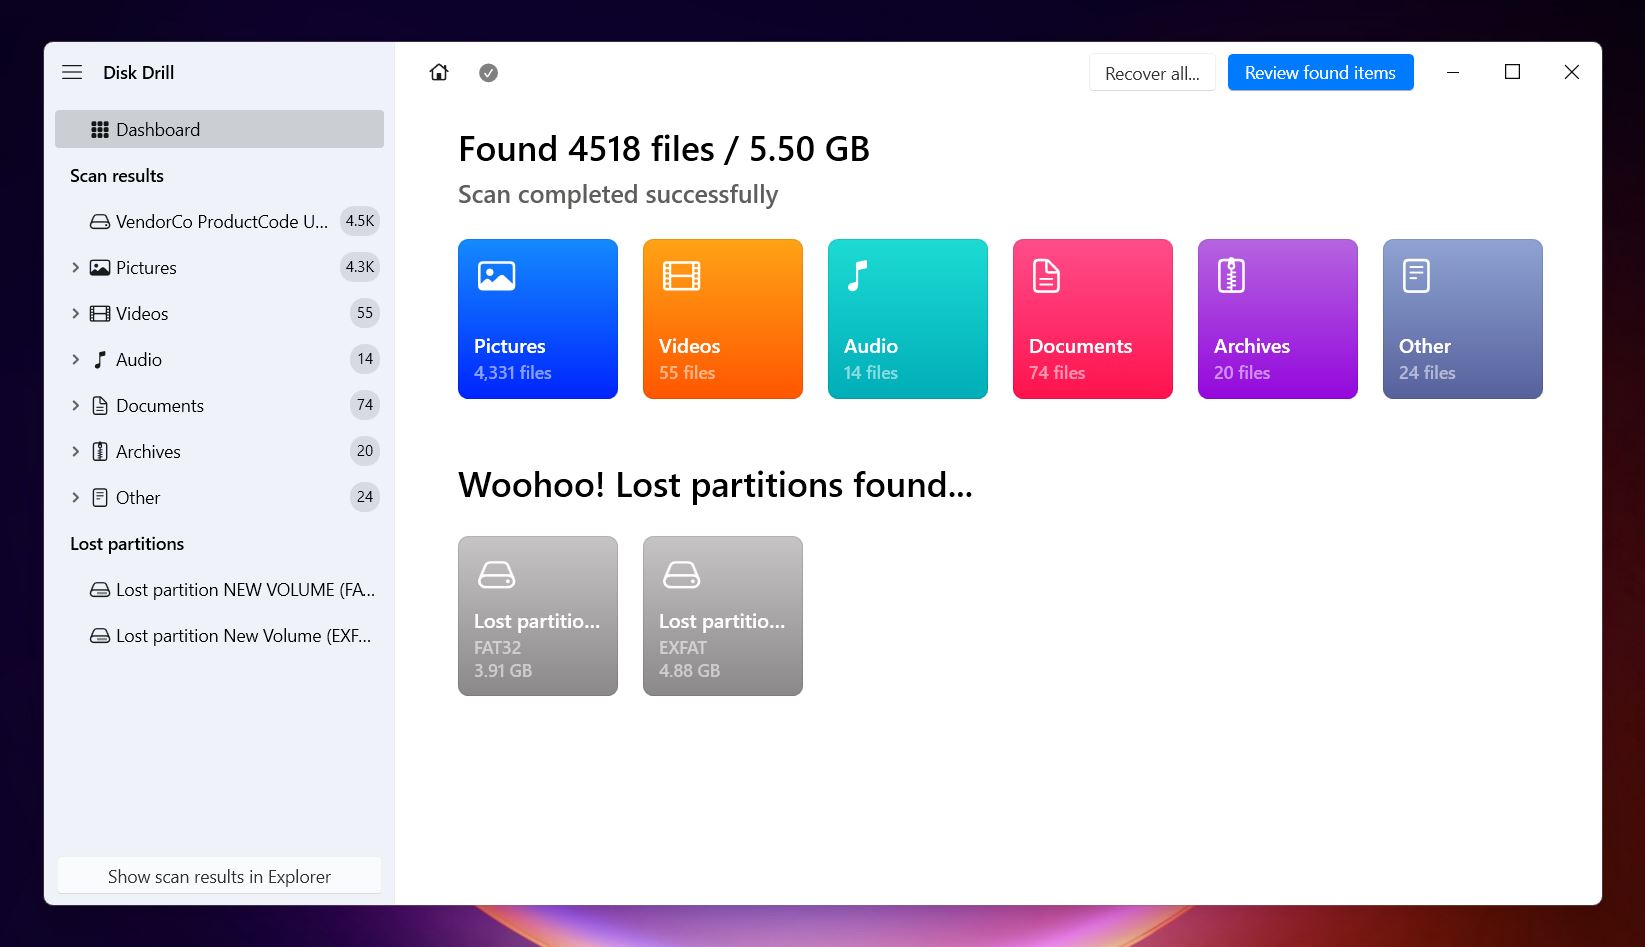 It’s also possible that Disk
Drill will detect lost
partitions and display them at the bottom of the results list. In our case, for
example, it found two FAT32 volumes and one exFAT partition that were previously deleted. If
you see something like that and want to check what’s inside, just click on the
partition name - it’ll show you the files recovered from that specific partition.
It’s also possible that Disk
Drill will detect lost
partitions and display them at the bottom of the results list. In our case, for
example, it found two FAT32 volumes and one exFAT partition that were previously deleted. If
you see something like that and want to check what’s inside, just click on the
partition name - it’ll show you the files recovered from that specific partition.
- You can use the categories on the left panel to navigate - Photos, Video, whatever you're
after. But if you’re looking for something specific, the search bar
is your best friend. Type in a full name, a partial name, or even just a file extension like
.mp4 or .jpg, and you’ll see matching results instantly. You can also filter by file
type, size, or date to narrow things down further.
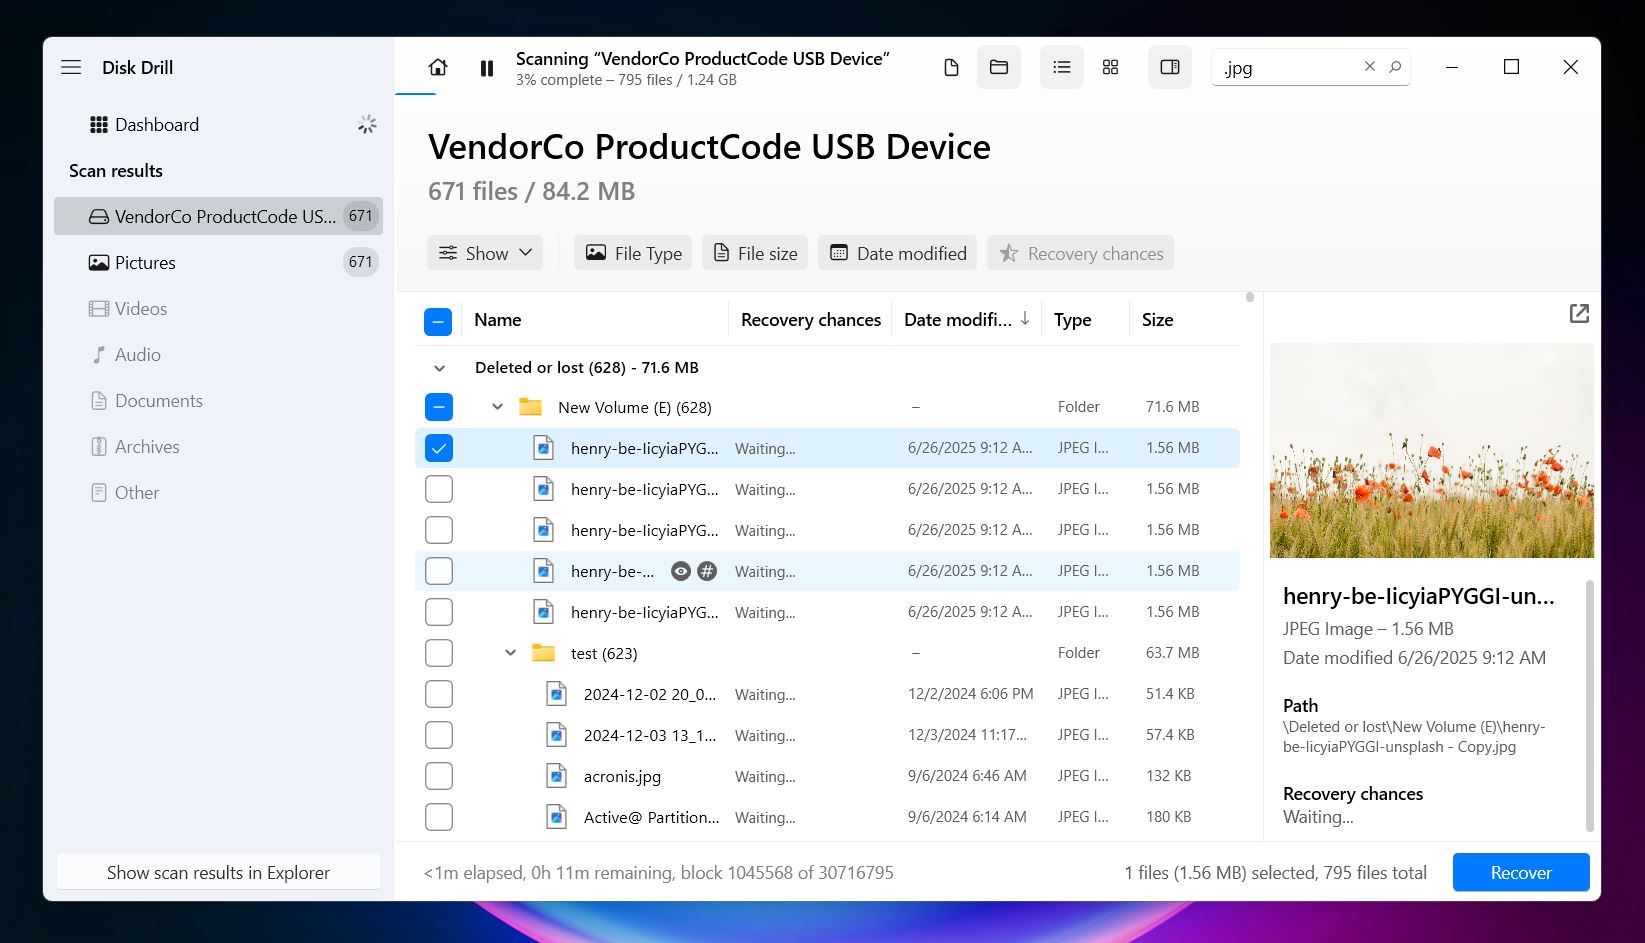
- Click the little eye icon next to a file to preview it. You’ll also see a recovery
chance label: High, Average, or Low. If
the partition was simply deleted and you’re using this method right away, your chances
are usually High across the board. And honestly, if you can open the
preview, that’s about as close to a 100% guarantee as you’ll get that the file
will recover just fine.

- Once you’ve selected everything you want, hit Recover. On Windows, Disk Drill lets you recover up to 500 MB of data for free without a PRO license. That’s usually enough for documents, a good batch of photos, or a few videos. And the best part, you can scan and preview an unlimited number of files as many times as you want. No limits. So even if you’re not ready to upgrade, you can still check what’s recoverable before deciding anything.
Give it a few minutes, and you’ll have your files back in a folder, ready to go. Even if the partition itself is unrecoverable, this method often saves the data, which is usually what matters most.
After that, you can safely format the drive and start fresh. Windows probably prompted you to do it earlier, but if it didn’t, the next method will walk you through how to make the partition usable again so you can get back to work.
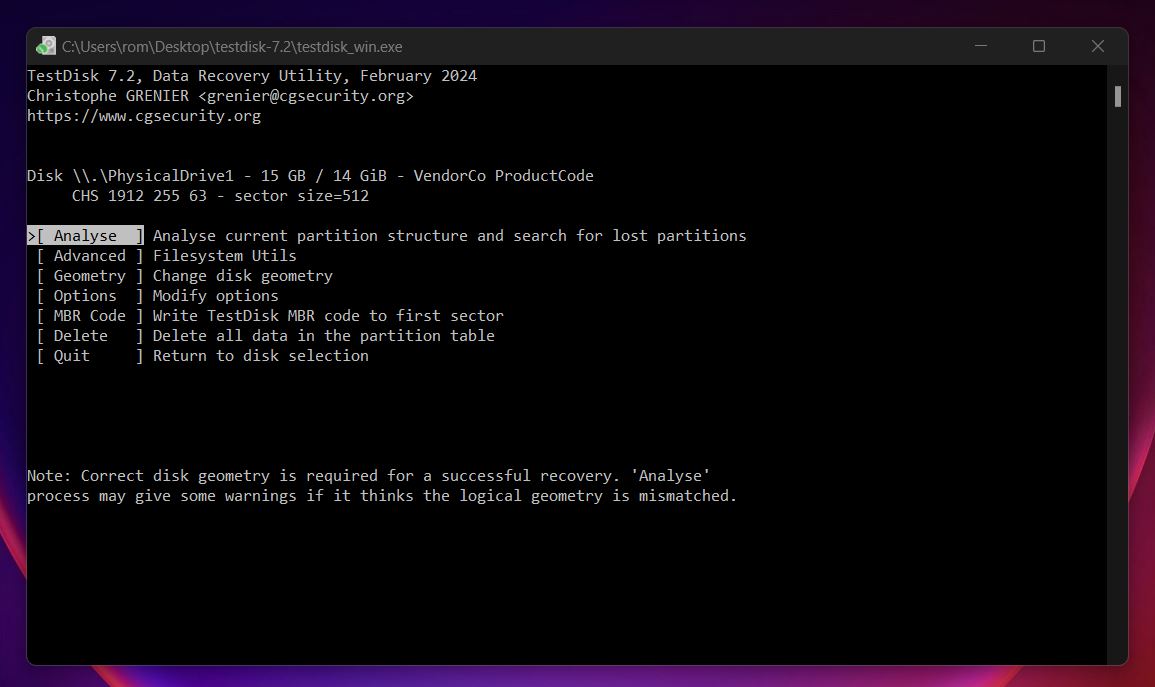
Method 3: Undelete a Partition with TestDisk
📁 When to use: Use TestDisk if you want to undelete the partition itself, not just extract the files. It works well on drives that show as Unallocated/RAW in Disk Management, or where the partition table was damaged but the file system is still intact.
Another great tool that often helps in cases where people deleted a partition by mistake is TestDisk. It’s free, open-source, and works directly with the partition table.
In the context of lost partition recovery, it offers some genuinely powerful features. It can fix a damaged partition table and restore a deleted partition so it reappears in Windows like nothing happened. If you’re dealing with FAT-based volumes, it can recover a lost FAT32 boot sector from its backup, rebuild broken FAT12, FAT16, or FAT32 boot sectors, and even repair corrupted FAT tables.
If the drive shows as Unallocated or RAW, and you haven’t formatted or overwritten it, TestDisk often finds the lost partition and restores access to the original data. It works well with both MBR and GPT disks.
But fair warning: TestDisk is a command-line tool, so forget about slick buttons or drag-and-drop menus. We’ll guide you through it.
Here’s how to undelete a lost partition using TestDisk:
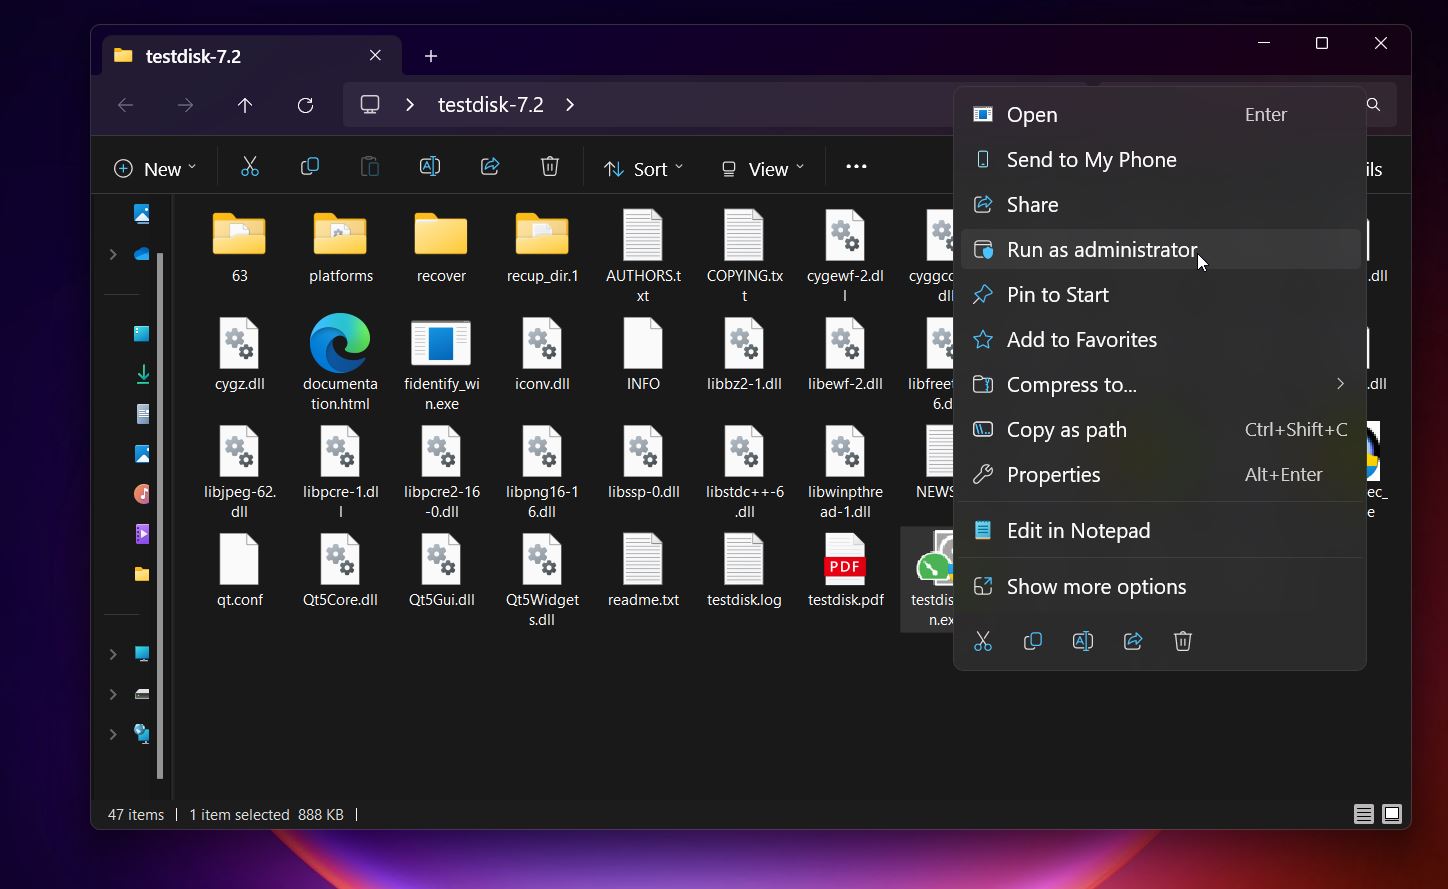
- Download TestDisk from the official site.
- Once you’ve downloaded TestDisk, unzip the archive anywhere you like. No installation
is needed. On Windows, right-click testdisk_win.exe and select Run
as administrator. The program will launch in a command-line window and open a
simple text menu.
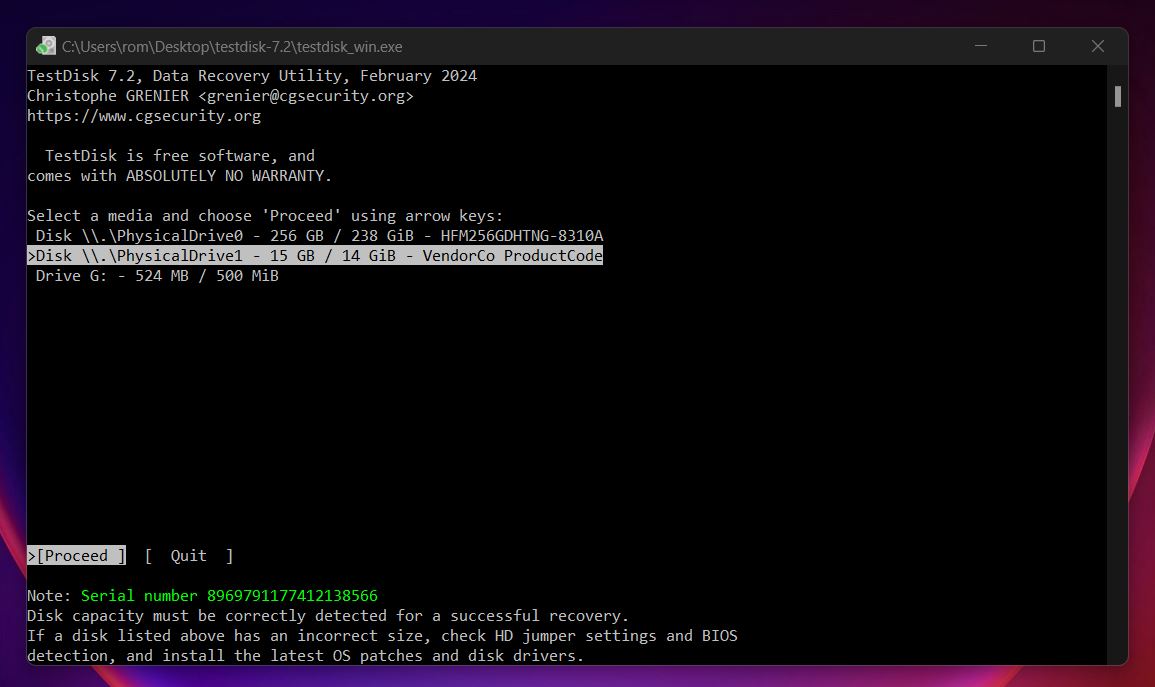
- Choose Create to start a new log (or No Log if you
prefer), then select the affected drive using the arrow keys and press
Enter.
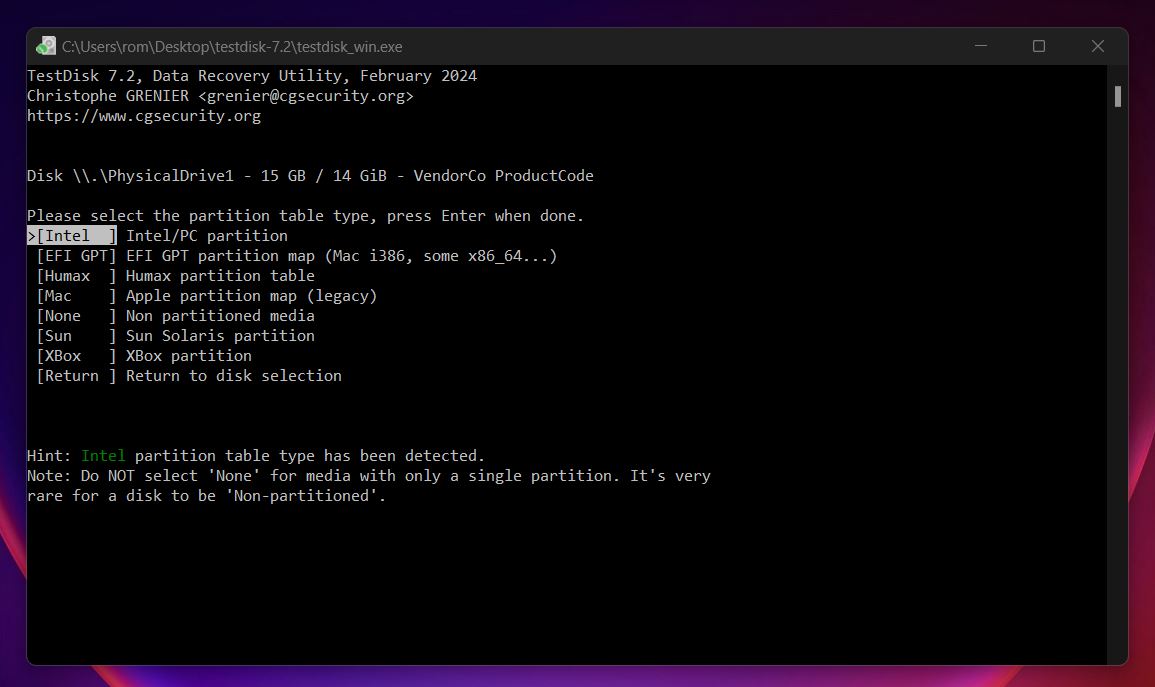
- Choose the partition table type. TestDisk usually detects this automatically. For most
modern drives, stick with [Intel] for MBR or [EFI GPT] for
newer systems.
- Select Analyse. TestDisk will scan the disk for the partition structure and
show current entries. Press Enter to proceed.
- Select Quick Search and press Enter. If the lost partition shows up in the list (you’ll usually see the label or type like NTFS, FAT32, etc.), highlight it.
- Press P to list files in the partition. If you see your folders and files, that’s a good sign (your data is still there).
- If everything looks correct, press Enter, then choose Write to restore the partition to the disk.
- Confirm the write when prompted, then exit TestDisk.
After you're done and TestDisk writes the recovered partition to the disk, you might need to reboot your computer for the changes to take effect. Sometimes the new partition shows up right away in File Explorer, but other times Windows needs a restart to fully recognize and mount it.
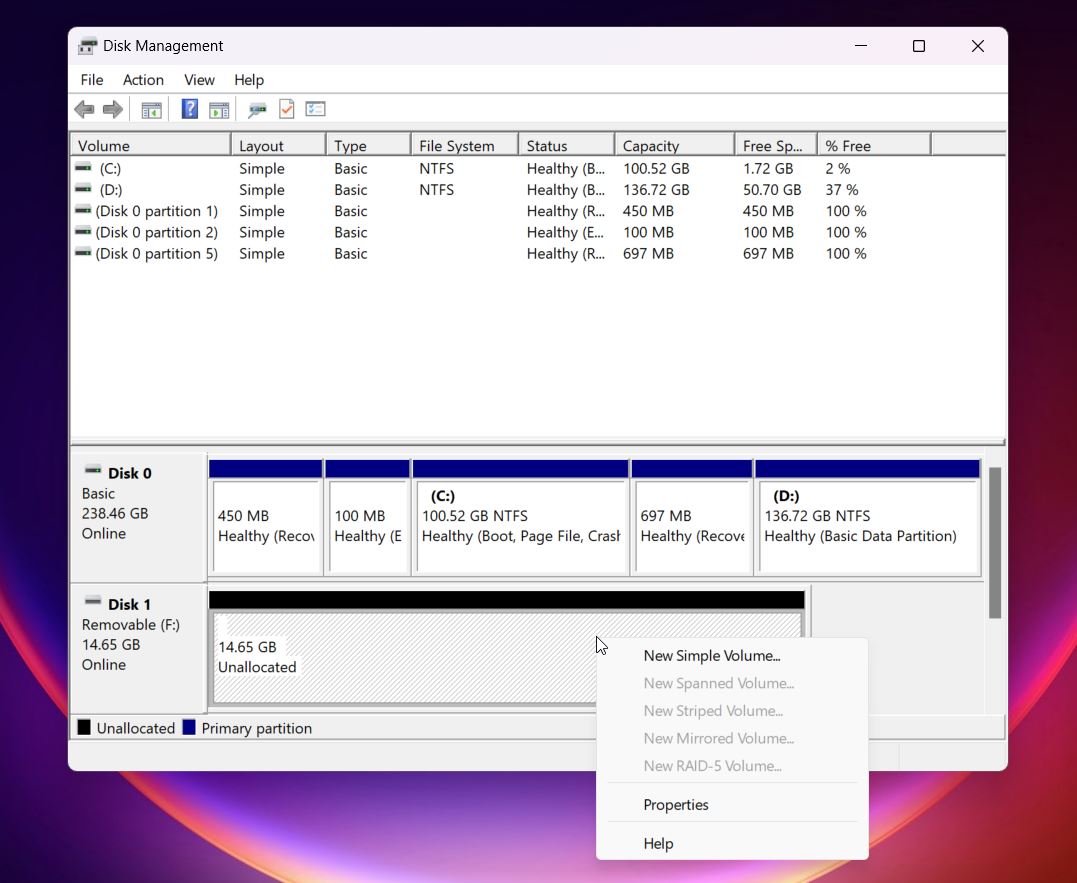
Method 4: Recover a Deleted Partition Using Disk Management
📁 When to use: Try this if you don’t need to recover the old data, or already pulled it out using Method 2. This is more about making the drive usable again.
If the partition was deleted but the space still shows as Unallocated in Disk Management, you might be able to bring it back with just a few clicks. This method will restore access to the space by creating a brand-new partition, but it won’t bring back your old files, folder structure, or anything that was previously stored there. It’s a clean start.
⚠️ Heads up. This doesn’t restore your old files. If you format over the space without recovering anything first, it may overwrite important data. Only use this method after you’ve finished recovering what you can, or if you’re 100% sure there’s nothing worth saving.
Here’s how to do it:
- Hit Win + X and choose Disk Management, or search
“Create and format hard disk partitions” in the Start menu.

- Look for the drive that shows a black bar on top and the label Unallocated. That’s the one with the deleted partition.
- Right-click the unallocated space and choose New Simple Volume.
- Go through the New Simple Volume Wizard. You can accept the default size and drive letter,
or set your own.

- When you get to the formatting step, choose NTFS or exFAT
depending on your use case. Stick with Quick Format unless you’re
wiping the drive on purpose.
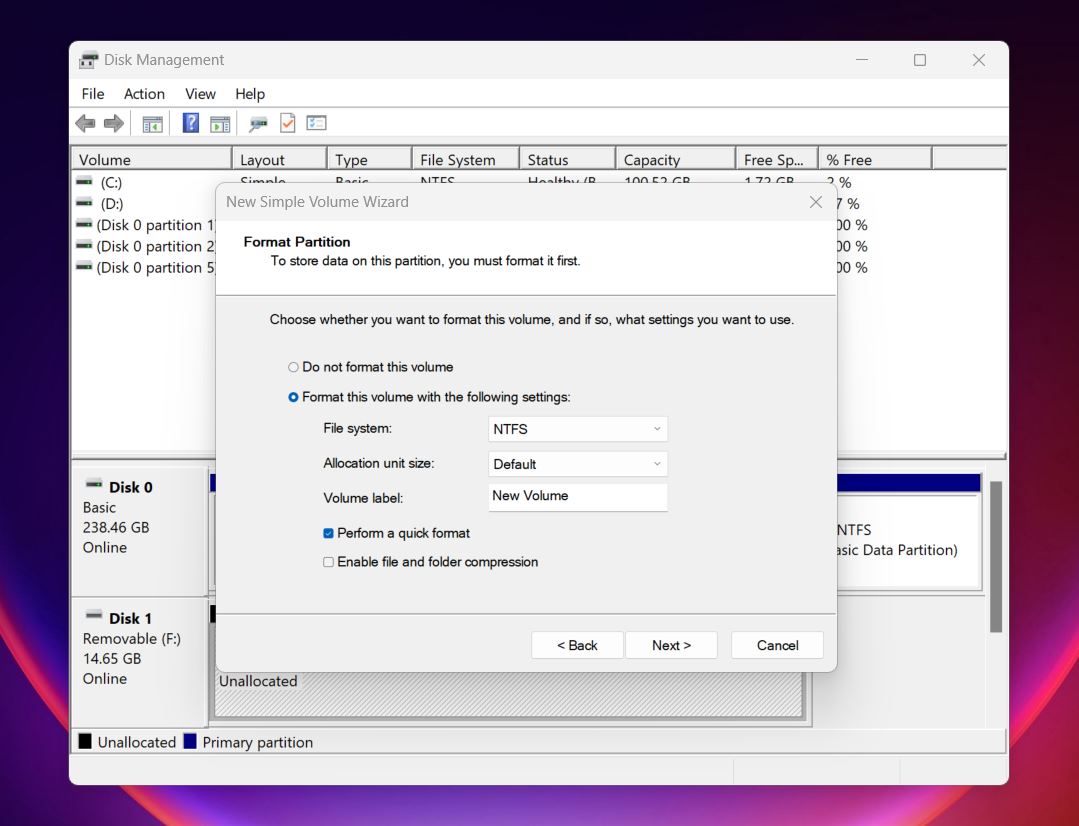
- Click Finish, and Windows will create a new partition. It’ll now show up in File Explorer as a usable drive.
If you don’t see unallocated space or the deleted partition, open the Action menu in Disk Management and select Rescan Disks, as covered in Microsoft’s official guide. This makes Windows recheck all connected drives and often reveals partitions or changes that didn’t load properly the first time. It happens sometimes, especially with external drives, but this simple refresh usually fixes it fast.
Bottom Line
We’ve seen a lot of cases like this: accidentally deleted partitions, sudden "Unallocated" drives, vanished partitions after a setup gone sideways. Most of the time, it’s not hardware failure. People delete the wrong partition while trying to install Windows. They click through Disk Management too fast. Or a third-party tool messes with the partition table. It happens. And more often than not, recovery works, if you move fast and avoid making things worse.
To recap, there are basically two ways to handle deleted partition recovery.
- You can recover your files from the lost partition using a data recovery tool like Disk Drill, which we covered earlier. Once your files are safe, you can use built-in Windows tools like Disk Management to create a new partition and make the drive usable again. This route focuses on saving your data first, then rebuilding the structure from scratch.
- Or, you can try a full partition recovery using third-party tools like TestDisk. This method aims to restore the partition itself, so it reappears in File Explorer with everything still in place. It’s a harder road and comes with no guarantees, especially if the file system is damaged or overwritten. But when it works, it saves you a lot of time and effort.
Both paths can work, and honestly, you don’t have to lock yourself into one approach. If the files on that partition matter to you, we always recommend starting with data recovery first. That way, if your data’s still there, you’ve got it backed up no matter what happens next.
Once your files are safe, you can take your time and try TestDisk or rebuild the partition in Disk Management without stressing about doing more damage. We’ve seen plenty of people jump straight into “fixing” the partition and accidentally make the situation worse.
So yeah, grab your files first. It gives you a safety net, and from there, you’ve got options.