A Complete Guide to FAT32 Data Recovery
If you lost files from your FAT32 device, whether it’s a flash drive, an SD card, or even an older hard drive, recovery is not impossible. It depends on a bunch of factors, sure, but in practice, it’s often doable.
That’s exactly what we’re covering today. We’ll walk you through the FAT32 data recovery process step by step, complete with screenshots and real-world tips, so you’ll know exactly what to do and what to expect.
💡 Note. FAT32 has been around since 1996. Plenty of people wonder why FAT32 is even in use anymore. But the answer’s pretty simple: compatibility. FAT32 works on basically anything: Windows, macOS, Linux, Android, cameras, even Teslas. It’s the default format for many flash drives and SD cards up to 32 GB, and it’s still used on many external drives for compatibility. But it’s also got limitations. For example, it can’t handle files larger than 4 GB, and it doesn’t have the journaling features of newer file systems like NTFS.
When Can You Recover Data from FAT32 Drives?
First things first, let’s set some realistic expectations.
We’re not here to overpromise or give false hope. FAT32 file recovery works surprisingly often, but not in every case. Whether or not you get your data back depends on how you lost it, what you did after it disappeared, and the overall health of the device.
- If you deleted files recently (and haven’t saved anything new to the drive), recovery chances are solid.
- Same goes for quick formats, FAT32 doesn’t wipe data immediately when you delete something. Instead, it just marks the space as “free,” which means recovery tools can often find and restore those files, as long as nothing else has overwritten them. Quick formats don’t touch the actual data blocks; they just reset the file allocation table (FAT). And in many cases, that’s recoverable.
- If you ran a full format, your chances are basically zero. Unlike a quick format, which just wipes the file system references, a full format actually overwrites the entire volume with zeros. That means the original files are gone at the block level, not just hidden or dereferenced. Recovery tools can’t bring back what’s already been overwritten.
- Physical damage? That’s trickier. If your drive doesn’t show up anywhere (not in File Explorer, not in Disk Management), it’s probably dead, and recovery software won’t help. But if it does show up in Disk Management (even without a drive letter), that’s good. You can still scan it. Even better, create a full disk image first and scan that instead (it’s safer). We’ll explain how to do that later on.
Also, FAT32 doesn’t handle fragmentation well. It’s more likely than newer systems like NTFS to break a file into scattered pieces. That makes recovery harder, since those fragments might not all be recoverable or even still intact. It's another reason why FAT32 recovery can be hit-or-miss.
Tips to Increase Your FAT32 Recovery Success
If you want to boost your odds of getting those files back from FAT32, follow these simple rules:
- Stop using the drive immediately. Don’t open it, don’t copy new stuff to it, just unplug it (if it’s an external device) until you’re ready to scan.
- If the drive seems unstable or slow, create a full disk image and scan that instead.
- And whatever you do, don’t recover files back onto the same drive. That’s how you accidentally overwrite the very data you’re trying to save.
If you follow just those three, you’re already ahead.
How to Recover Data from FAT32 Devices
Now let’s get to the practical steps. For this part, we’ll demonstrate the recovery process using our partner product, Disk Drill. It’s one of the most capable FAT32 recovery tool options out there, and it’s packed with useful features that make recovery more reliable, even in tricky situations.
Disk Drill uses several scan types to recover data from FAT32 drives:
- Quick Scan works best when files have been recently deleted, say, using Shift+Delete or after emptying the Recycle Bin. It checks the file table, so it’s fast and usually brings files back with names and folder structure intact.
- Deep Scan is meant for more serious cases, like when the drive was formatted or the file system got corrupted (for example, if the FAT32 partition suddenly shows as RAW). It still tries to use file system records, even damaged ones, which can sometimes restore names and folders.
- Then there’s Signature Scan, which doesn’t rely on the file system at all. Instead, it looks for known file types based on binary patterns; useful for badly damaged or reformatted drives, though filenames won’t come back, and results can vary if the disk was heavily fragmented.
- And if your files were deleted directly from a camera that uses FAT32 (like a Canon or Nikon DSLR), Disk Drill also includes an Advanced Camera Recovery mode that’s specifically tuned for fragmented media files lost this way.
Quick Scan, Deep Scan, and Signature Scan are all part of the same automatic process in Disk Drill; you won’t need to select anything manually. We just wanted to break them down so you know what’s happening under the hood.
Step 1: Download Disk Drill (But Don’t Install It on the Problem Drive)
Before anything else, grab the latest version of Disk Drill from the official website. But here’s the important part - do not install it on the FAT32 drive you’re trying to recover from. That could overwrite the deleted files and make recovery impossible. Instead, install it on your computer’s internal drive or a different external drive that’s not involved in the data loss. Once it’s set up, you’re ready to move on.
💡 Note. Disk Drill works on both Windows and macOS, so you’re covered no matter what platform you’re using. It’s free to download, and on Windows, you can recover up to 500 MB of data for free, no upgrade required. That’s more than enough for photos, documents, or a few important videos if you’re testing things out. And if you decide to upgrade to PRO, you’ll get a 2-for-1 license that works on both platforms.
Step 2: Connect Your FAT32 Device and Launch Disk Drill
Now plug in the FAT32 device you want to recover files from. This could be a flash drive, SD card, or external hard drive. Open Disk Drill, and it’ll automatically scan for connected storage devices.
Your FAT32 drive should show up in the list, even if it’s not showing in File Explorer. If you're unsure, open Disk Management (on Windows) or Disk Utility (on Mac) to confirm the drive is being recognized at the hardware level.

As long as the system sees it, Disk Drill should be able to scan it.
Step 3 (Optional Step for Unstable Drives): Create a Byte-for-Byte Backup
If your FAT32 drive is acting slow, freezes, or has shown signs of corruption, it’s a smart move to create a full disk image before scanning. This gives you a safe copy to work with, so if the drive fails mid-recovery, you won’t lose your only shot.
To do it in Disk Drill, head to Byte-to-byte Backup under Extra Tools, select your FAT32 device, and then choose Create backup.
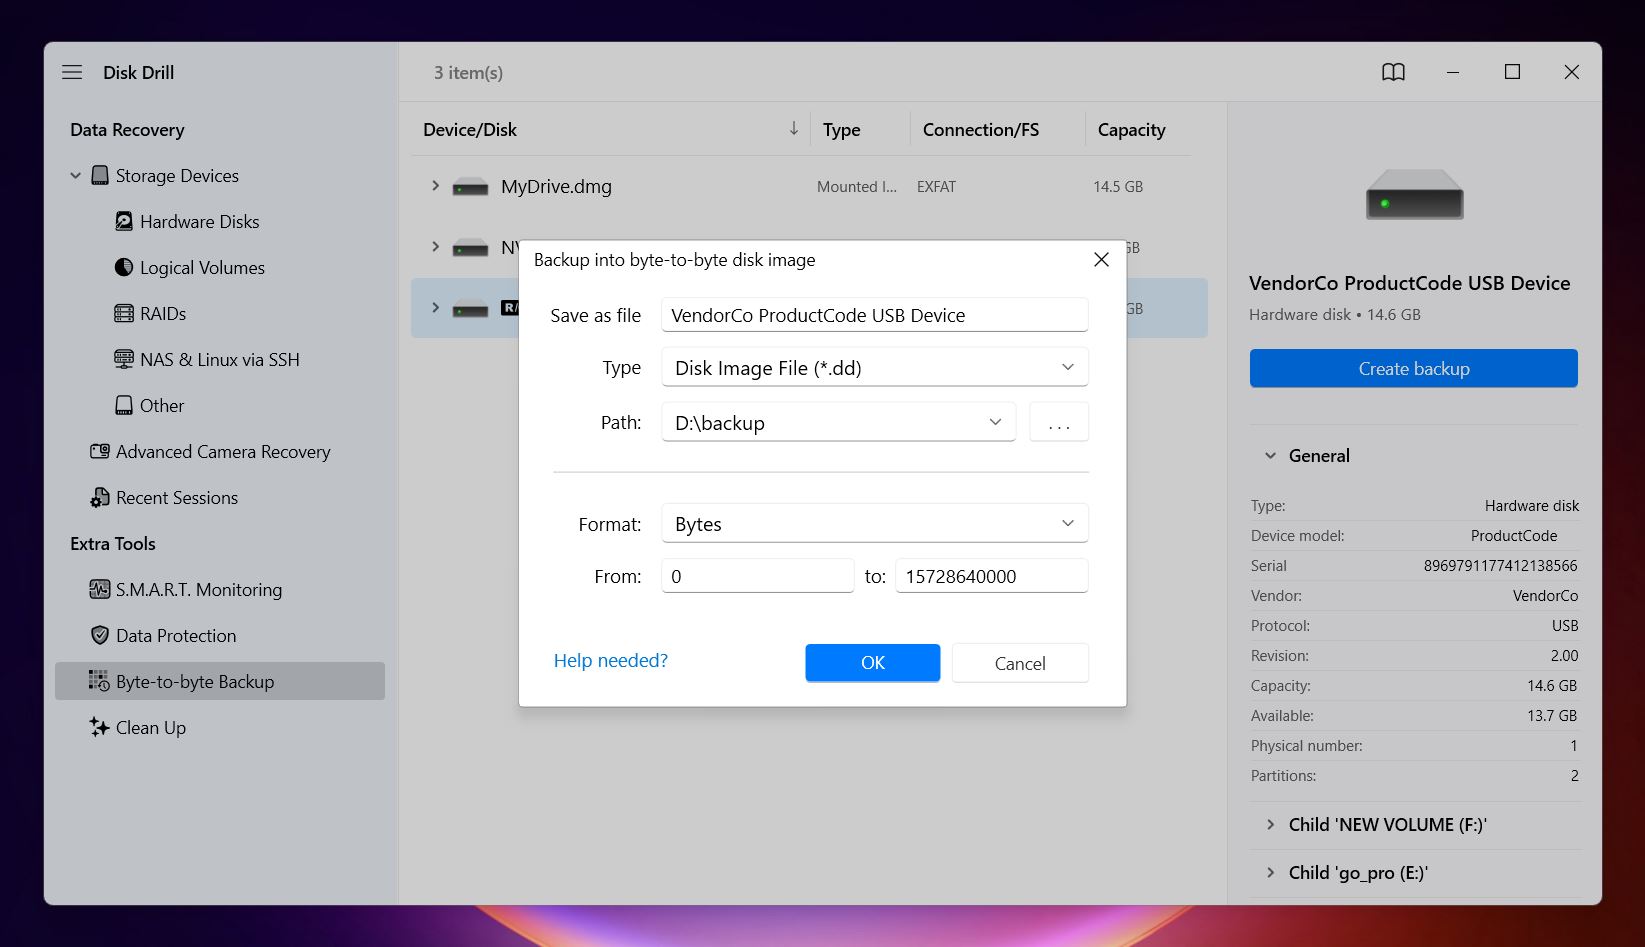
Make sure the destination has enough space (at least equal to the size of the drive). Disk Drill 6 uses smart tech here: it skips over damaged sectors during the first pass, tries them again later, and even adapts block sizes for better results. Once the image is ready, mount it and scan that instead of the original drive. It takes a bit longer, but it’s a safer route.
Step 4: Start the Scan
💡 Note. If you made a disk image earlier, you don’t need to scan the original device. Just click Attach disk image, browse for the image file, and double-click it. Disk Drill will mount it and treat it like any other drive, ready to scan.
Click Search for lost data next to your FAT32 drive (or its image). You’ll see two scan options: Universal Scan and Advanced Camera Recovery.

If you’re trying to recover deleted files from FAT32, say the drive was connected to your computer and you accidentally deleted something or ran a quick format, go with Universal Scan. That’s the go-to for most standard deletions or file system damage.
But if the files were deleted directly from a camera, or never saved properly due to a glitch or interrupted recording, Advanced Camera Recovery is worth a shot first. It’s specifically designed to handle footage lost on FAT32-formatted memory cards used in cameras.
Start with whichever fits your situation. You can always try the other one if your files don’t show up right away.
Step 5: Let the Scan Run and Explore the Results
As the scan runs, Disk Drill automatically sorts the files it finds into categories like Pictures, Video, Audio, Documents, Archives, and Other Files. You don’t need to wait for it to finish; you can browse the results in real time.
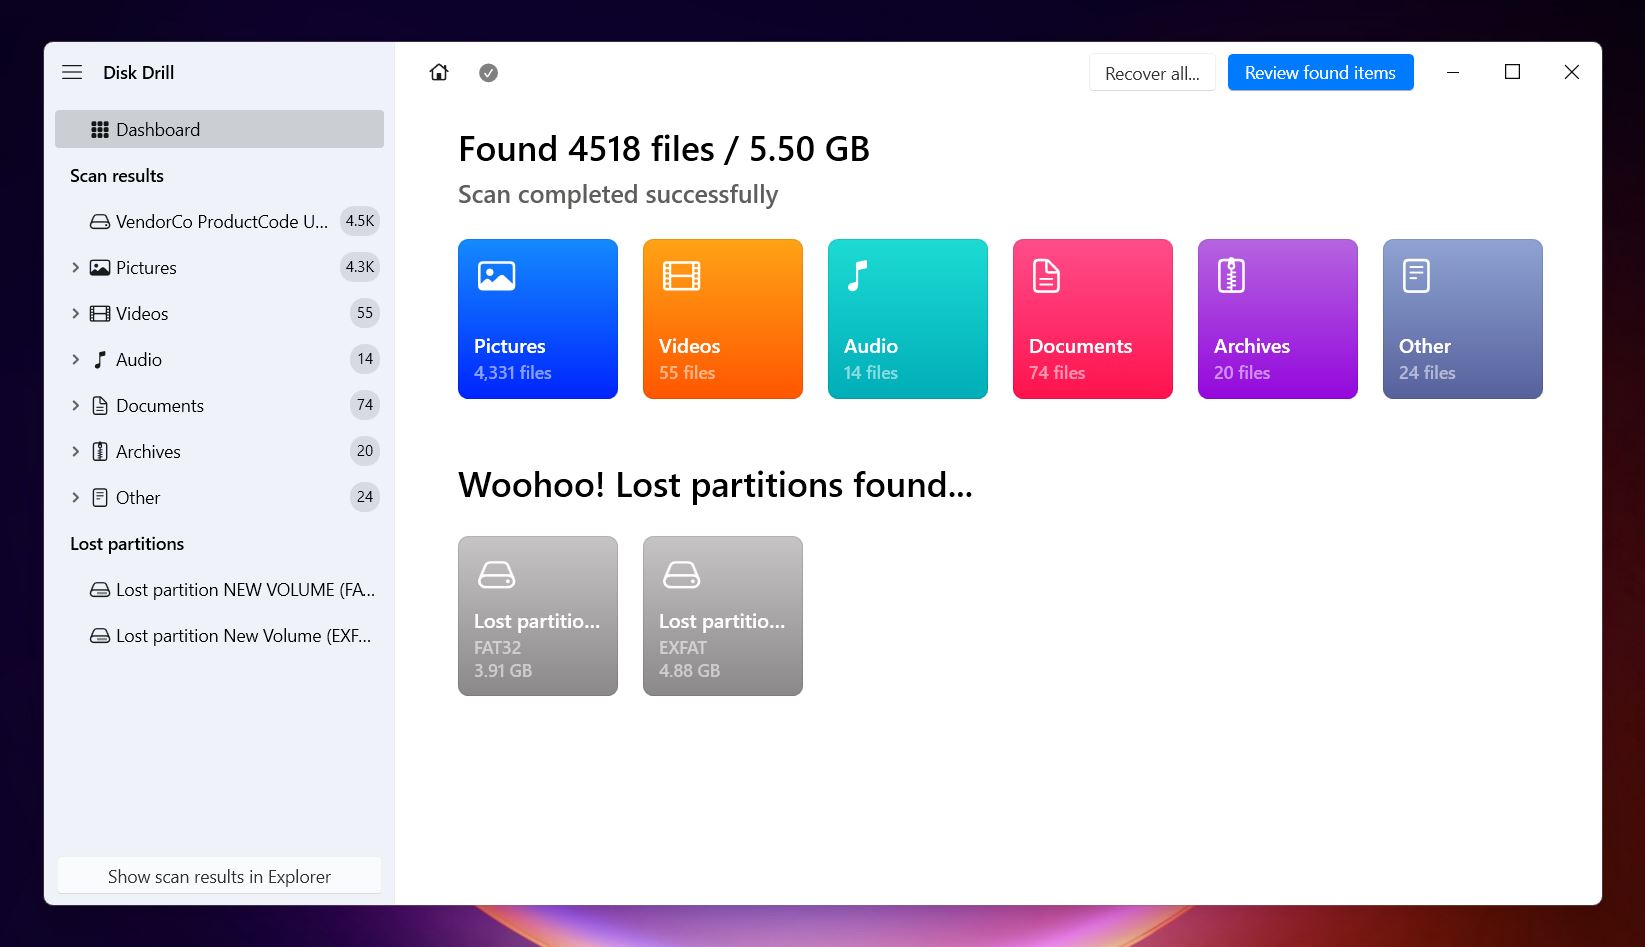
💡 Note. Disk Drill can also detect lost partitions, including FAT32 volumes that no longer show up in File Explorer. As you can see in the screenshot above, it clearly identified a lost FAT32 partition (3.91 GB) along with another exFAT volume during a scan. If you want to check what files were found there, just click on the partition.
Click Review found items to start checking what’s already been discovered. Want to zero in on something specific, like lost videos - click directly into the Video category. Or, if you’d rather grab everything at once when the scan completes, hit Recover All and choose a safe location to save the files.
Step 6: Filter and Organize What You See
Once you’re inside the results screen, Disk Drill splits files into three main groups:
- Deleted or Lost. Files that were removed or disappeared after formatting or deletion.
- Reconstructed. Files Disk Drill recovered using signature scan (based on file structure, not file names).
- Existing. Files still intact but maybe not visible through normal browsing.

At the top, you’ll find ways to customize how results are shown. Use Tree View to browse through the folder structure (great if names were preserved), or Icons View to see visual previews. You can filter results further by choosing to view: Only Deleted, Existing, or All Files. You can also hide duplicates or show hidden system files.
There’s a search bar too, super useful if you remember a file name or extension. For example:
- Type "report" to find files with that word in the name.
- Type ".jpg" to see only JPEG images.
- Type "doc" to surface Word documents or files with “doc” in the name.
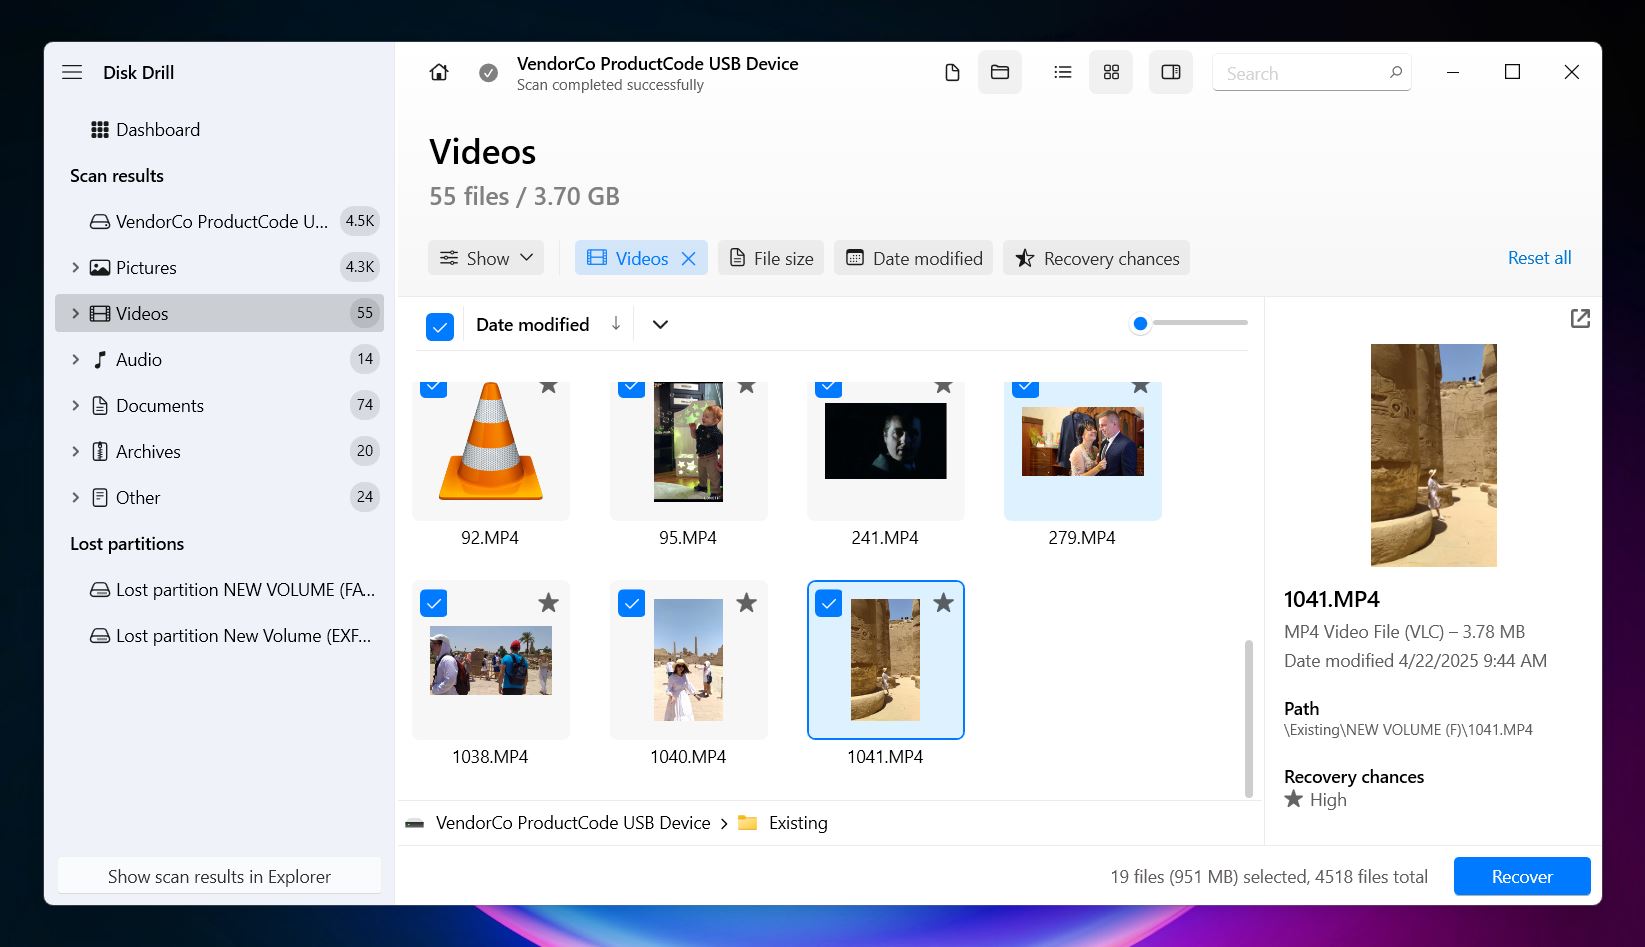
Step 7: Preview Files Before Recovering
Click on any file to view a preview on the right. Disk Drill can display photos, videos, PDFs, Office files, and more, either through native OS support or using installed apps. You can also open a preview with the eye icon or right-clicking the file and selecting Preview.
Need to check file structure? Use Hex View to look at the raw data in hexadecimal format. That’s more of a pro-level tool, but it can help verify file integrity.
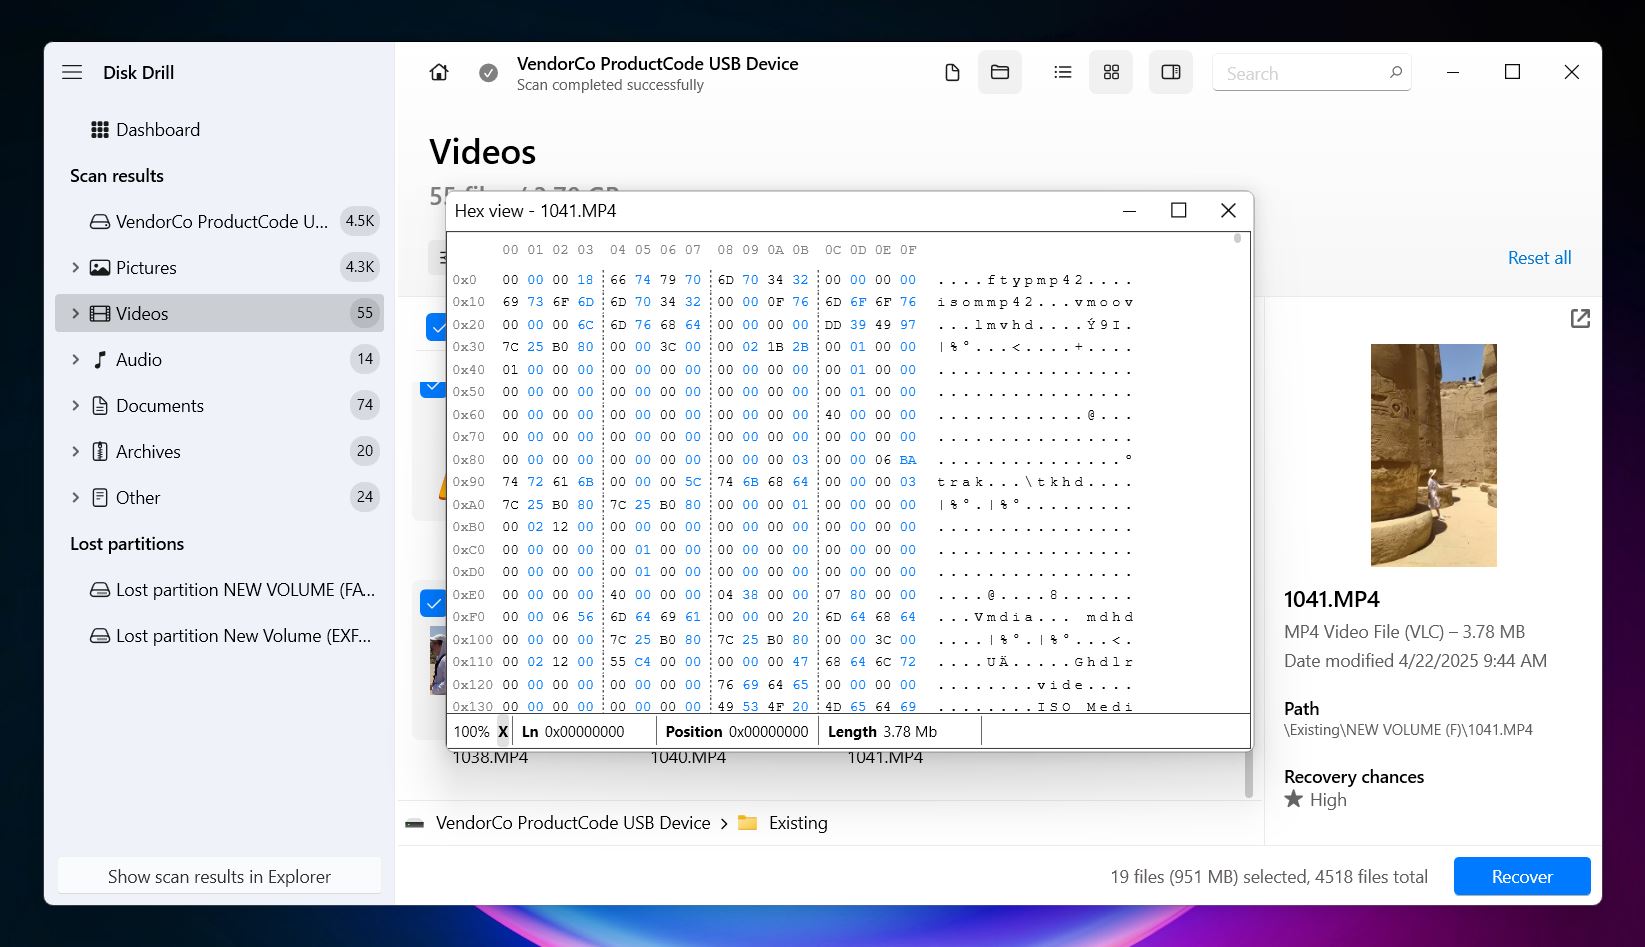
You’ll also see Recovery Chances next to each file:
- High (file is likely intact and fully restorable)
- Average (could work, but might have partial damage)
- Low (recovery is unlikely, file may be corrupted)
Step 8: Select and Recover Your Files
Once you’ve chosen what to recover, click the Recover button. Disk Drill will ask where to save the recovered data.
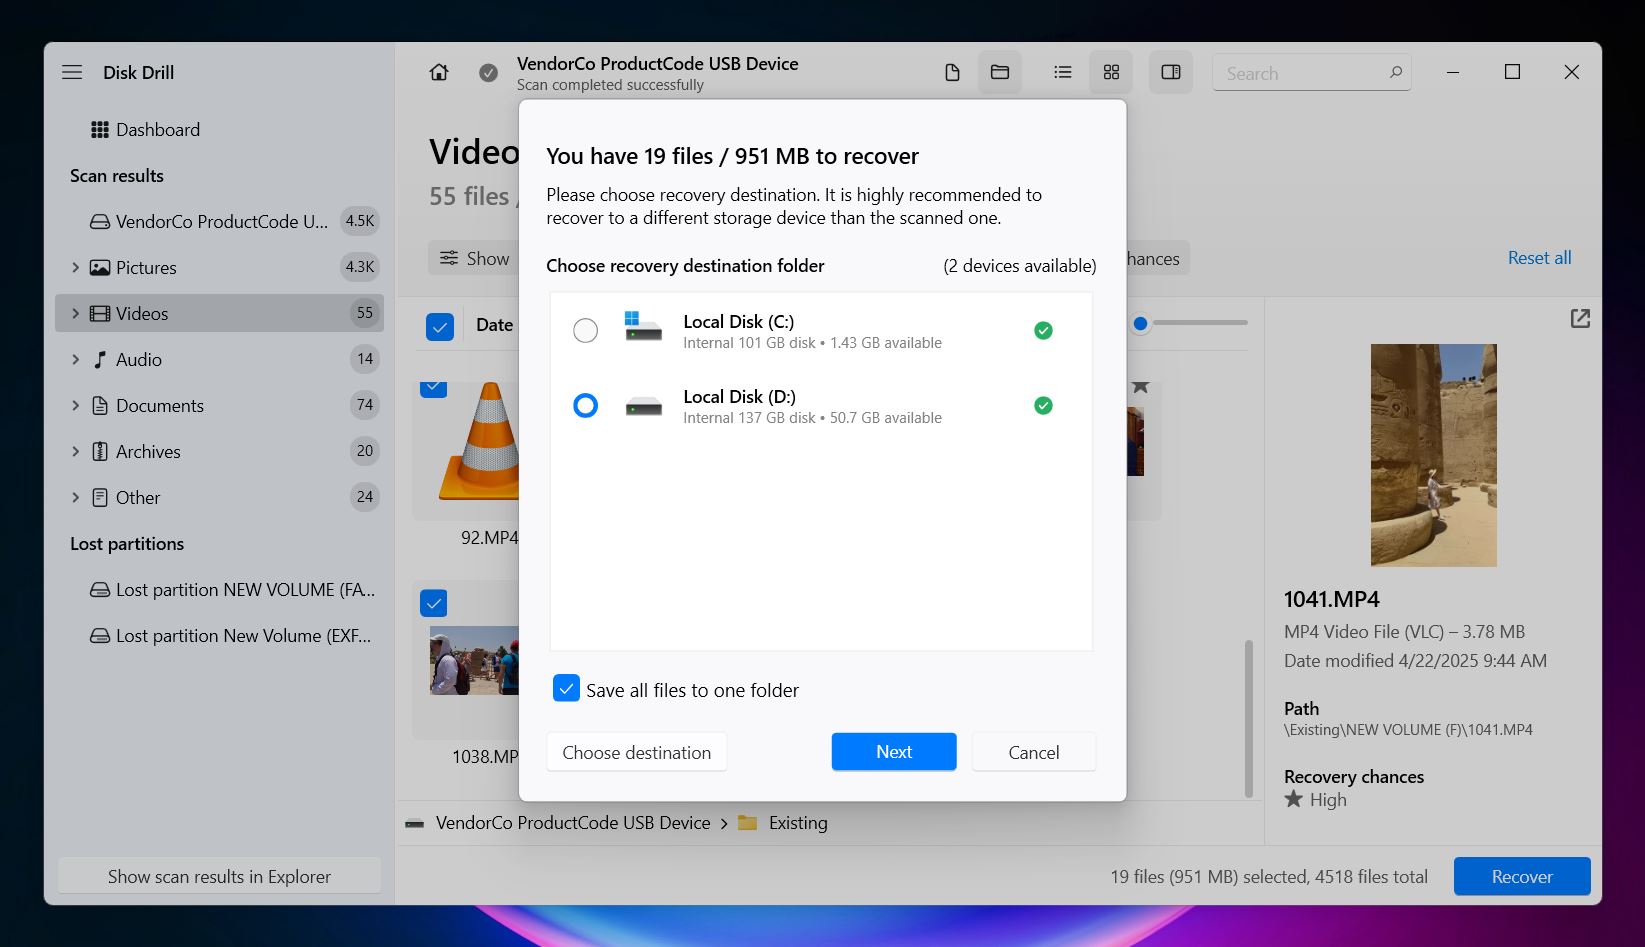
⚠️ Important! Don’t save it back to the same FAT32 drive. Pick a different location to avoid overwriting anything still recoverable.
After recovery, Disk Drill will offer to open the folder in File Explorer. Check your files and make sure they open and look right. That’s it. Your data’s back.
How to Recover an Entire Missing FAT32 Partition with TestDisk
Another tool we want to cover is TestDisk. It’s a free, open-source utility that can be incredibly useful if you accidentally deleted a FAT32 partition or if the drive suddenly shows up as RAW or Unallocated. In these situations, the partition structure itself is usually the problem. And sometimes, TestDisk can fix that and restore access to your FAT32 volume.
Now, to be clear: this can be a long shot. It doesn’t always work, especially if the disk is badly corrupted. In most cases, recovering files with Disk Drill is the safer and definitely easier option. But we still want to include TestDisk here, just in case. For the right scenario, it’s worth trying.
Here’s what TestDisk can do specifically for FAT32 volumes:
- Fix a damaged partition table or recover a deleted partition
- Rebuild the FAT12, FAT16, or FAT32 boot sector
- Recover the FAT32 boot sector from its backup
- Repair or rewrite damaged FAT tables
It works on Windows, macOS, and Linux, and while it uses a text-based interface, it’s more approachable than it looks. If your FAT32 partition vanished completely, this might be the righ tool.
Here’s a basic step-by-step to help you use TestDisk.
Step 1: Launch TestDisk and Select the Drive
Head over to the official website and download TestDisk. You’ll see two versions available: the stable release TestDisk 7.2 (from Feb 22, 2024), and a 7.3-WIP beta (Work In Progress). The beta has a few newer features, but we recommend version 7.2 (it’s the most reliable).
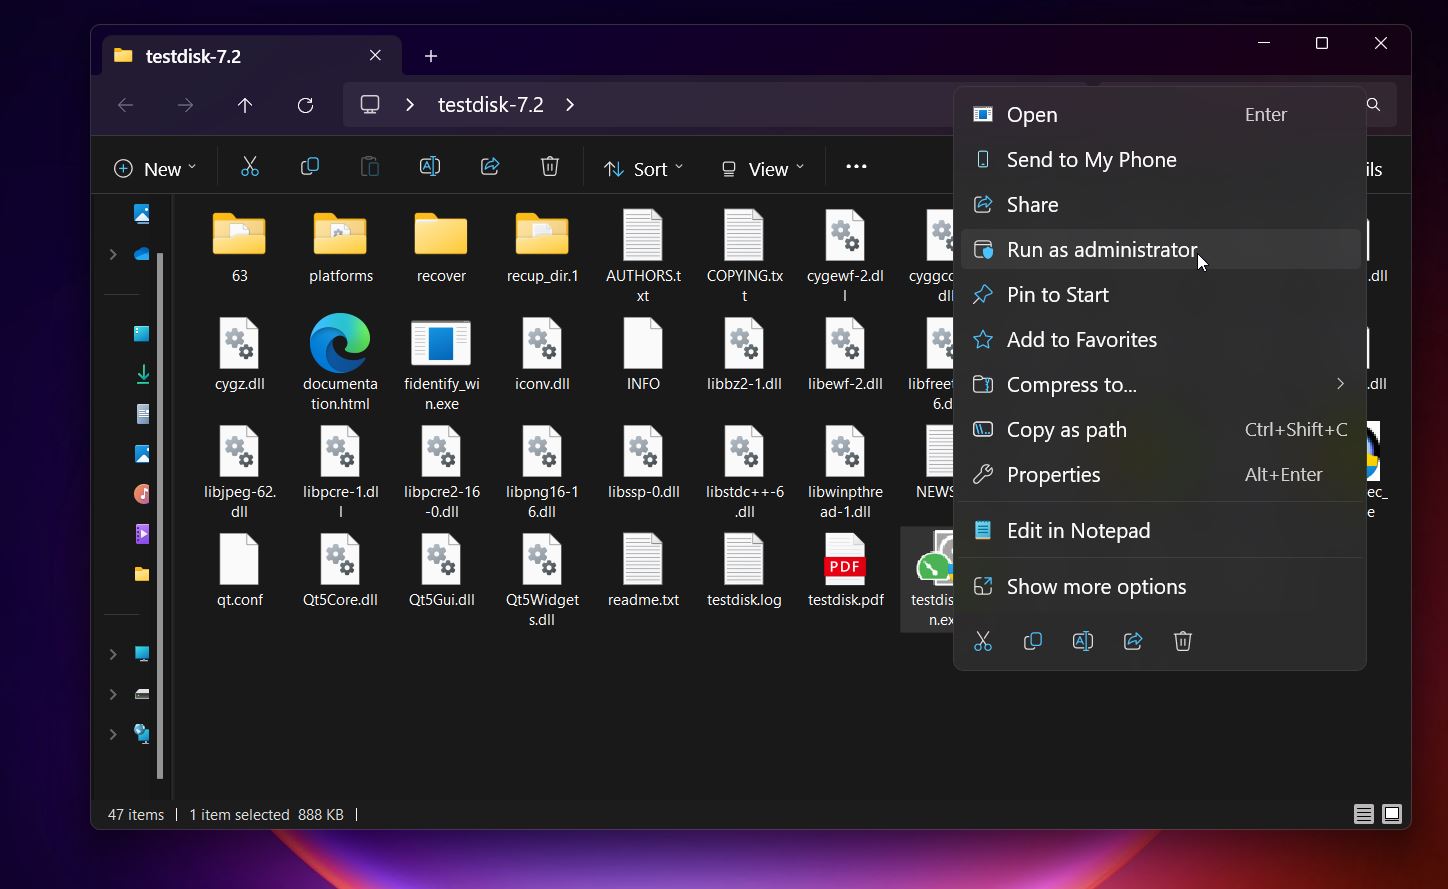
Once downloaded, unzip the archive. No installation is needed. On Windows, right-click testdisk_win.exe and choose “Run as administrator”.
When it starts, TestDisk will ask if you want to create a log. Choose [Create] or [No Log], either is fine for this purpose.
Next, you’ll see a list of storage devices.
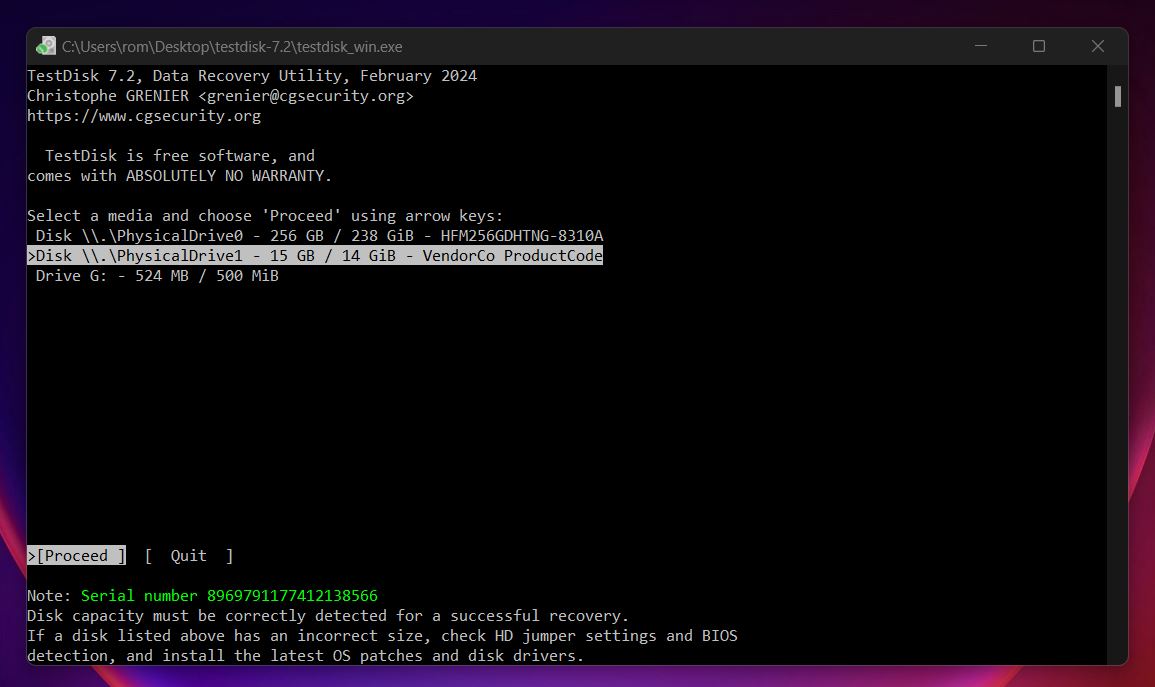
Use the arrow keys to select the entire physical disk where your FAT32 partition used to be, not an individual volume. Look for something like “16 GB / 32 GB” instead of drive letters. Press Enter once selected.
Step 2: Analyze the Disk and Start the Scan
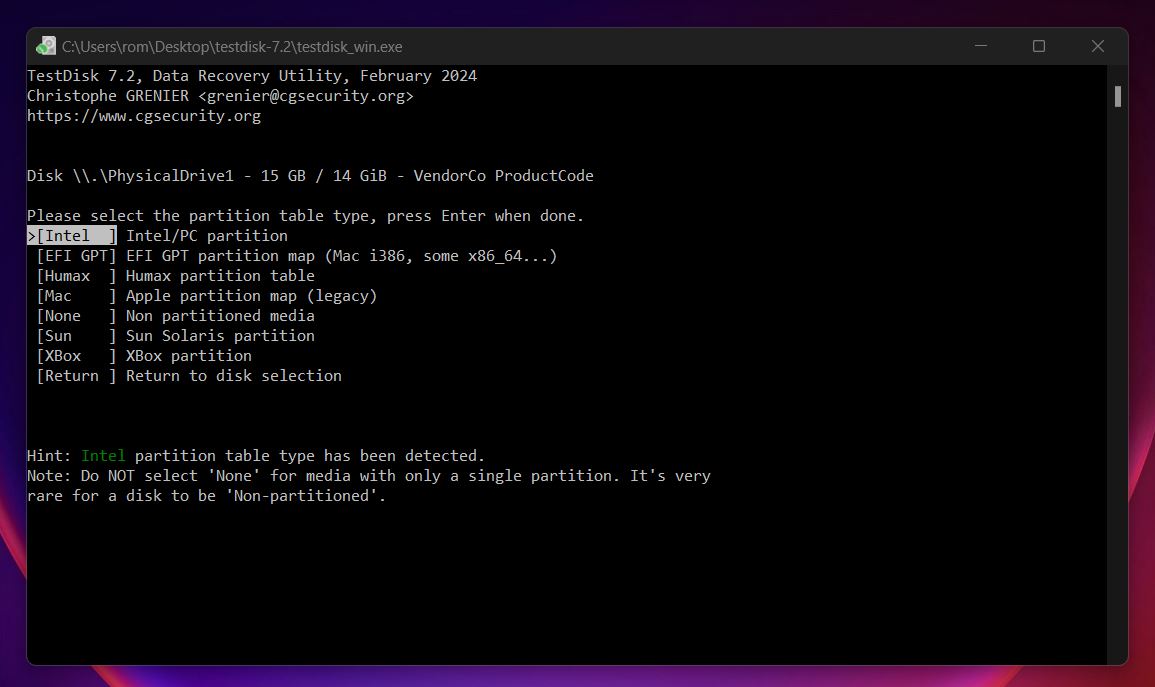
TestDisk will then ask about the partition table type. Stick with the default [Intel] option unless you’re working with a GPT disk and know what you’re doing. Press Enter to continue.
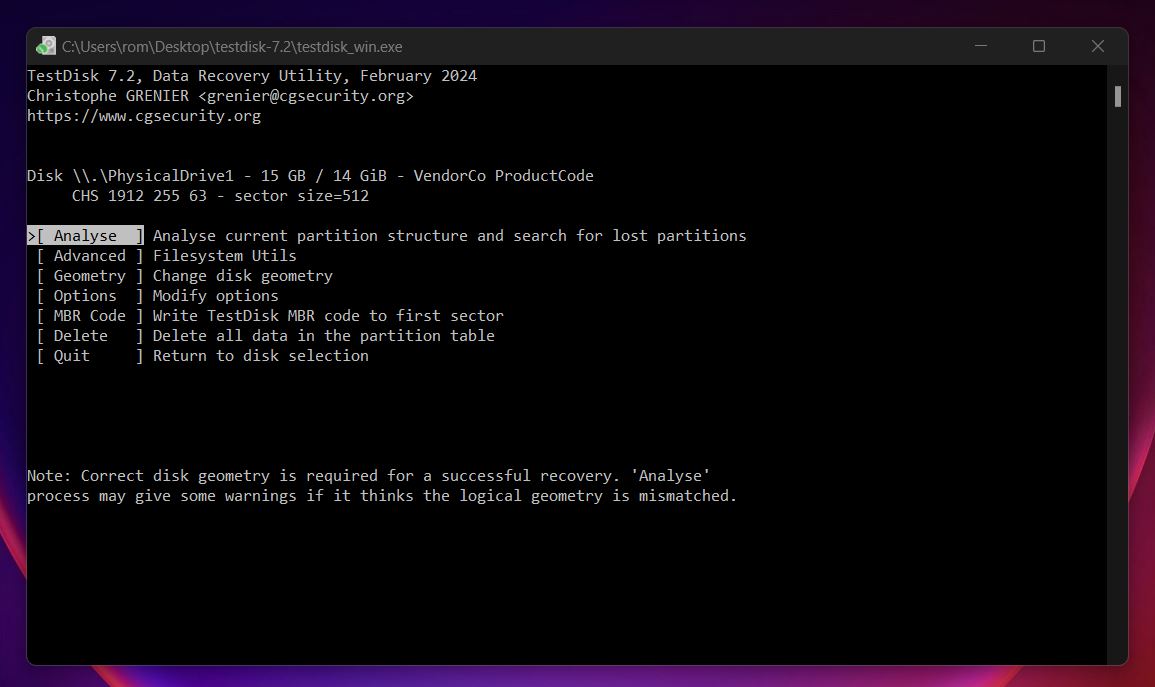
You’ll now see a list of options. Highlight [Analyse] and hit Enter. This tells TestDisk to check the current partition structure and look for lost or deleted partitions.
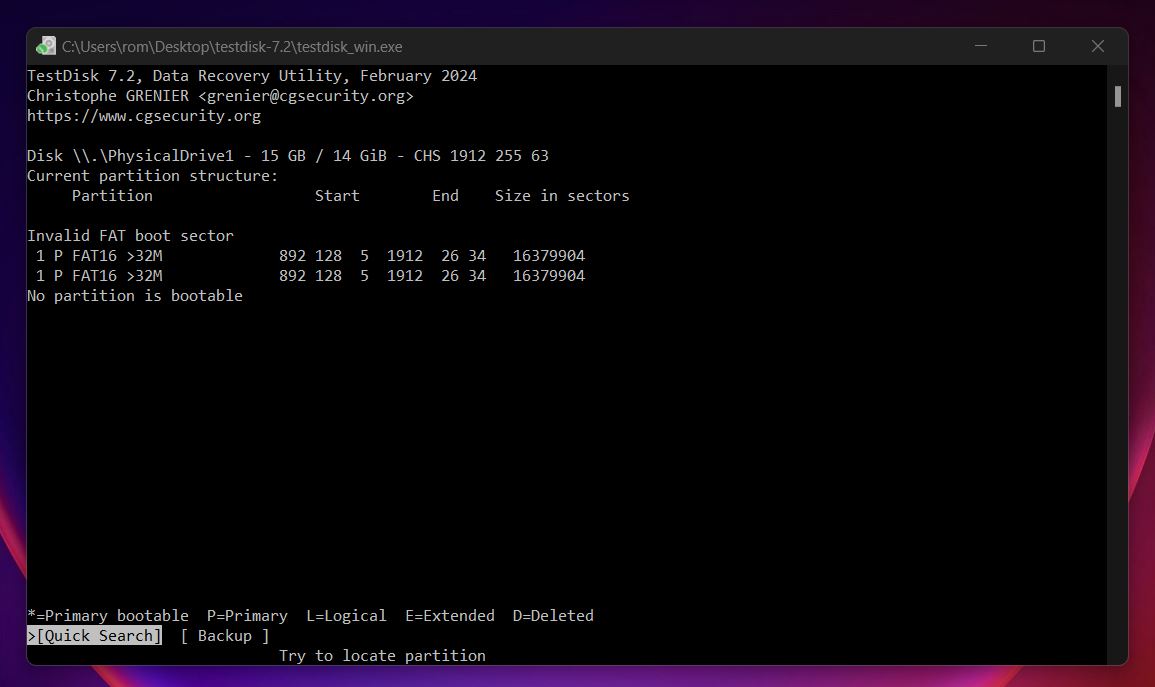
On the next screen, choose Quick Search to begin scanning. This scan usually picks up recently lost partitions. If your FAT32 partition shows up here, great, you’re almost done.
If it doesn’t, don’t worry. You’ll be prompted to continue with a Deeper Search, which scans through the entire disk more thoroughly and takes longer, but it often finds partitions that the quick scan misses. Let it run and keep an eye out for anything labeled as FAT32 or showing the size you expect.
Step 3: Review Found Partitions and Confirm Contents
Once the scan is complete (whether Quick or Deeper) you’ll see a list of partitions TestDisk was able to find. Look for one that matches the size and location of your missing FAT32 partition. If you’re not sure, you can press P on any entry to list the files inside.
If the contents look familiar (folders, filenames, file types you recognize), that’s a good sign the partition is intact and recoverable. Use the arrow keys to navigate, and Q to go back.
Double-check that you're selecting the right one, this is the part where things can feel a bit nerve-wracking. In a Reddit thread on r/datarecovery, a user had TestDisk show them a promising partition layout, but held off on writing changes due to scan errors and no backup. That’s a valid concern. If you’re unsure, don’t rush to restore. Always double-check partition boundaries.
In most straightforward FAT32 cases, though, if the partition lines up and contents look intact, you're probably safe to move on to the next step.
Step 4: Write the Partition and Reboot
Mark the correct partition as Primary, press Enter, and choose Write to restore the partition structure. Reboot your computer or replug the drive, your FAT32 partition should now be back and accessible.
Bottom Line
Data recovery is often easier than people think.
If you need to recover data from FAT32 (or even FAT16), the methods and tools we covered above can give you a real shot. When it comes to accidental deletions, logical issues, quick formats, or file system errors, DIY FAT32 recovery is more than doable.
In our experience, around 7 (or even 8) out of 10 cases end in a successful recovery if the user acts quickly and avoids making things worse.
Of course, if you're dealing with an old FAT32 hard drive that has mechanical damage (like clicking noises, bad heads, and so on) you’re probably not going far on your own. That’s when it’s time to look into professional recovery labs (and yes, those can be expensive).
But in most everyday cases we’ve seen, recovery is totally within reach. You don’t need to be an expert; you just need to be careful.
And if you remember three key things we mentioned earlier, you're already ahead:
- Stop using the drive immediately.
- Scan from a disk image if the drive is unstable.
- Recover files to a different device to avoid overwriting data.
Stick to those rules, and chances are, your files are still there, just waiting to be recovered.