How to Recover Deleted Photos from a Canon Camera for FREE
Lost some photos on your Canon camera? Happens all the time - Canon community forums are packed with people in the same boat. Whether it was a wrong tap or a quick format without thinking, there’s still a solid chance you can get those shots back.
Below, we’ll explain how Canon cameras actually store your photos, what recovery methods make sense, what’s possible (and what’s not), and walk you through a couple of simple steps to recover deleted photos on a Canon camera.
💡 Note. While we’ll mostly talk about photos, the same steps apply if you need to recover deleted videos from a Canon camera too. The tools we cover handle both images and videos.
Can You Recover Deleted Photos on a Canon Camera?
In short, the answer is yes, but there’s a lot of fine print.
- Canon cameras don’t actually erase your photos the second you delete them. What really happens is the file system marks that space on the memory card as “free,” which means your camera can use it for new files. Until that space gets overwritten, your deleted photos are still there, in the background. That’s your recovery window.
- Most Canon cameras today - from the EOS R5 and R6, to older DSLRs like the 80D or Rebel T7i - save everything directly to a memory card. No internal storage. So when you delete a photo or format the card, what you’re affecting is the card itself, not the camera. And that’s good news, because it means you can pull the card out, plug it into your computer, and scan it with recovery software (we’ll show you exactly how in the next section).
- Recovery works best if you act fast. The moment you realize something important got deleted, stop using the card. Every new photo or video you take could overwrite the old data. So don’t make the same mistake we’ve seen other photographers make, put that card away.
So yes, you can recover deleted photos from a Canon camera. But what you do (and when you do it) matters. Let’s recap the key takeaways one more time to really drill it in:
- Stop using the camera or SD card as soon as you realize something’s missing.
- Remove the SD card from your camera and set it aside.
- Use recovery software on a computer to scan the card.
How to Recover Deleted Photos from Canon Camera
Let’s assume you did it the smart way - removed the SD card, and connected it to your computer. Maybe your laptop has a built-in card slot, or you grabbed a basic USB card reader (they’re cheap and work fine). Either way, you're ready to scan the card without risking more damage. Now it’s just a matter of using the right tool and letting it do its thing.
For this guide, we’ll show two tools in action: Disk Drill and GoPro Recovery.
Disk Drill is a partner product that handles a wide range of recovery scenarios, from simple photo deletes to serious card corruption. GoPro Recovery (GPR) is our own software, purpose-built for camera recovery, including GoPros, DSLRs, and mirrorless models like Canon.
Since Disk Drill covers a broader range (including everything GPR does and then some), we’ll start with it first, then show you how our tool works and when it might be the better fit.
Method 1: Recover Deleted Photos from Canon Camera SD Card Using Disk Drill
Disk Drill has been a popular choice for this kind of work for more than a decade. It’s super easy to use, has a powerful recovery engine under the hood, and delivers solid results with Canon file formats. We're talking about Canon RAW files (.CR2 and .CR3), Canon CIFF RAW files (.CRW), and MP4 videos encoded with H.264 or HEVC. If you're shooting in high-res or recording 4K/8K video, that kind of format support really matters.
This becomes especially important when you’re dealing with something more complex than a basic delete. Maybe your SD card got severely corrupted, or the file system vanished entirely. In those cases, your recovery software needs to look beyond the file system and search by file signature.
The fact that Disk Drill can recognize Canon-specific file signatures and works seamlessly with FAT32 and exFAT file systems (which is exactly what Canon cameras use) is one of the main reasons we chose it for this guide.
Now, let’s get into the recovery process itself. Here's how to get deleted pictures back from your Canon camera:
- Head to the official Cleverfiles website and download the latest version of Disk Drill for your OS (whether you're on Windows or Mac, the site should detect your OS automatically and give you the right installer).
- Once the installer finishes downloading, launch it. The installer is straightforward. Follow the prompts, agree to the terms, and let it finish.
- If your computer has a built-in SD card slot, insert the card directly. If not, use an external
USB card reader. As long as your system can detect the card as a connected storage device (with the
correct size showing), Disk Drill will see it too. If you're unsure, open Disk
Management to double-check - look for the drive that matches your SD card's capacity. Even
if it doesn’t show up in File Explorer, Disk Drill can still scan it.
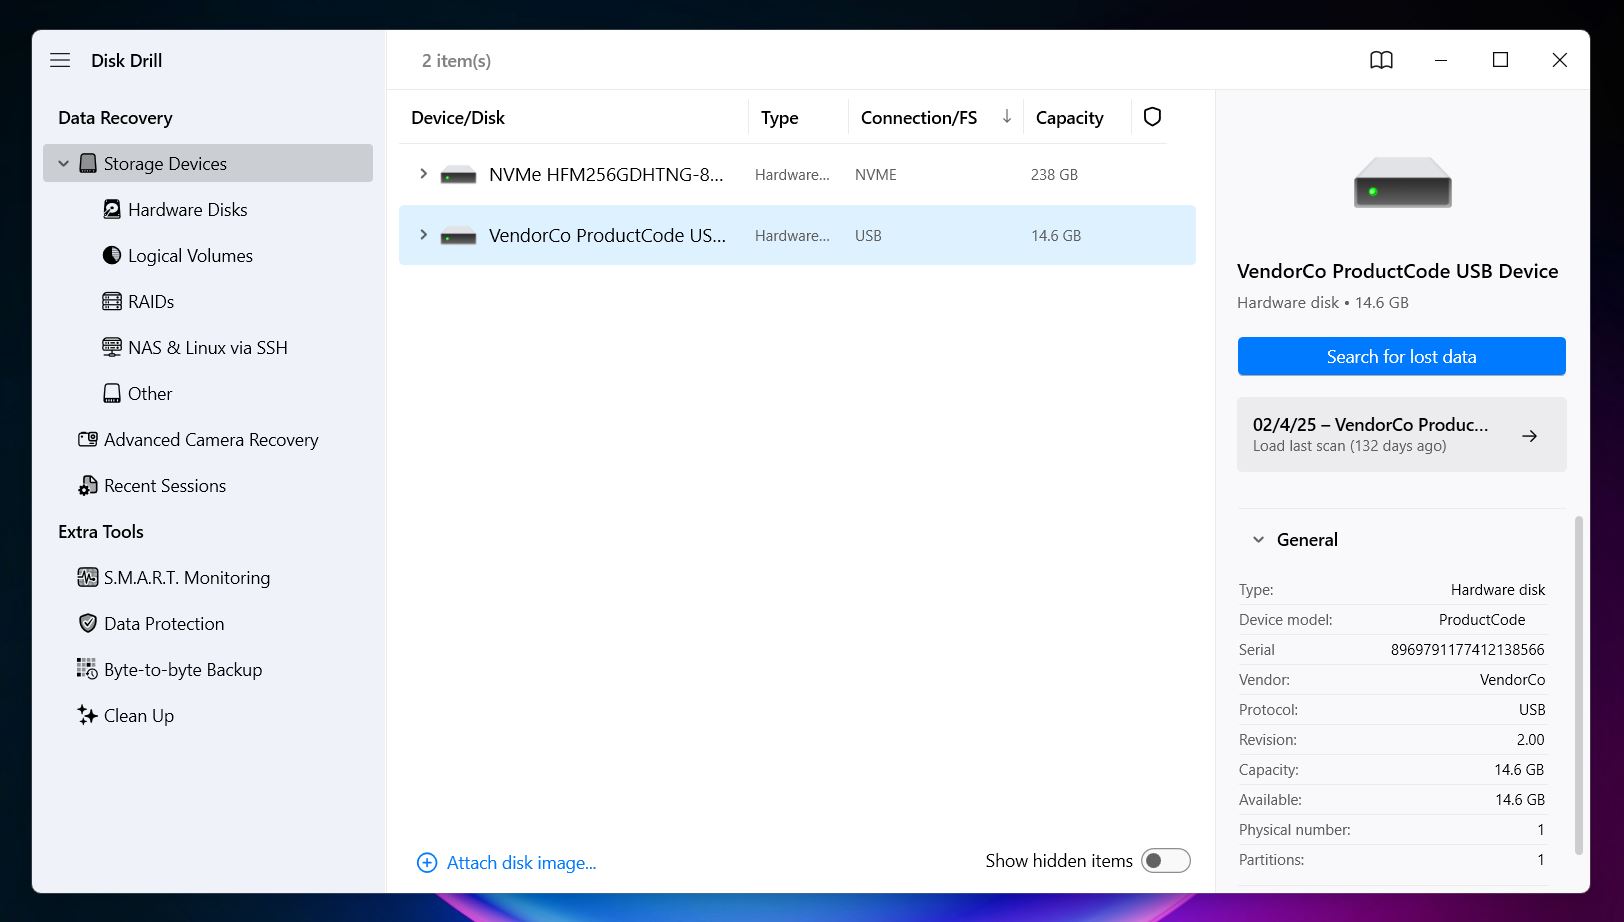
- You’ll see a list of all connected storage devices. Find your SD card and select it. If it has partitions, you can choose to scan one or the entire card. For Canon photo recovery, we recommend scanning the whole SD card.
- Click Search for lost data next to your SD card. Disk Drill will then ask you to
choose a scan mode: Universal Scan or Advanced Camera
Recovery.
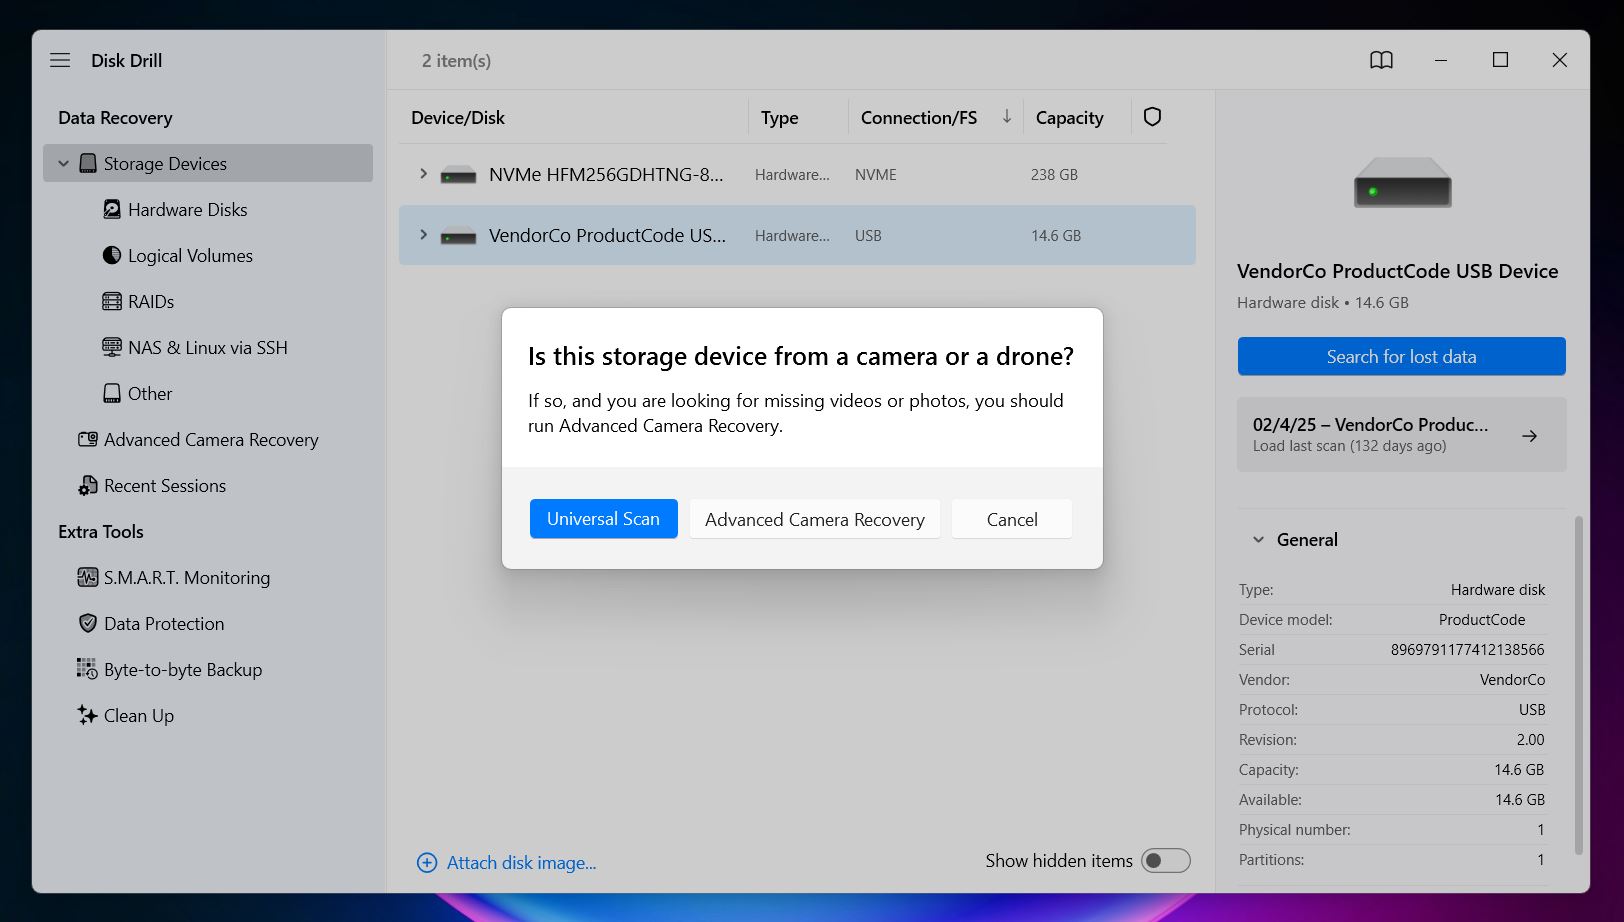 If you recently deleted files and haven’t used the card since, Universal
Scan is all you need - it’s faster and does a great job finding photos and
videos. Advanced Camera Recovery, on the other hand, is built for trickier cases,
like when large video files have been fragmented. This mode can reconstruct Canon multimedia files
that might be scattered across the card. Use it if the standard scan doesn’t find what
you’re looking for.
If you recently deleted files and haven’t used the card since, Universal
Scan is all you need - it’s faster and does a great job finding photos and
videos. Advanced Camera Recovery, on the other hand, is built for trickier cases,
like when large video files have been fragmented. This mode can reconstruct Canon multimedia files
that might be scattered across the card. Use it if the standard scan doesn’t find what
you’re looking for.
- The scan itself can take anywhere from a few minutes to over an hour, depending on your card size
and condition. You can explore recoverable files as they’re being found, or wait until the
scan finishes and click Review found items.
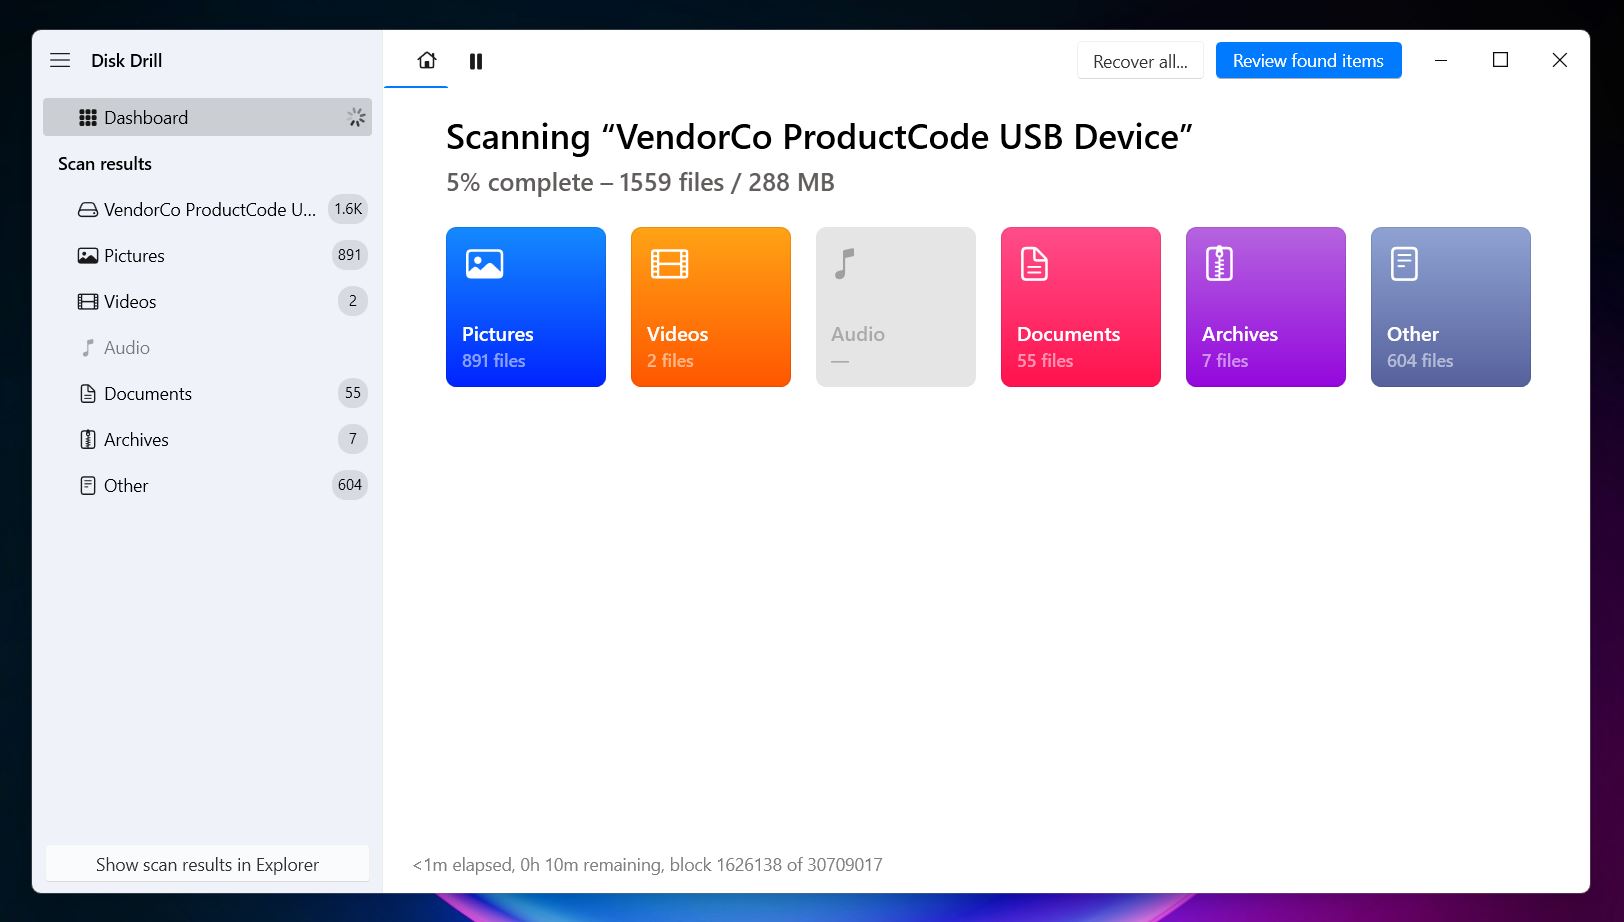
- Once the results load, you’ll see files sorted into categories like Pictures, Video,
Documents, etc. You’ll also see subcategories under Pictures for things like
JPEGs, RAW files, and video formats like MP4. This makes it easier to browse by file type. But if
you’re looking for something specific, use the search bar at the top - type in extensions
like .cr3, .jpg, or .mp4 to narrow things down fast.
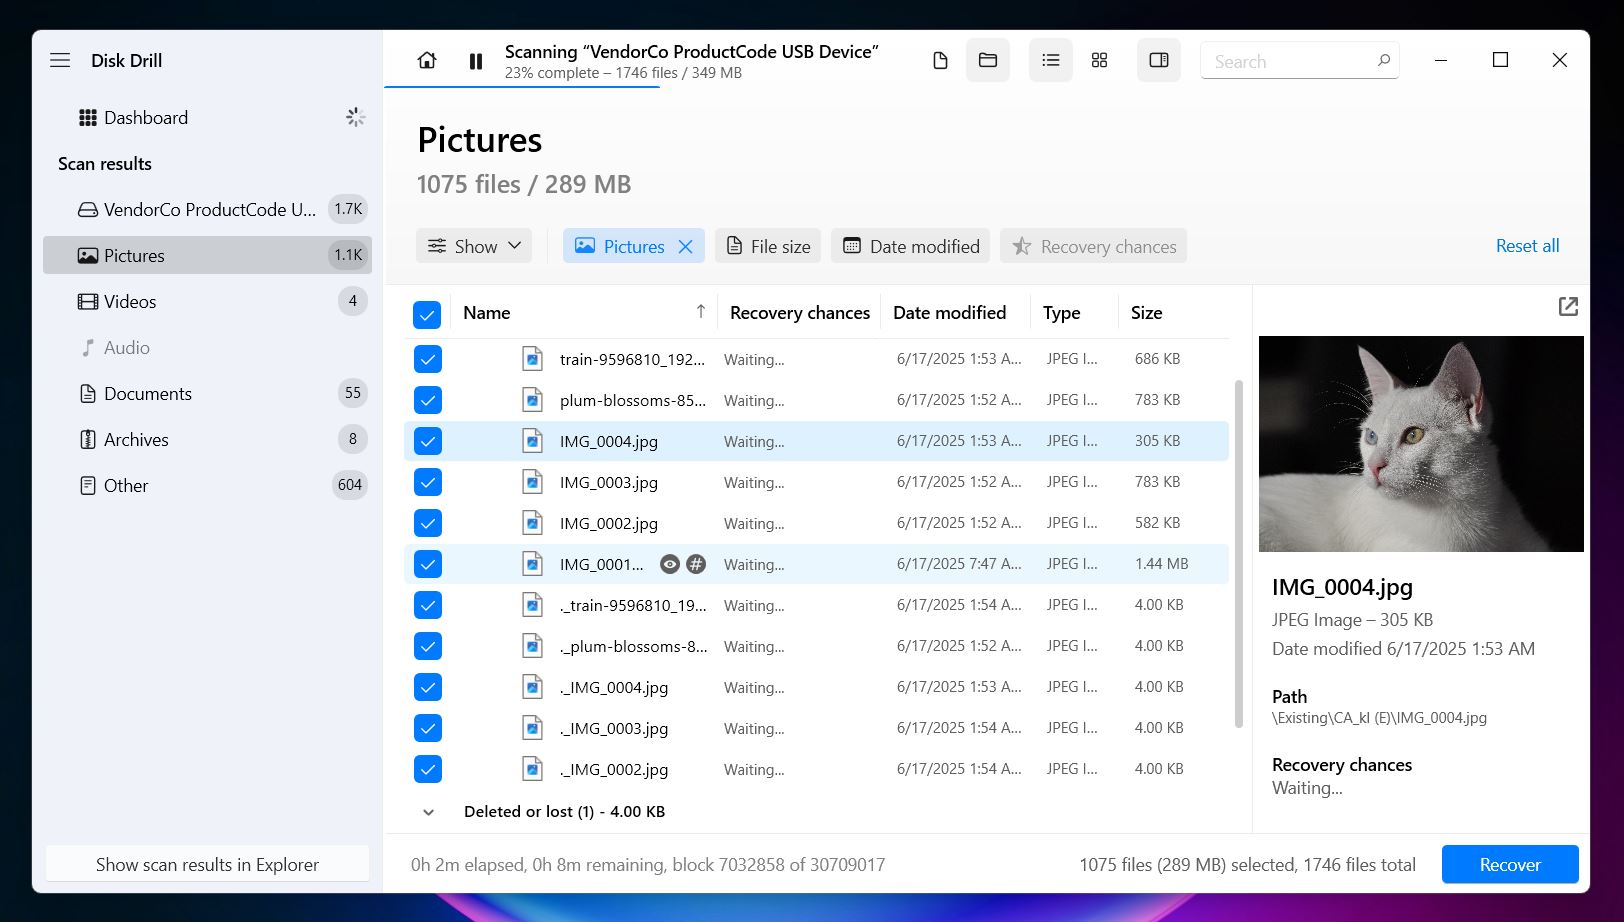
You can also filter the results by how Disk Drill found them: Deleted, Lost, or Reconstructed. - But since you’re after pictures or videos, one of the most useful ways to sort through
results is previews. Disk Drill lets you preview most photo and video files before
recovery. Click the little eye icon next to any file to see a preview.
 As long as your OS can open the format (or you’ve got a viewer installed), Disk Drill should
have no trouble showing it. If the image loads cleanly or the video thumbnail looks right,
that’s a strong sign the file is still intact.
As long as your OS can open the format (or you’ve got a viewer installed), Disk Drill should
have no trouble showing it. If the image loads cleanly or the video thumbnail looks right,
that’s a strong sign the file is still intact.
You’ll also see a recovery chances label: High, Average, or Low. High means the file is likely intact. Average or Low usually means the file is partially damaged or has already been overwritten. - When you’re ready, select the files you want and hit the Recover button. Choose a destination folder - make sure it’s somewhere on your computer, not the SD card you’re recovering from. Disk Drill will actually warn you if you try to save to the same card, since that can overwrite other recoverable data and kill your chances.
- Once recovery finishes, Disk Drill can open the folder so you can check your recovered files.
And that’s it. As you can see, pretty simple to use. Also, Disk Drill lets you recover up to 500 MB for free on Windows, which is plenty if you’re trying to get back a few accidentally deleted JPGs.
If you're working with larger files like RAW photos or videos, you'll hit that limit faster, but the free tier still gives you a solid way to see if the software can actually find your files before thinking about upgrading to PRO (which is a one-time $89 lifetime license).
Worth noting: even in the free version, you get access to extra tools like S.M.A.R.T. monitoring, data protection features, and disk imaging. That last one (disk imaging) is especially important in tougher recovery cases. It lets you create a full copy of your SD card and scan the image instead of the original, which helps protect your data if the card is unstable or on the verge of failing.
Method 2: Use GoPro Recovery (Works for Canon Cameras Too)
Another tool that can be used here is our own GoPro Recovery, and don’t let the name fool you. While we originally built it for recovering media from GoPro cameras, it works just as well with Canon cards too.
It works especially well with Canon DSLRs, mirrorless cameras, and camcorders that record in high-resolution formats like 4K Motion JPEG or H.264/HEVC inside MP4 containers. So if your deleted footage is fragmented (or if you're dealing with an SD card that’s been formatted, corrupted, or used across multiple devices), GPR software can often piece everything back together cleanly.
Here’s how to retrieve deleted photos (and videos) from a Canon camera using GoPro Recovery:
- Go to the official site and download the latest version of GPR-64 (v4.31). It’s a Windows-only tool, but people have reported success running it on macOS using Parallels or on Linux via Wine. The download is small and installs quickly.
- Once installed, launch the app. Make sure your Canon SD card is inserted using a USB card reader.
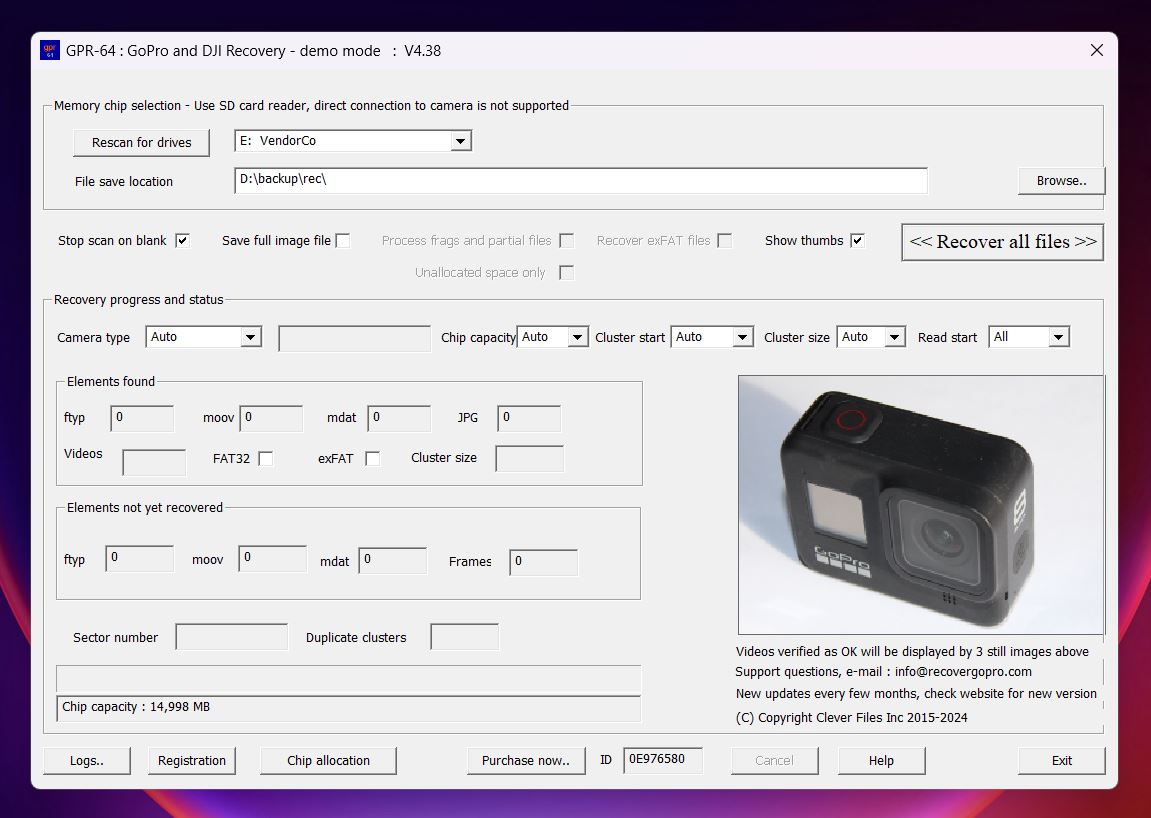
- On the main screen, you’ll see your card listed - look for the correct drive letter and capacity to confirm it’s the right one. Then, choose a folder on your computer where recovered files should be saved. This folder should be on a different drive than the SD card to avoid overwriting data.
- Click <<Recover all files>> to begin. The software will automatically
go through five internal stages: first scanning the entire memory chip to locate all video and
audio fragments, then extracting any .JPG and .WAV files (including Canon CR2/CR3 images and sound
recordings), followed by rebuilding the file structure by adding the necessary moov atom
for MP4 compatibility. After that, it processes lower-resolution videos before moving on to
reconstruct high-resolution files like 4K and 5K footage.
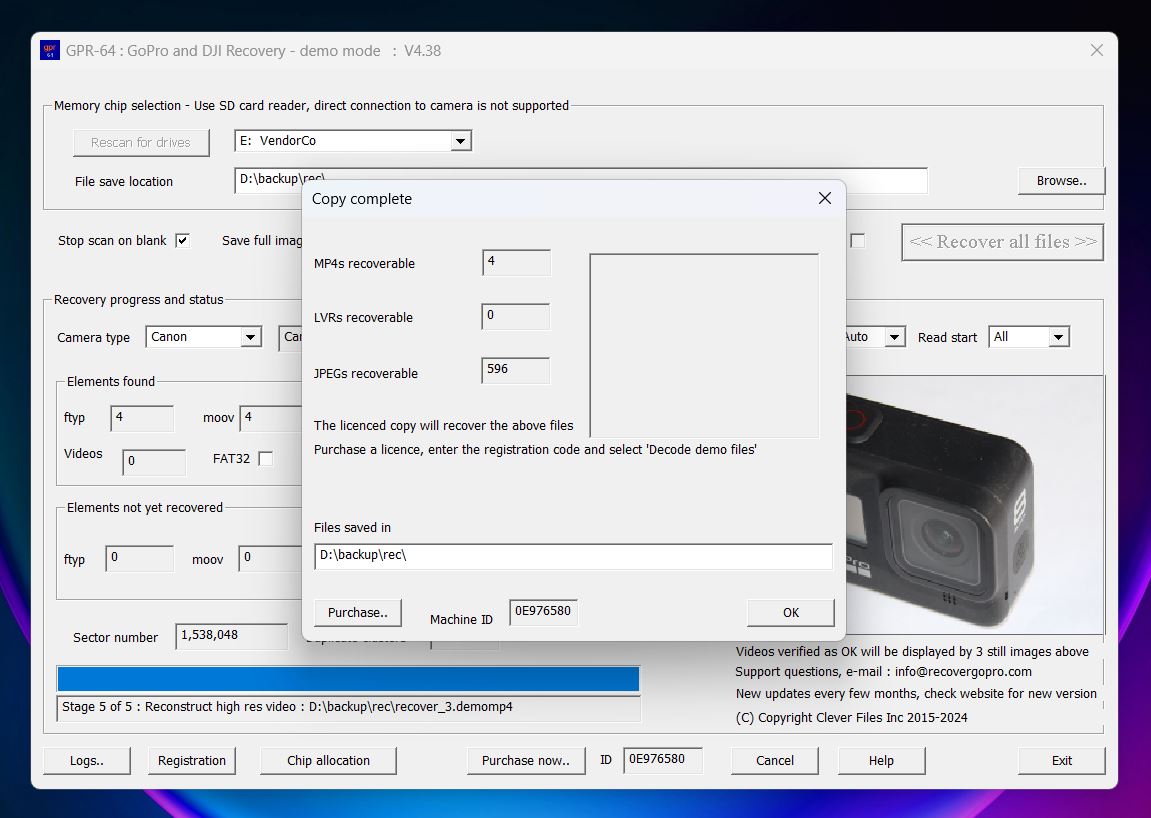
- You’ll see thumbnail previews of files during recovery, though in demo mode you can’t
save the files yet. This lets you confirm if the recovery is working before purchasing the full
version.
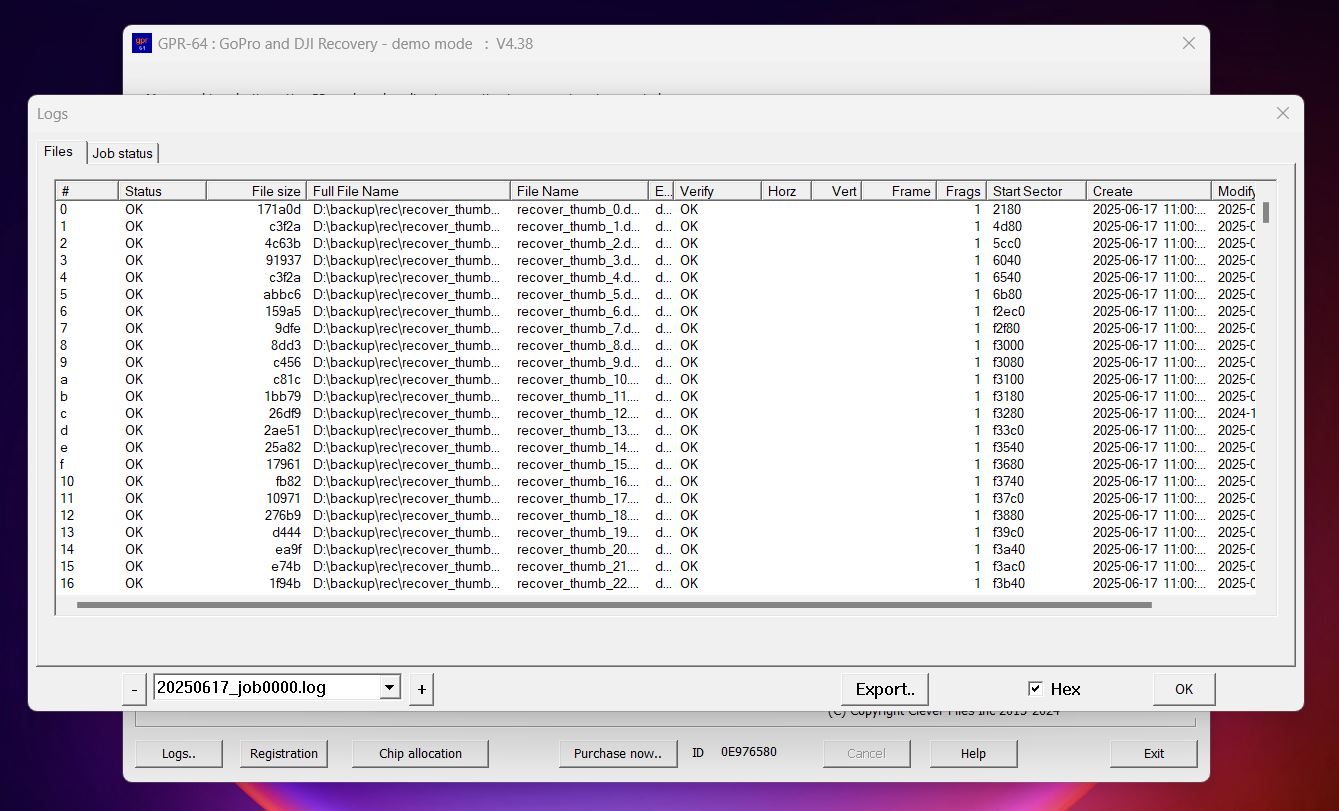
- Once the scan finishes, check the log window. It shows every recovered file, including filename, size, date, and how many fragments it was stitched from. You’ll also see whether the file is verified and playable.
GoPro Recovery officially supports video recovery from multiple Canon devices, including:
- Canon EOS series (including DSLR and mirrorless models)
- Canon XA20, XA25, Vixia, and Legria camcorders
- PowerShot cameras like the SX600
- CR2 and CR3 RAW photo formats
- 4K Motion JPEG and other MP4/H.264/HEVC video formats
This app is particularly useful for recovering videos. While many other tools may attempt to restore large Canon video files, they often fail to piece together the fragments into a playable result. GPR was purpose-built to understand how cameras like GoPro and Canon structure their data across memory cards, and that’s why it sometimes works where others don’t.
The free demo lets you see what’s recoverable with thumbnails and file logs. To actually save the recovered videos, you’ll need to upgrade, but it’s reasonably priced (about $22.95 at the time of writing), and you get lifetime updates and email support.
Can I Just Retrieve Deleted Photos from a Canon Camera Directly?
Not really. Most Canon cameras don’t give you access to the internal file system - they’re designed to act more like external media players than storage drives. When you connect a Canon camera directly to your computer with a USB cable, it usually mounts in MTP (Media Transfer Protocol) mode. You can view and copy existing photos and videos, but you won’t be able to scan the card for deleted files.
That’s because recovery software needs low-level access to the memory card - the kind you only get when the SD card is connected directly through a USB card reader. This allows your system to treat the card like a regular storage volume, which gives recovery tools the access they need to search for deleted or fragmented files.
So no, you can’t just connect your Canon camera and expect recovery tools to work. You’ll need to remove the card and connect it properly for recovery to be possible.
Additional Hurdles You Might Run Into
If you caught the issue early (deleted your Canon photos, immediately removed the SD card, and followed the steps we covered), your chances of getting everything back are honestly very high. Modern data recovery tools are built exactly for that kind of job.
But not everyone is that lucky.
Sometimes, you keep using the camera after deletion without realizing what happened. Maybe you took more shots, recorded new video, or the card was used in another device. That’s when recovery becomes a whole lot harder. As we’ve stressed multiple times throughout this guide - new data overwrites old data. And once that happens, your chances of getting the original files back drop fast. For smaller files like JPEGs or even RAW CR2/CR3 images, that still might be recoverable. But for larger, fragmented files, especially RAWs, the story gets messier.
In some cases, what you recover might be partially corrupted: images with strange color shifts, blocks of missing pixels, or files that won’t open at all.
If that happens, don’t give up just yet. You might want to look into recovery or repair tools like:
- JpegDigger - great at pulling out JPEGs even from partially overwritten or fragmented files.
- JPEG Recovery LAB - specifically recommended for RAW and fragmented image recovery.
- JPG-Repair Toolkit - especially helpful if you managed to get a damaged or corrupted CR2 file. While it doesn’t truly "fix" the RAW, it can often extract high-res JPEG previews embedded inside - good enough to save the shot.
You can find some great case studies on those tools over on Disktuna.com. If you’re dealing with broken or unreadable files, check out their article on corrupt JPG and Canon .CR2 files or the one on recovering data from corrupted CR2 photos.
They go into real-world examples of what can be done.
Final Words
Before you go, we want to quickly recap our guide.
You can recover deleted photos or videos from your Canon camera - and in many cases, it’s surprisingly doable if you act fast and keep a few key things in mind:
- The moment you realize files are gone, stop shooting. Every new image or video could overwrite what you're trying to recover.
- Use a card reader, not the camera. Your Canon camera uses MTP mode, which doesn’t allow recovery tools to properly access the card. Pop the card out and connect it to your computer directly.
- Scan your memory card with capable recovery software that can handle Canon formats, including CR2 and CR3 RAW files, and works well with FAT3/exFAT file systems, which are what Canon cameras typically use.
- Once the scan finishes, don’t save recovered files back to the same memory card. Save them to your computer or an external drive. Writing to the card again could wipe out even more data you might still be able to recover.
- And if you end up in one of those cases where a recovered photo looks corrupted or won’t open, you still have a few solid options, like the ones we talked about earlier.
If you stick to those basics, you’ll probably get back what you thought was gone for good. And who knows? Maybe this’ll finally be the push you needed to start backing up your photo shoots like you always meant to… but never quite got around to.